
How to add or amend Forms
note
Please note that when a form is public (e.g. when readers are not required to sign in) there will be CAPTCHA included for security reasons, to prevent bots from submitting many forms, or trying to maliciously add code.
To add a form to the system, open the
My profile
dropdown, then select Content Hub
. Resources
, and Forms
.
Select
Add Form
to display the New form
screen: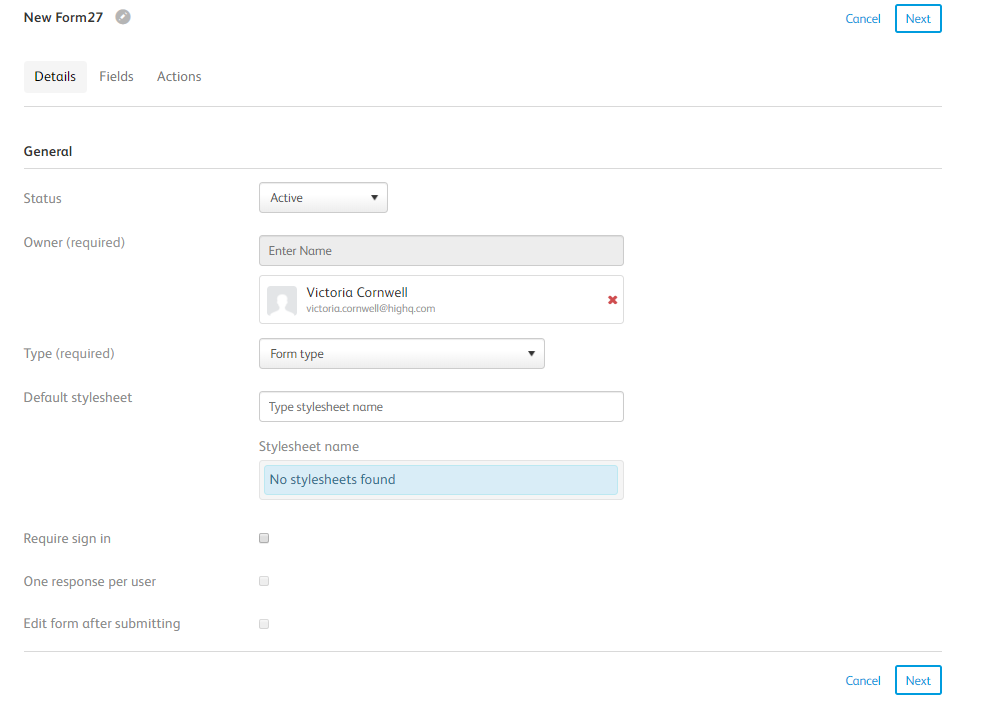
Within this screen, on the
Details
tab, you will have access to the following fields and options:- Status- Active means that the form is viewable, archived means this form is no longer in use
- Owner- The person who created the form
- Type- This is a system Metadata node that will need to be added before proceeding further
- Default Stylesheet- This is where you can apply the css stylesheet (also found in resources and can define the colour of the buttons etc.)
- Require sign-in- Should you want a public form you would leave this blank, alternatively, if you would want only logged in users to complete the form, select this checkbox
- One response per user- If this is a form that should only be used once then you can limit this. You will need to determine if any forms require this functionality
- Edit form after submitting- You can lock a form after submission or you can allow editing after, so this will be a decision for each form for those that have already selected 'one response per user'.
The various field types that you can select are listed below:
- Single-line text box
- Multi-line text box
- Dropdown of options
- Single-select group - user can select one option from a possible list with all options displayed
- Multi-select group - user can select multiple options from a possible list with all options displayed
- Number
- Date picker
- Single Checkbox
- Attach a file
Once a form has already been created should you want to edit any of these fields that have already been created, you need to navigate to
Content Hub
> Resources
> Fields
. Within this screen, search for the name of the field that you want to edit, then select More actions
and Edit details
:
Alternatively, should you want to add an entirely new field you can navigate to the form in question and under
Fields
add the new field in. You can preview what the addition will look like using navigating between the layout and preview buttons.It is possible to add actions off the back of these forms, under the
Actions
tab of the form wizard, listed below:- Send notification- You can send an email notification to the owner of the form to let them know that a response has been added
- Send campaign email- You can send an automated campaign email to the user who fills out the form. For example, this could have PDFs attached to it. This is only possible if you have purchased the Campaign Module on Publisher. Please contact your Client manager if you wish to discuss this more
- Forward to page- You can redirect the user to a page that exists on the system
- Show text/image- You can show the user text or an image or both once the user has submitted their response. For example, you can say "Thank you for submitting your form. Someone will be in touch with you in due course"
- Sync to iSheet- You can automatically create an iSheet on a chosen site if you have purchased the iSheets module. This will only appear to users if the site has been linked to a Collaborate instance and if you System Admin in both Collaborate and Publisher
note
If you would like use the Collaborate
number formatting
feature enhancement from October 2023 when using Sync to iSheet
, you need to make this change after
the iSheet has been created, numbers in the Publisher form do not follow the iSheet number formatting settingnote
You can take the URL of a Publisher page and copy it into any external or internal web page
Related Content
-
Forms number fields decimal place validation
Format: Article,
1 min read
Article,
1 min read