
Assign document review tasks
This feature allows Site admins (and Content admins if the
File Index
view has been enabled in a site) to assign document-review tasks for one or more files. This allows admins to track the status of all previously assigned document-review tasks and provides a visual representation of those tasks.note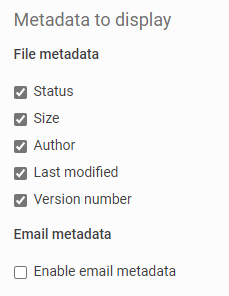
The document review feature must be enabled within the
Files Admin
page. Also, both the Files and Tasks modules
must be enabled.File status metadata must also be selected in
Admin
then Files
.Document review components
Document review features the following components:
Document review allocation
An administrator can assign document review tasks for each file to different site users (or indicate that a file should not be reviewed) from the Index View. Files can be allocated for review in bulk and a task will be created for and associated with each selected file.
Document review status
The status of each file is displayed in the
Status
column. If the status is Unallocated
, the file has not been assigned a status.The status is displayed in every view of the Files module. For example, in Column view.

This status is updated based on the status set in the Tasks module. Every site user with access to the Files module sees these status icons.
Enhanced document review reporting
When Document review is enabled, the existing Reporting section of the site's Admin module is moved into a Reporting module.

In addition, a
Status report
is added that allows an Administrator to track the status of all documents and document review tasks.A user must be assigned the Reporting administrator or Site administrator role to access the Reporting tab.
Index view
After files have been added to a site where document review has been enabled, the Admin must switch to the
Index view
of the site's Files module.
A list of files and folders is displayed. Initially, files have a status of
Unallocated
. Two status options are available once a file or folder has been selected.- Allocate review.
- Mark as N/A

Selecting files for review
Select the checkboxes next to files to be allocated to a reviewer or group of reviewers. Selecting the checkbox next to a folder will include all the files and subfolders beneath it. Then navigate to
Actions
then Allocate for review
.
The checking allocation window is displayed.

The selected files will be checked if they have already been allocated for review, as the same file cannot be allocated twice. If a file has already been allocated for review but another has not, a message will be displayed saying that the Files that have reviews already allocated have been detected and will ask if you would like to proceed without these files.

Select
Continue
to allocate tasks for all of the unallocated files (previously allocated files will be ignored).If
all
of the files selected have already been allocated for review, the same message will appear, but without the Continue
button, as there are no files that can be allocated.
Creating tasks for every selected file
The
Add task
screen will be displayed.
Other than some exceptions this form is identical to the standard
add new Task
form only a single task form will be displayed regardless of how many files were selected.The information entered into this form will be added to a separate task created for each selected file. This assigns all selected files to the same person or group of people.
For example, if three files are selected and the New Task form is completed and assigned to Users A and B, then three tasks will be created, assigned to both Users A and B, and each task will be associated with a different file.
The task title is automatically generated. Each task will be called
Review [title of files]
with each title based on the name of each file. If only a single file is selected for review allocation, then the task name defaults to Review [filename]
.Once the New Task form has been completed, an email will be sent to each assigned user, covering all of the tasks (and files) that assigned for review. Information about all of the files and tasks will be listed in the email.
After tasks have been assigned, the status of the selected files will be changed to the status selected in the Add Task form.
Managing document review tasks
List of tasks
After selecting multiple files for review and completing the task form, a task for each file will appear in the Tasks module.

Each task has a unique title, based on the file the task is associated with. After the tasks have been created, the details of each task can be modified, such as by changing assignees, due dates, reminders, etc.
As each file is reviewed the status of the corresponding task will be updated.
These tasks are identical to regular tasks.

In each task, the corresponding file is added as an attachment, to make it easy to locate the file to be reviewed.
note
The only difference compared with a regular task is that in edit mode, the title of a document-review task cannot be changed.
note
If a document-review task is deleted, then the corresponding file will return to having a status of Unallocated. If the file is deleted, the corresponding document-review task will also be deleted.
Updating task status
Document reviewers will review files (this may involve completing an
iSheet
for each file) and update the corresponding task status (to In Progress
or Completed
etc.)Document review status report
Another way a Site Admin or Reporting Admin (but not a Content Admin) can manage the document-review process is with the Status report, located via
Reporting
then Status Report
.
This report highlights the total number of files in the site, how many have not been allocated, how many are considered not applicable, and the name of the status for those which has been assigned a status.
An administrator can delve further to see a list of the files in each category, by clicking the number associated with that category.
For example, click the number in the
Allocated/Test Status
column to list each file that is in progress, including who the document reviewer(s) are for each file.
Selecting files to be ignored
Some files on the site should not be reviewed, such as files that provide background information, an index, etc. Those files can be marked as
Not Applicable
and will be ignored. From the Index View, select the checkbox next to any file or files that should be ignored and select Actions
then Mark as NA
.
The checking files is not applicable for review window will be displayed.

The status of the selected files will change to
Not Applicable
.Changing the allocation of a file
A file previously marked as
Not Applicable
can be allocated for review later by following the steps above for allocating a file.A document that has been allocated for review can be set to
Not Applicable
by selecting the checkbox next to it and select Action
then Mark as NA
. In that case, a prompt will be shown saying that the files has already been allocated and will be deleted and will ask if you would like to continue.
Select
Continue
to delete the task associated with the file.note
In cases where a previously allocated file is set to
Not Applicable
, an email will be sent out to each person who has been assigned the corresponding task