
Workflow rule - Send email
The
Send email
action sends a customised email when the selected conditions are met.Select
Send email
in the Action
tab.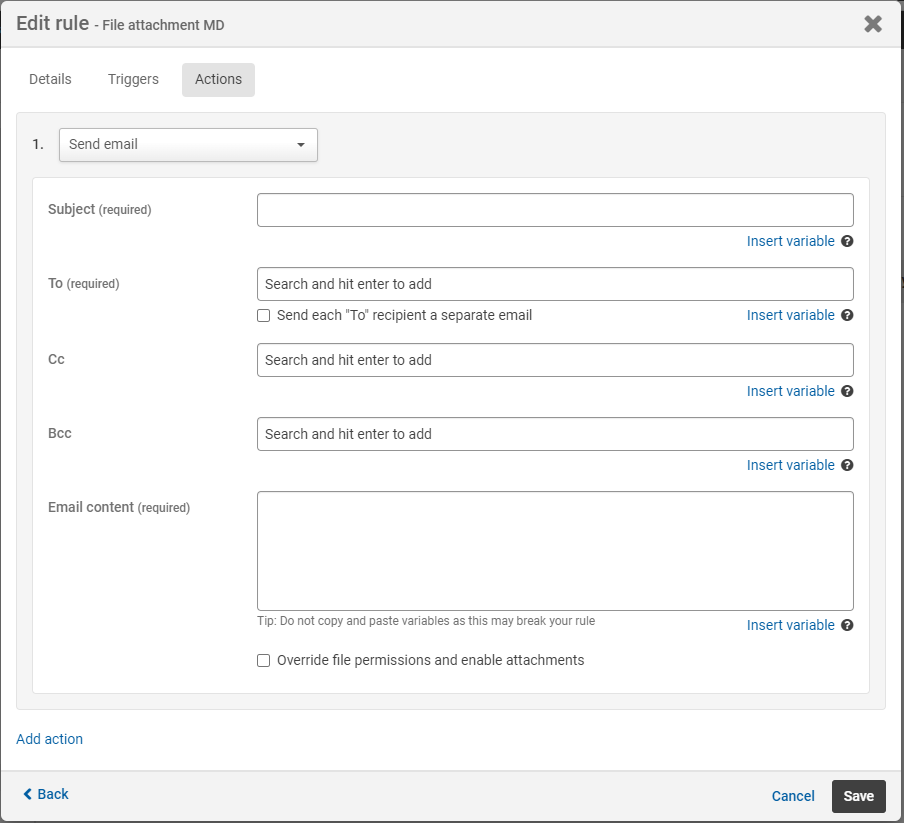
Each field is described below:
- Subject- This is the subject of the email
- To,CcandBcc- These are lists of all of the recipients of the emails
note
For example, use Cc or Bcc to send a copy to an admin email address that keeps a record of custom emails sent from your site.
- Email content- This is the content of the email
- Attachments- You can attach a static file from your site, the triggering document if the trigger is a file, or dynamically attach a file from an iSheet record
note
To attach a file from an iSheet record, select iSheet record as the trigger and the iSheet must:
- be a file metadata iSheet, or
- have one or more attachment columns
Subject
Enter the subject for the email.
If you need to vary the subject of the email, select
Insert variable
next to the subject field to display the Insert variable - Subject
screen.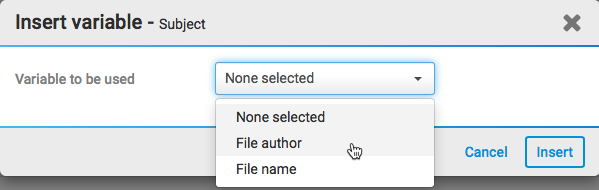
In the
Variable to be used
dropdown, you see all variables available to you. If an iSheet is used as a trigger, columns from that iSheet are available (in this example, we have File author
, File name
and Recipient name
).note
As of April 2023, if you know the name of the variable, you can use the Search field to quickly find the variable from a long list of variables.
Select the variable you want to use, ('file name' in this example) and select
Insert
. 
In this case, the field is populated with the name of the file.
Email recipients
Add recipients for the email in the
To
, Cc
and Bcc
fields. Type a fixed address, or select Insert variable
to add addresses from the triggering record.note
You can select a
user lookup
, single line text
or multi-line text
column.Select
Insert variable
next to the email recipients field to open the Insert variable - Email recipients
screen.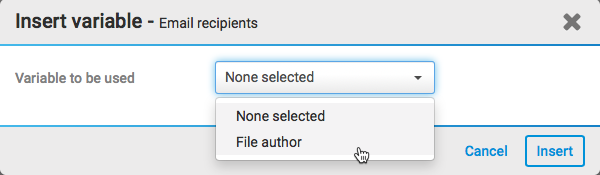
Select the variable that you want to use, (if your trigger is a file, the only option is 'File author') and select
Insert
.If your trigger is an iSheet, any user lookup column can be used as a variable.

In this example, when the trigger is activated, the author of each file becomes the recipient of the email.
note
Please note that it is possible to
send a BCC copy of all notification emails
for audit purposes.Send emails to user groups
You can also select a
group
as a recipient.
This ensures that everyone in the group receives the custom email.
Grouping emails or sending them individually
Emails sent to people in the
To
field may be sent as a group or individually. The default setting is to send these as a group; one email is sent to all recipients in this field.Select
Send each 'To' recipient a separate email
to send emails individually, this means that the recipients receive separate emails and they do not see that each other has received the email.note
Recipients in the Cc and Bcc fields receive duplicate emails for each recipient in the
To
field.Sending emails - Internal error
If the email server returns an 'Internal error', such as when an incorrect email address is supplied, Workflow attempts to send the email over the next five days. If the email is not successfully sent after five days then the rule stops and reports a failure.
Email content
Enter your email content in the
Email content
field.note
Both rich text and plain text are supported.
Select
Insert variable
to add variables from the triggering record or other fields.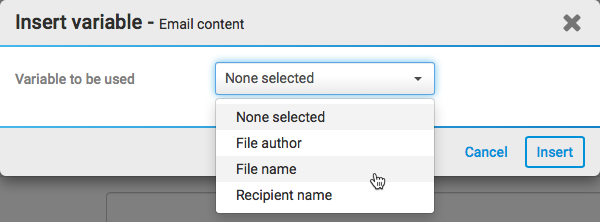
In the
Variable to be used
dropdown, you see available variables. If an iSheet is used as a trigger, columns from that iSheet are available (in this example, we have File author
, File name
and Recipient name
).note
Recipient name
inserts the recipient's full name; select Recipient's first name
to insert just their first name.Select the variable(s) you want to use, (File name, File author and Recipient name in this example) and select
Insert
.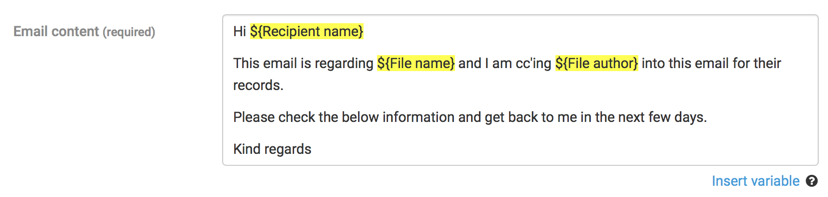
When the trigger is activated, each of the variables is replaced with the relevant data and sent to the email recipients.
note
As of June 2024, you can use a default or system-generated Folder link (i.e. from a Folder / File Metadata iSheet, not a Folder Link column from a standard iSheet) as an insert variable in the email content.
Adding attachments to the email
You can add attachments to the email. You can attach a static file from your site, the triggering document if the trigger is a file, or dynamically attach a file from an iSheet record.
note
To attach a file from an iSheet record, select iSheet record as the trigger and the iSheet must:
- be a file metadata iSheet, or
- have one or more attachment columns
note
Attachments cannot exceed 25 MB. If the attachment exceeds this size, the email is not sent.
Select
Override file permissions and enable attachments
, then select Allow iSheet attachment
or Allow file attachment
.note
Override file permissions and enable attachments
This option allows the rule to send the selected attachment to any email recipient, including unregistered users outside your instance. This overrides any permissions set in HighQ.
If you select
Allow iSheet attachment
, select the attachment column from the dropdown list.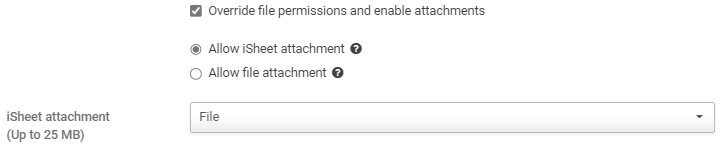
note
Allow iSheet attachment
is only available if iSheet record is selected as the trigger, and the selected iSheet has one or more attachment columns, or if a file metadata iSheet is selected.If you select
Allow file attachment
, select Browse
to select a file from the File module.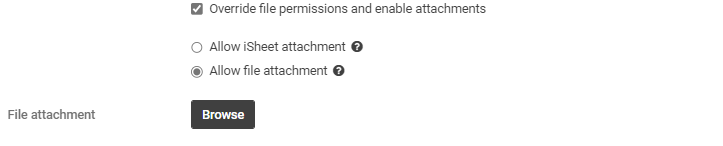
note
If the file is updated, the latest version of the file is attached to the email. If the file is moved, the file is still attached, but if the file id deleted the rule fails and the email is not sent.
Click Add action to add further actions.
Select
Save
to save your changes.