
Configure print styles
Print styles make it possible to apply custom print formats to printed calculations. You can set up styles that include elements such as a cover page or headers and footers, and designate a print style as the default style for others in your organization to use. When someone prints a calculation, they select the print style to use and the print will use the defined settings.
ONESOURCE Corporate Tax includes a pre-defined print style called Modern. Any new print styles you create start with Modern settings, which you then customise to suit your needs. You can view the settings for the Modern style but can't make changes.
To view the settings for the Modern print style, select the view icon  in the
Actions
column.Define a new print style
- SelectConfiguration, thenPrint Styles.
- Select theAddbutton on the toolbar. A new print style is created with the same settings as the Modern style. You can add, change, or remove settings as necessary to create your new print style.
- In thePrint Style Namefield, enter a name for the new print style.
- Mark theDefault Stylecheckbox if you want to make this the default style.
- Use the settings on theIncludetab to define style elements that you have set up and want to include.
- Cover Page: Mark this checkbox to include a cover page for the selected sheets. The cover page includes the calculation name, dataset purpose, and period end date.
- Table of contents: Mark this checkbox to print a table of contents for the selected sheets. The table of contents consists of the sheet name and reference.
- Header: Mark this checkbox to include a header.
- Footer: Mark this checkbox to include a footer.
- Cross References: If you mark this checkbox, cross references between sheets appear in blue text and help you trace the transfer of data between sheets. Links appear only if sheets containing the source and the destination of the link are included in the print job.
- In Sheet Cross References: Include the in-sheet cross references in the printed version.noteTheIn Sheet Cross Referencescheckbox only appears if theCross Referencescheckbox is marked.In the printed version, the in sheet cross references appear marked with "above" and "below" in place of the arrows.
- Print Sheets On Separate Page: Mark this checkbox to start every sheet in the calculation on a new page in the PDF.
- On theCover Page - Logostab, you can add one or 2 logos to your cover page. Drag the images from your computer into the box, or select theBrowse for filebutton to go to the file on your computer.
- Enter a value in centimetres in theImage positionfields to specify the location of the images from the left and top of the page.
- You can enter a value in theImage Scalingfield to enlarge or shrink the image. The default is 100, which displays the image in its original size. To enlarge the image, enter a value greater than 100. To shrink it, enter a value less than 100.
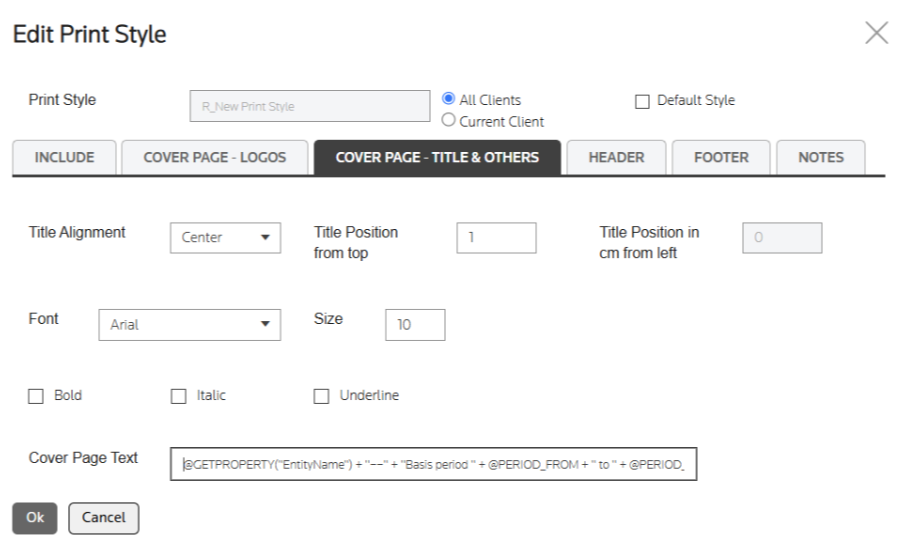
noteAccepted file formats include JPEG, JPG, and BMP. You can't upload a PDF or other type of file. The system also prevents files from being uploaded if the file extension has been changed to something other than the actual file type. For example, if you change the extension of a PDF to .jpg, a warning will appear if you try to upload it. - On theCover Page - Titles & Otherstab, specify the title alignment, location, font, and text.You can also customise the text that appears on the cover page by specifying properties to include in theCover Page Textfield.SymbolFunction@Use the@symbol to specify a property or range name to be included.Range names are defined at the template level and all available range names in a calculation are supported." "Use quotation marks" "around any custom text you want to include.~Use the~symbol to move the content after it to the next line. You can add additional~symbols to insert blank lines. Enclose the symbols in quotation marks.+Use a plus symbol+between phrases.Example:In the example provided, "period from" and "period to" are range names used in calculation to demonstrate the usage of range names. You can use any range names per the calculations you are printing, and their values will be reflected in the printout.@GETPROPERTY("EntityName") + "~~" + "Basis period " + @PERIOD_FROM + " to " + @PERIOD_TO in Cover Page Text creates a cover page.
 The following properties are supported:PropertiesDetailsDataset properties
- DATASETNAME
- YEAR
- PURPOSE
- CREATEDBY
- CREATEDDATE
Entity properties- ENTITYNAME
- ENTITYSHORTNAME
- LEGALENTITYTYPE
Calculation properties- CALCULATIONNAME
- STATUS
- TAXREGIME
- STARTDATE
- ENDDATE
- On theHeaderandFootertabs, specify the header and footer text and the font styles to use. You can specify the font, the font size and style, and the alignment of the header and footer text.
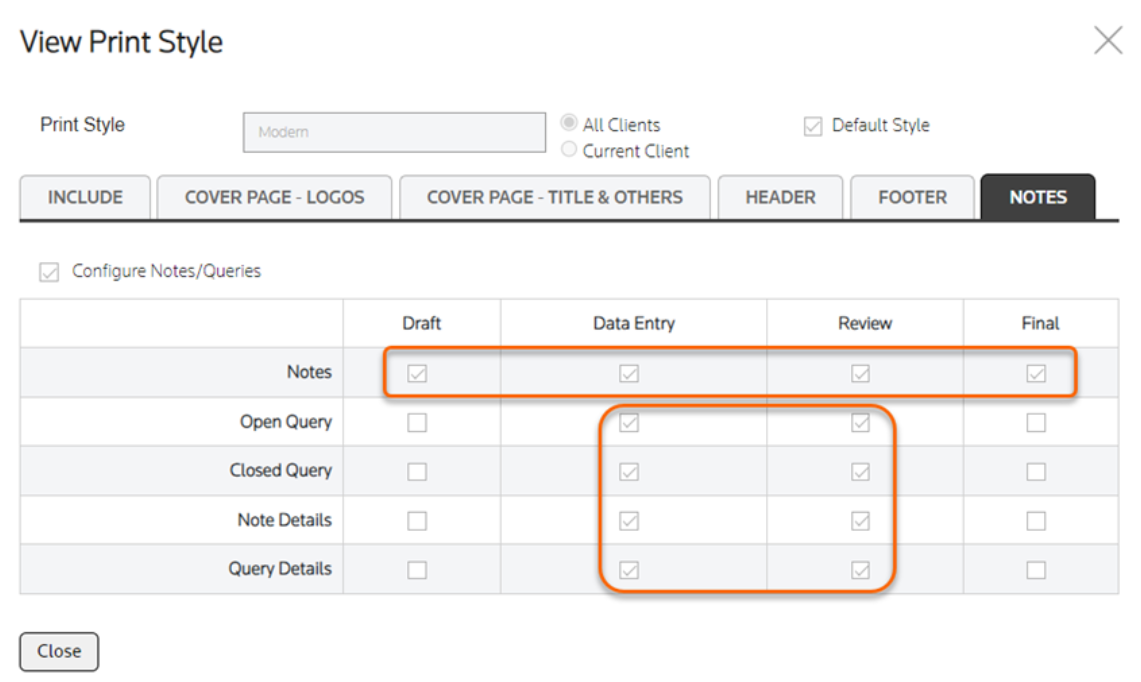
- On theNotestab, use the checkboxes to indicate whether to include notes and queries. Use the checkboxes to include notes or queries based on the calculation status. Users will see the options you define here in theNotes and Query Print Optionson the Print Calculations window.
- Select theOKbutton.