
Import a nominal code list into Accounts Production Advanced
Open your Practice Master template. You'll import all new nominal codes and account assignments into the template, then publish it to make them available to your clients.
The FRS 102 2026 template introduces new
Right of Use (RoU)
asset categories. To support these categories, import the RoU nominal codes, then import an account assignment file for each category structure.important
Template releases don't add the new nominal codes or account assignments to your template. You'll import them yourself from the supplied files.
- Download the file you want to import:
- Limited Company Codes Excel file, for a standard limited company nominal code list.
- Right of Use (RoU) nominal codes ZIP file, for the RoU asset categories in the FRS 102 2026 template.
- Save the ZIP file to your desktop and extract it. It containsRoU codes.csvand an account assignment file for each category structure.
- Select theImport/Account Assignmenttab.
- SelectImport Wizard.
- SelectBrowseand mark the file you want to import.tipYou can import our Limited Company Codes Excel file, theRoU codes.csvfile from the ZIP, or your own nominal code list. Your own list will need to use the same format as our Limited Company Codes file.
- SelectNext.
- In the Header Rows section of the wizard, mark the 1st checkbox in Row 1 to remove column headers from the imported file.
- Verify that the account codes appear in the correct format, for example 540.03, then selectNext.
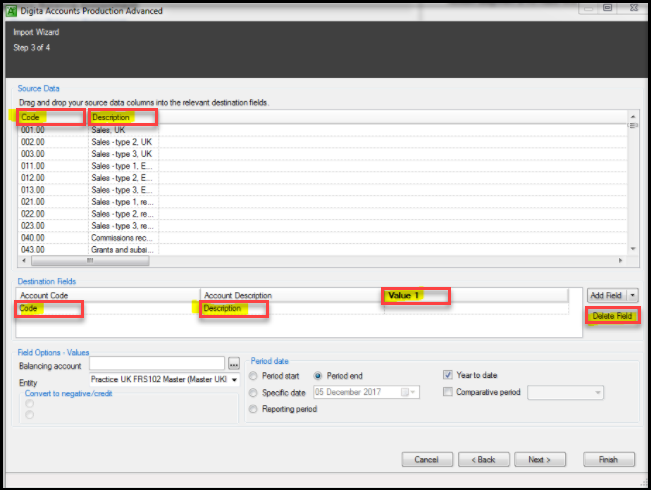
- Match the Source Data to the Destination Fields:
- Drag and drop theCodecolumn header from the Source Data section to theAccount Codecolumn of the Destination Fields section.
- Drag and drop theDescriptioncolumn header from the Source Data section to theAccount Descriptioncolumn of the Destination Fields section.
- Select theValue 1column header in the Destination Fields section, then selectDelete field.
- Select theAccount Codecolumn header in the Destination Fields section, then set the following options:
- Mark theImport account codes if zero valuecheckbox.
- When you import the RoU nominal codes, also mark theUse imported accountscheckbox. If a prompt appears, selectNo.
- SelectNext, thenFinishto import the list.You will get a warning that theValuecolumn is not mapped but you can ignore it because this column is not required.
- Import the RoU account assignments. Complete this step only when you import the RoU nominal codes.
- Select theImport/Account Assignmenttab.
- SelectAccount Assignment (Master) Maintenance.
- Verify that theCategory Structuredropdown is set toBalance.
- SelectImport, then selectRoU Assignment Balance.csv.
- SelectApply.
- Repeat the import for each remaining category structure, selecting the CSV file that matches it. Each structure has its own account assignment file.
- Format 1
- Format 2
- iXBRL Format 1
- iXBRL Format 2
- Publish the updated master template.
Your clients get the new nominal codes and RoU category assignments when you publish the template.