
Import trial balance data in an Excel or CSV file to Accounts Production Advanced
Follow the steps in the Import Wizard to import data from an Excel or CSV file. You may need to map columns and add a comparative period if needed. You can also use these steps to import trial balance data you've exported from Xero.
- tip
- You can follow the steps described in this article in our Import a Trial Balance video.
- If you want to export a trial balance from Xero as an Excel file ready to import to Digita, take the following steps:
- Open the client in Xero.
- Go toAccounting, thenTrial Balanceto open the Trial Balance Report.
- SelectExport, thenExcel.
- Open the exported trial balance in Excel.
- Delete the Total row and save your amended Excel file.
- Make sure that the Excel worksheet or CSV file you want to import has the following columns.Example
- Column 1: Nominal code number.
- Column 2: Nominal code description.
- Column 3: Debit/Credit.
noteIf Column 3 combines debits and credits, enter debits as positive numbers and credits as negatives. Alternatively, you can make Column 3 Debit and Column 4 Credit. - Open the client in Accounts Production Advanced.
- Select theImport/Account Assignmenttab.
- Under the Transactional Import heading, selectImport Wizard.
- UseDefault entity settingsunless you've created your ownStored entity settingsduring a previous import.
- SelectBrowseto find the Excel of CSV file, then selectOpen.
- SelectNext.
- Mark the checkbox for each row that's blank, that includes headings, or has totals to exclude them.
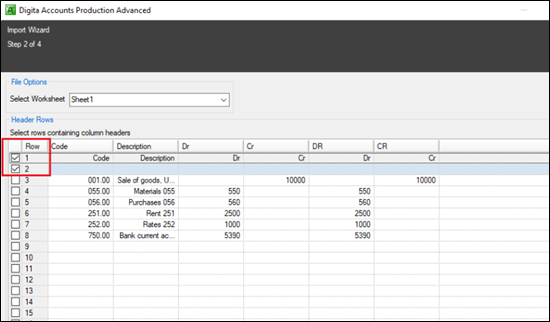
- Review the data to check the content and format are correct, then selectNext.
- Drag and drop each column heading from the Source Data section to the corresponding column in the Destination Fields.
 noteIf you've separate Credit and Debit columns in your file, drag one, then the other to the same Destination Fields column to combine them. Digita will show combined columns separated by a colon (for example,C:D).
 - Take the following steps if you want to import another accounting period as a comparative period.
- SelectAdd Field, thenValue 2to create a new column in the Destination Fields section.
- Drag and drop the column heading for the comparative period from Source Data toValue 2Destination Field.
- Take the following steps if you have comparative data in theValue 2column of the Destination Fields section.
- Select theValue 2heading.
- Clear theYear to datecheckbox.
- Select theComparative periodcheckbox.
noteYear to dateis the default. - If your Excel or CSV file has 2 separate Credit and Debit columns, then you'll need to take the following steps.
- Select the cell inValue 1where you dragged and dropped the columns from your Source Data.
- In theConvert to negative/creditsection, select the column that contains the Credit.
- Repeat these steps for theValue 2column, if you have comparative data.
- Take the following steps to set the Balancing account.
- In the Destination Fields section, select theValue 1column header.
- Select theBalancing accountellipsis button.
- Choose a Balancing account, then selectOK.
- Repeat these steps for aValue 2column, if you have one.
- Take the following steps if the codes in your Source Data are in the same format used by Digita (for example, 000.00).noteIn your import file, you'll need to set the Account Code format toTextto match the Digita format.
- Select theAccount Codeheading in the Destination Fields section.
- SelectUse imported accounts.importantIf the Descriptions in your Excel or CSV file don't match the Descriptions in Digita, Digta will replace its Descriptions with yours. You may not want this.
- If you don't want to replace Digita Descriptions, select the cell underDescription, then selectKeep first descriptionandKeep existing description.

- SelectNext.noteDigta will warn you that'the period already contains account codes and the Use imported accounts option is currently selected'.
- SelectNowhen Digita asks if you want to map imported accounts.
- Go to Step 17.
- Take the following steps if your Source Data is not in the format used by Digita.
- Select the cell under theAccount Codeheading in the Destination Fields section.
- SelectMap imported accounts to Digita accounts, then the ellipsis button.The External Account Mapping dialog shows the Source Codes and Descriptions and Digita Codes and Names.
- If you've a mapping file, selectImportto apply it.noteYou can download and use our mapping file for Xero if you're importing an Excel file that contains trial balance data exported from Xero. This file contains a generic mapping. If you've customised Xero, our mapping file may only work partially or not at all. In this case, you'll need to follow the steps to manually map the imported file.
- If you don't have a mapping file, drag and drop each Source Code to the corresponding Digita Code.The imported Code will appear underneath the corresponding Digita Code.
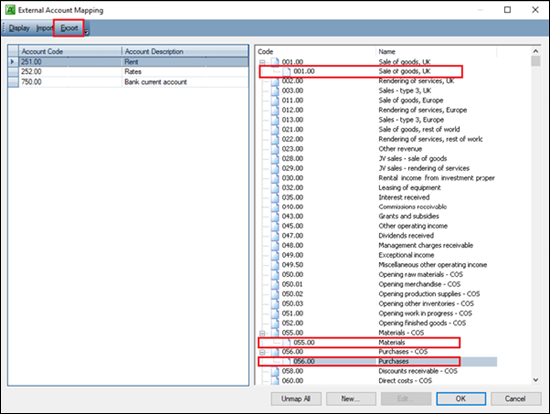
- When you've mapped all the Codes, you can selectExportto save your mapping file to use for future imports.
- SelectOK.
- SelectNext.
- Review the Settings and Journal details in Step 4 of the Import Wizard.note
- Update Default Entity Settings: Digita will save the mappings for future imports. It doesn't retain the nominal code assignments.
- Save As: Use this option to save bespoke import settings for the client.
- Don’t Save: Digita won't retain any of the amendments.
- Classification: You can change the journal classification. The default isOriginal Trial Balance.
- SelectImport.
Related Content
-
Integration of Accounts Production Advanced with Xero
Format: Article,
1 min read
Article,
1 min read