
Authorise and set up an AI using the generic connector
Important - before you start
The HighQ AI Hub requires specific API commands to communicate with a new third-party AI engine. Requirements can be found on the HighQ developer community.
Access to these AI services must also be enabled for your instance - please contact HighQ Support to request this. Once this has been done, the chosen AI service is visible in AI Hub at system level and can be configured.
Enabling an AI engine
note
This requires System Admin permissions.
To add an AI engine that uses the HighQ generic connector for AI, a system administrator must first enable the AI at the system level. Navigate to your
Profile
> System admin
> System settings
:
Scroll down to
Generic AI
:
Select
Add
and enter the requested information, including the Instance URL
, Client ID
and Token
(Client secret key). Set a name, description and add an image to further customise your AI service.
note
Contact the administrator of the AI service to get the Client ID and Token.
Once you have this information, scroll down to read the extra terms and conditions and select the checkbox to confirm that you have read and agree to them.

note
These terms and conditions must be accepted, as you must acknowledge that some data will leave HighQ.
Select
Test
to check the credentials and confirm that a connection can be established.
If validated, select
Save
to add the AI to the list of available AI engines.note
If you receive error messages when you first enable the AI service, please contact your system administrator and check your configuration, for example, check that HighQ IP addresses are whitelisted. If an error still occurs, contact the HighQ support team.
Click on the drop-down for your AI engine and change the status from
Disabled
to Enabled
, default OFF in every site
.

Select
Save
at the bottom of the page to save your changes.note
This enables the engine for your instance, but leaves it switched
off
at the site level. This allows you to have more control over which files from which site are sent to which AI engine.Site-level settings
The AI engine is enabled, but not yet configured to be used on any site. To switch the engine on at the site level, navigate to your site and select
Admin
> AI Hub
> Configure
:
Find to the new AI setting:

Click the drop-down and select
ON
, then select Save
to enable the engine for your site.Assign the AI engine to a folder
You must assign the AI to at least one folder in your site. Folders can be assigned in either the Files module or in Admin.
If an AI is assigned to a folder, any files dropped into that folder are automatically sent to the AI service to be processed and stored in the AI Hub when finished.
Assign AI in the Files module
Open the
Files
module and select More actions
for the folder where you want to assign the AI. Select Edit details
:
The
Edit folder
screen opens. Open the Settings
tab:
In the
AI Hub configuration
section, click Select...
. The Manage AI Hub
screen opens:
Select your AI service and then select
Save
. The selected AI is shown in the settings tab:
Select
Save
to save your changes. The AI is now assigned to the folder. Any compatible files added to the folder will be processed.Assign AI in the Admin module
In site admin, open
AI Hub
> Manage
:
The
Manage
screen opens:
note
After the AI engine is activated, the current status of files is indicated with an icon that replaced the checkbox. Hover over the
i
for more information.Folder and sub-folder selection
- By default, you can select each folder independently (Single folderselection) or you can select multiple folders to apply the same AI (Folder and sub-foldersselection).
- However, you may want to select a folder and all of its sub-folders and apply the same AI settings. To do so, change the folder selection mode toFolder and sub-foldersbefore selecting the parent folder. You can apply AI to every folder within a site by choosing the root folder whilst using theFolder and sub-foldersselection mode.
- You can also selectIndividual files. Select this option to apply AI to a selection of files from the site.
Select the files and folders you want to analyse with AI, and select
Assign AI
, then select the AI service to apply (in the example below, Insura
).
Assigning multiple AI projects
As AI projects are assigned at the folder level, multiple projects can be assigned in a single HighQ site. For example, different types of contract can be held in different folders on a HighQ site. The AI Hub can send files in a folder to the designated AI project, so that the AI review process matches the contract type.
View progress as files are processed
You can see how many documents are processed by navigating to
Admin
> AI Hub
> Insight
:
The
AI Hub insight
page is a reporting page containing charts about analysis and data that has been extracted by the AI service.This is an example of an AI Hub statistics report.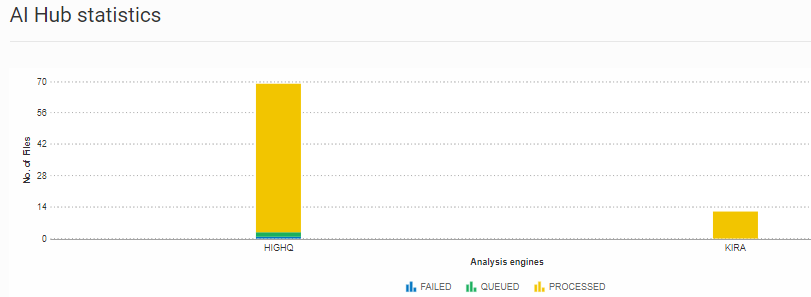
This data can be used to enrich iSheets and Data Visualisation.