
iSheet Panel
The iSheet panel enables you to display one or more iSheets from your site in a panel.
To add an
iSheet
panel, click Edit dashboard
within your homepage, then select iSheet
from the available panel options.
The
Add panel
- iSheet
screen opens:
Enter a title for the panel, and optionally add translations for your title, or select the
Hide title
checkbox, to hide the title from users viewing your dashboard.Select the site you want to pull data from, then select the iSheet or Multi-iSheet source you want to display.
note
You may also be able to select a view for an iSheet, within the
View
drop down, if the iSheet is not a multi-iSheet source.Bypass permissions when displaying data
When
Multi-iSheets source
is selected, users can now bypass permissions when displaying data. You can aggregate all data from the source sites, rather than hide data that the user may not have permission to see.When adding an
iSheet
panel, and your source is set as Multi-iSheet, you will have the following permissions options:
- TheRetrieve all dataoption should be set to ensure that the permissions on the record data are ignored and all records that match any filter are returned from all sources. The user will not be able to drill down into the data of any sites or iSheets that they do not have permission to see.
- TheRespect user permissionsoption will only display the data that the user is allowed to see.
note
Please note that site security checks are still shown (such as terms and conditions and password etc.), but once they have been passed, the data is collected as if the user is a site administrator.
When you have chosen either your individual iSheet or Multi-iSheet source, select whether you want to display this panel on all devices, or desktop/tablet only.
Finally, click the
Presentation
tab. The Presentation
screen opens:
Select how you want to display the data. Click
Add
to add your panel.The panel is now visible in your new section.

Customise KPI border colour
As of February 2025 release, Users can now customise the KPI border colour for a more distinct or stylish appearance that provides the flexibility to override the white default border colour and define their preferred style.
To apply KPI changes, navigate to
system admin
> customize
> KPI card default border color
under the general section.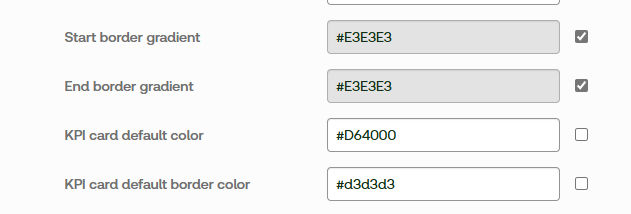
The KPI screen appears as below:

note
For existing clients, the KPI card border will default to the same colour as the KPI card.
note
Please note that user permissions are respected when viewing this panel. Additionally, if you do not have XSS permissions, you cannot edit a panel that has a script added to it.
Related Content
-
Panels for Custom pages and Site homepages
Format: Article,
1 min read
Article,
1 min read