
Bulk uploads
Bulk uploads
You can use an Excel file to bulk upload data to your iSheets. You can either import new or updated data into an existing iSheet or create a new iSheet.
Use an Excel file to:
- Create a new iSheet - Create a new iSheet and columns from an Excel file.
- Import records to existing iSheets - Update existing records or add new ones in bulk from an Excel file.
Creating an iSheet from an Excel file
You can create an iSheet directly from an Excel file.
note
An Excel file with no data can be used to create an empty iSheet (defining just the columns).
You can create a metadata iSheet (File, Folder or Task) from an Excel file; a metadata iSheet will not import data.
You can:
- Automatically create an iSheet column for each Excel column.
- Assign a content type for each column.
- Add data (optional).
Check your Excel file
Before importing the file, check the Excel file to confirm that the contents are supported.
note
Compatibility
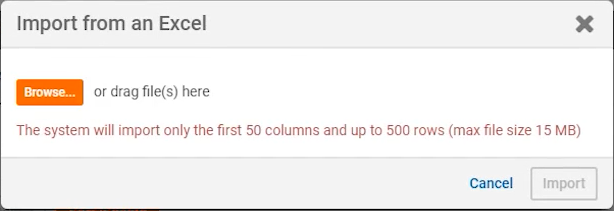
Up to 50 columns and 500 rows may be imported. The maximum file size is 15 MB.
Supported data types from Excel cells
Only
text
, email address
, number
, date
and choice
data types are supported.Cells
can
use other formats, but the data is not imported.Merged cells
The contents of merged cells are imported as if they were all in the top-left cell; other cells in the merged area are left blank.
Upload an Excel file
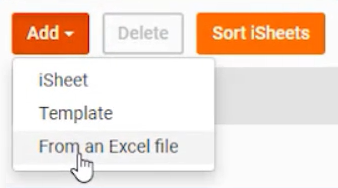
- Upload an Excel file throughAdmin>iSheets>Add>From an Excel file
- Add the Excel file:
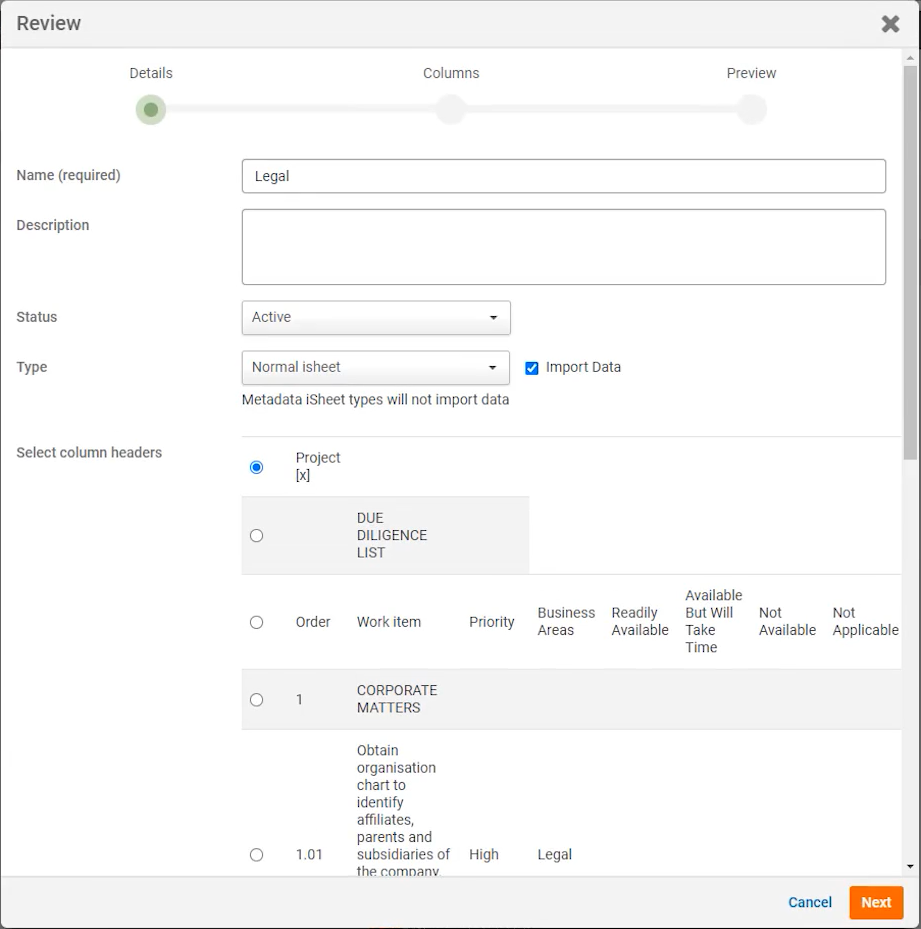
- When the file is ready, clickReviewto review and configure the iSheet details (name, status, type and column headers).
- Check and revise the column name and type for each imported Excel column in theColumnssection.
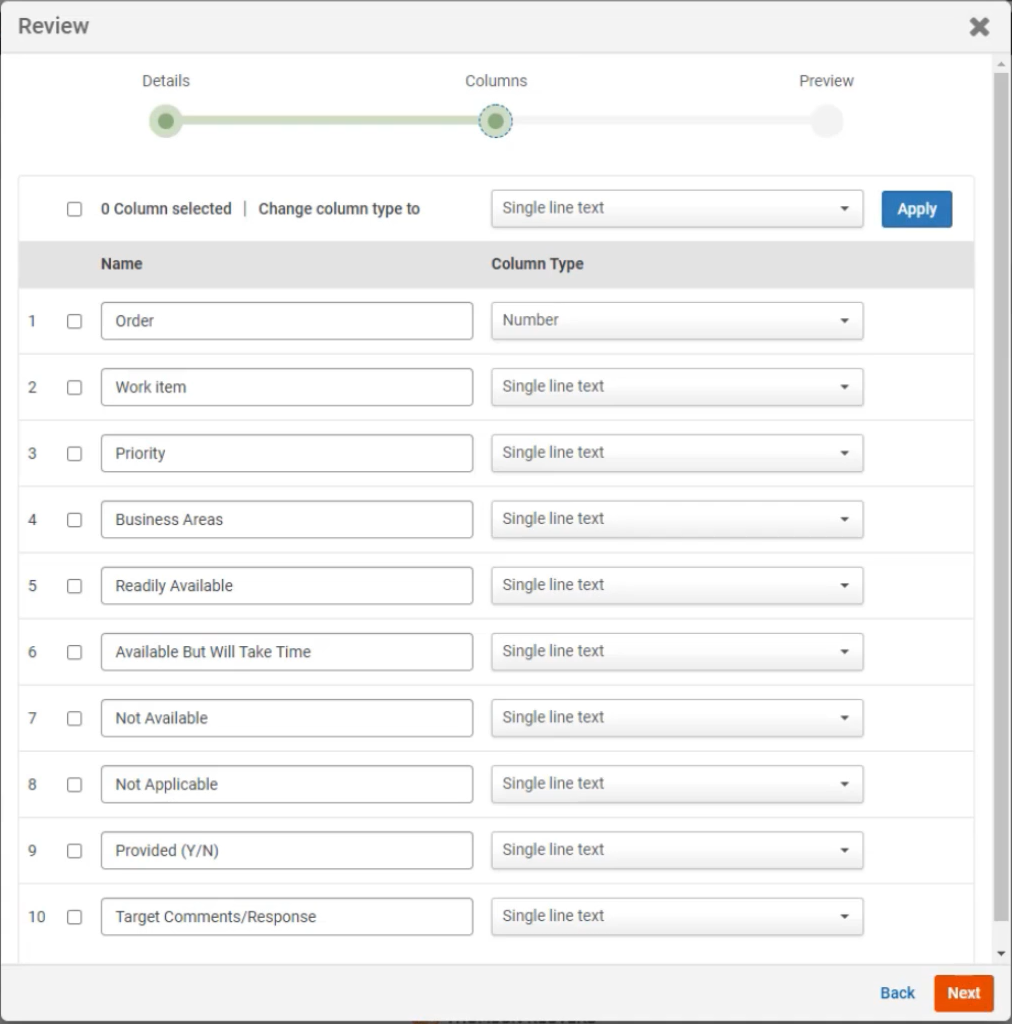 noteBy default, columns are defined as Single-line text, Number or Hyperlink. Select the best match from: Single lineMulti-lineChoiceNumberDate and timeHyperlink.
 - Check the preview before finalising the import.
A notification indicates the import progress.
note
Records that fail are left blank in the created iSheet. After the import has finished, we recommend that you add records manually or delete as required.
If an iSheet is not created, please check compatibility.
Check the imported iSheet
Open the iSheet in the iSheets module to check the output.
You may also check each column. Open
iSheets
in the Admin
module, and select Manage columns
for the imported iSheet.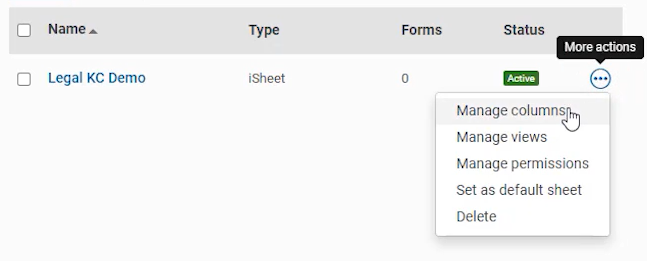
note
For example: add descriptions, default values, colours for values in a choice column, etc. See Column types in iSheets and Column settings in iSheets for more information.
Note that it is only possible to change a column
type
in very limited circumstances; for tips on how to change a column type, see Edit and delete columns in iSheets.Import records from an Excel file
Import via Excel provides an efficient way to:
- Update a large number of rows at once.
- Add new data in bulk.
- Upload data queried from an internal database or content repository. Such data can be formatted in Excel and imported in bulk into the iSheet.
- Allow users who do not have access to the site or iSheet to review and update data. Admins may provide the downloaded iSheet data to stakeholders who can update the content in Excel, then return the file to an admin who can import the updates into the iSheet.
If a file metadata iSheet is configured for a site, importing iSheet data may be an efficient alternative to adding metadata to uploaded files, rather than doing so one file at a time. An Excel file allows you to quickly enter appropriate information for many documents in one place and then import the data.
note
Import is only available to admins (system, site and content admins) to protect iSheet data integrity and prevent data errors.
iSheet data may be imported in three steps:
- Export theImport template(an Excel file - 'ItemData.xlsx') withMore Actions>Export.
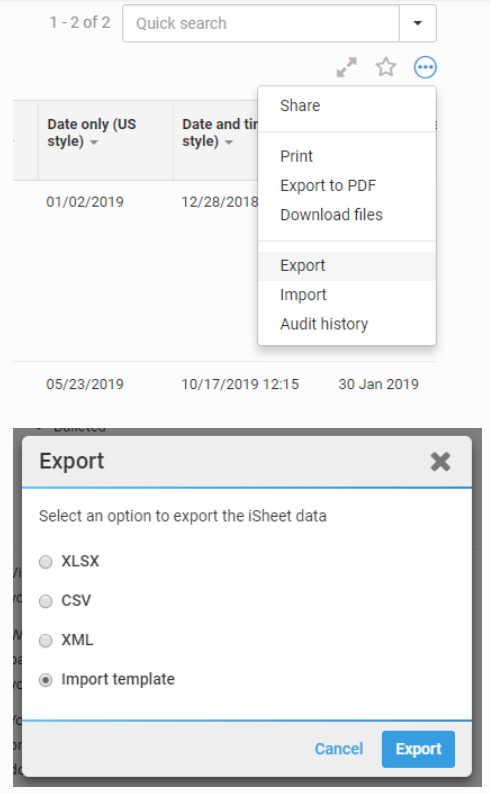
- Update the template by removing, editing and/or adding new rows.
note
All compatible items in the current view are included in the exported template, so select the required View. You can also run a search to generate a result list of items to be updated.
If you only need to add
new
entries in the import process, without modifying any existing entries, delete the rows that will remain unchanged. All columns in the iSheet, except lookup columns, are included in the import template, even if they are not included in the selected view when downloading the file.
Template format
The template includes some special formatting to handle the import:
- The first column (A) of the Excel file is hidden. Column A contains theSystem Generated ID, a unique identifier for each row. It is recommended that you leave column A hidden,butif you do unhide it, ensure you do not change the values. Changing the values could cause data to be imported improperly or iSheet items to be overwritten.
- Do not make any changes to the first row. These are the column names; keep the format of the Excel file as is, and do not add additional columns.
- All columns, except for lookup columns, appear in the import template.Note that certain column types require additional instructions for importing, while other types cannot be added through the import process.
- You may insert new rows after the last row shown in the Excel file. However, any rows added to the Import templatefor a file or folder metadata iSheetare ignored.
- If column A is unhidden, leave it blank for all new rows. They are assigned aSystem Generated IDon import.
Save the updated template on your computer, then:
- Import the updated Excel file fromMore Actions>Import.
- The import summary shows information about the rows of data to import
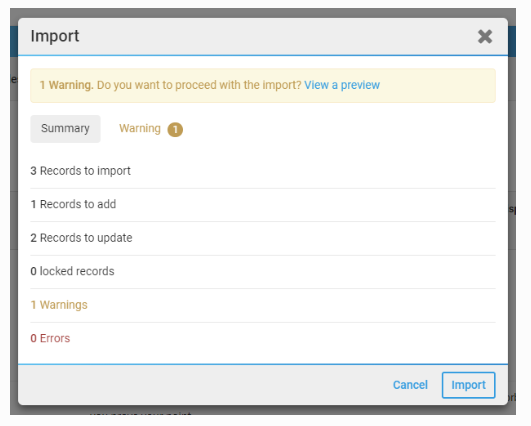
- TheSummarytab lists the total number of records (rows) to be imported, how many rows are new records, and how many modify existing records.If there are warnings, select theWarningtab and decide to proceed with the import, or clickCanceland address the warnings in the Excel file. Any errors in the import will prevent you from proceeding; you must correct errors in the Excel file before attempting the import again.noteClick the message link in theWarningtab to identify which cells have warnings. Click the warning message to see the relevant row highlighted.
- ClickView a previewto see the data to be imported. The preview highlights cells that trigger warnings.
- To proceed with the import, close the preview window and clickImport.
Troubleshooting
If you see an error message, please check the cells for limitations related to the target column type.
Single line text
Check if the text entered into a single line of text column exceeds the character limit defined in the column configuration (up to 255).
Cancel the import and limit the text entered into text cells,
or
increase the column character limit in HighQ, or
change the column type to multiple-line text.Multiple line text (with 'Allow rich HTML text enabled')
These fields show the HTML markup and allow edits. For new rows, plain text or HTML markup may be entered. Ensure HTML markup is valid.
note
Click
Invalid HTML detected
to identify the cell with the invalid HTML markup. Cancel the import and correct the markup error before attempting the import again. Typical errors that trigger this warning are opening tags without closing tags, standalone tags without a slash, or markup that does not constitute well-formed XML.
Choice
All choice columns are automatically configured as choice dropdowns in the Excel import template. When modifying existing rows or adding new rows, you may click the choice column cell, select the drop-down arrow and select an appropriate value.
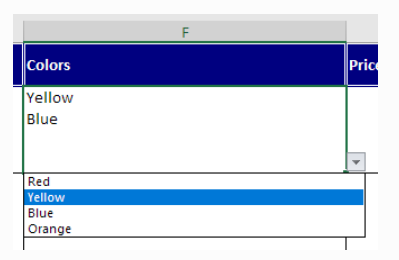
note
If the choice column is configured to allow multiple selections (i.e. with checkboxes), separate multiple selections with a single line break (ALT+ENTER) in the cell.
If the choice column is configured to
Include "Other" option
, you can enter a value other than those provided in the drop-down. Otherwise, the cell value must exactly match one of the possible configured options. In single-selection choice columns, Excel validation typically prevents incorrect entries. However, a cell with multiple selections can bypass this validation; please check carefully.Number
If a number value is outside the minimum or maximum value restrictions set in the Number column configuration, an error message is displayed.
note
If a specific number of decimals is configured, the value is rounded to match the decimal places before import.
Date and time
Date and time values must be properly formatted to import without errors. Date formats must match the format designated in the column configuration, and columns configured to include time must have a time entered in the Excel cell.
User lookup
To import values into user lookup fields, enter the email address of the user
as used by HighQ
. The email address must
be used, regardless of the display setting in the column. Users must be within the scope of users configured in the column, such as 'All Site users', to avoid errors.note
If the user lookup column is configured to allow multiple users, separate multiple user email addresses with a single line break (ALT+ENTER).
Hyperlink
Hyperlinks may be imported in two ways. If the cell contains only the URL, the iSheet display text will be the same as the URL. Alternatively, if the cell uses the Excel insert hyperlink feature, the display text matches the text used to display the link in Excel.
Image
Enter the image URL to import values into an
Image as URL
column.note
Image as attachment
columns are not supported.Attachment
Attachments cannot be imported with the Excel import process. Leave attachment column cells blank for new rows; any
note
ext entered in an Attachment column cell is ignored during import.
Lookup
Lookup columns cannot be imported into iSheets via the Excel import process and are not included in the import template.
File link, Folder link, iSheet link, Join, Calculation and Auto-increment
These column types cannot be updated or imported via the Excel import process. Document links, folder links, joins and inject, calculation and auto-increment columns should be left blank if new rows are added during the update process, as any text entered is ignored during import.
System-generated fields
Created by, Created date, Modified by and Modified date cannot be entered during the import process.
note
Modified date may be entered if
Enable modified date override
is enabled on the iSheet.The site admin who imports the Excel file is automatically assigned in the 'Modified by' column, and the date and time of the import is assigned as the 'Modified date'. The same applies to 'Created by' and 'Created date' for new rows added via the Excel import process.
Mandatory Columns
You may import new rows without entering data in columns configured as mandatory. Blank 'mandatory' cells are listed as
Warnings
after the import template is uploaded, but you may proceed with the import.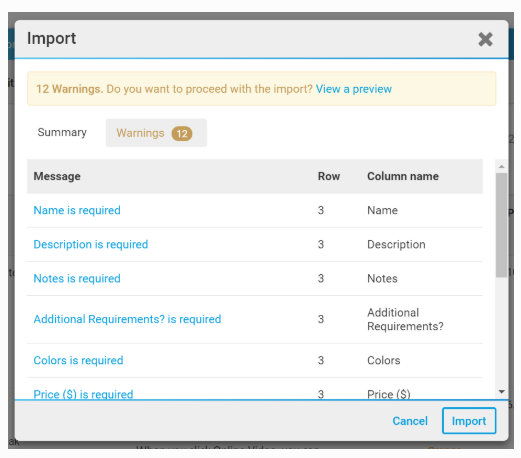
Conditional Columns
You may import values for Conditional columns, including columns that would not appear due to column conditions. After import, these values are only displayed if the condition is met.
For example, if a column is configured to display when another choice column value is 'Yes', you can enter and import a value into that column regardless of what was selected in the choice column. However, once imported, that value appears blank in the column grid view if the condition to display the column is not met. When viewing and editing the item, that column would not appear. If the choice column were edited to select 'Yes', the values entered for import appear, and the user can change the value.
File, folder and task metadata iSheets
New
rows cannot be added to file, folder or task metadata iSheets during the Excel import process. Files, folders and tasks must be added in the Files module, exported and then modified for the import process.Removing rows
You may not delete rows with the Excel import process; deletions must be made in HighQ. Rows deleted in the Excel file have no effect during import.
If you need to remove rows in the import template Excel file, because they will not be modified, select the entire row in Excel and fully delete the
entire row
: right-click the selected row (or rows) and select Delete
. note
Rows
must be deleted in their entirety
to remove the associated System Generated ID and to avoid inadvertently overwriting existing data.Additional import options
Enable modified date override
If an iSheet has
Enable modified date override
configured, the following option appears when exporting the import template: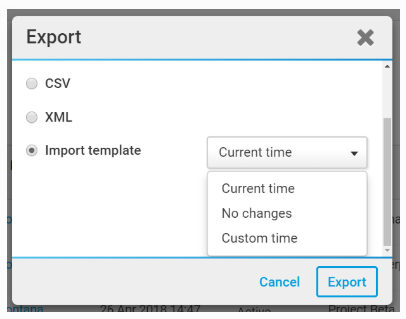
- Current time- The current date and time are inserted as the modified date.noteThis is the default behaviour of the modified date when items are added or updated during the import process.
- No changes- The modified date and time will not change for modified items. Any new items added to the import process will have the current date and time applied as the modified date.noteAlthough the modified date does not change for items if they are updated via an import using this method, the audit and version history records display the import modified date and time.
- Custom time- A site admin can define a date and time for modified date fields. This may be useful if importing metadata from another source, where date and time stamps must be maintained
Enable record locking
If an iSheet has
Enable record locking
configured and items in the import are locked for editing, an 'Overwite locked records on import' option appears in the Import
summary window: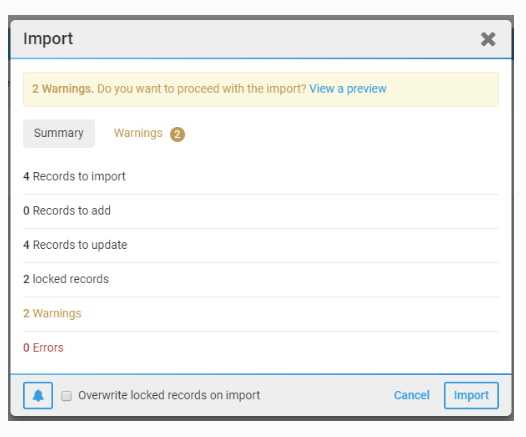
Items that are locked for editing are shown as
Warnings
. Select the Warnings
tab for more information: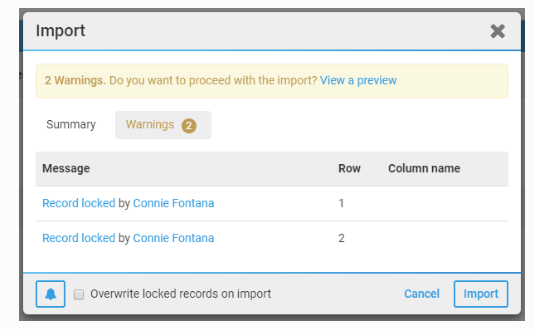
The list includes locked records and the row location for the record. Click each
Record locked
link to view the record highlighted in the import preview: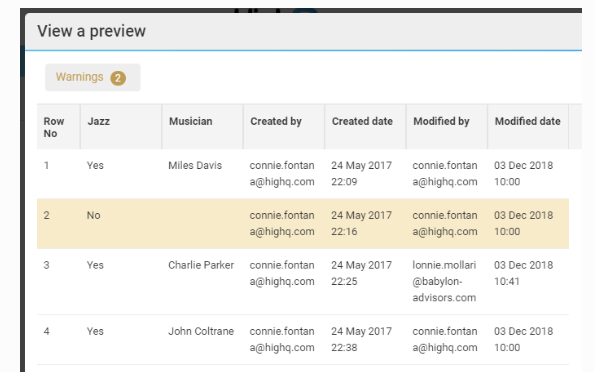
If you choose to proceed and need to overwrite all locked records, select
Overwrite locked records on import
:
If
Overwrite locked records on import
is not selected, those items remain locked and are not modified during import.note
See Import iSheet data from an Excel file for more information.