
File approval templates and process
The HighQ file approval process allows site and content administrators to:
- Create custom approval workflows rather than a fixed predefined approval process
- Allocate approvals to one or more users or a group
- Set due dates and reminders
- Create multiple steps in the approval process
- Set approvals for a Site
- Allocate selected files to an approval process
note
You can create an approval workflow that uses the File Status as a trigger; this does not need a metadata iSheet.
Users entered as approvers receive notifications for items awaiting approval and can see a list of approval requests in My Approvals.
As of June 2023, with One-click approval, users can approve or reject changes directly from a notification email. or, as of November 2023, directly from a Microsoft Teams message.
note
Please note file approvals use the workflow approval process to enable data-driven approvals.
Setting up file approvals
Creating an approval template
On your site, navigate to site
Admin
.
The
Site admin
screen opens. In the Site admin
screen, navigate to Approvals
> Approval templates
.
The
Approval templates
screen opens.
To add a new template, click
Add template
.
The
Add approval template
screen opens.
Enter the details required for the approval template. For example:
- TemplateName- Lease agreements
- Approvers- Finance Team
- Assign due date- 5 days after the initial request
- Instructions- Please review this lease agreement for a final pricing
In this example, we are creating an approval template for lease agreements, which needs to be approved by the finance team and we have provided them with some instructions to help them do this.
Set default due date and reminder
You can set a default number of days used to calculate the due date, which is automatically added to the approval request.
Select the box next to
Assign due date
, then enter the number of days until the initial due date.
note
The approver can change the due date of the request.
Select
Exclude weekends
to skip counting Saturday and Sunday when the date is calculated.You can also set one or more reminders, based on the due date. Select
Add
to add a reminder.
Type the number of days before the due date for the reminder notification, then select the tick to confirm. Select
Add
again to add further reminders.Additional steps
Click
Add step
to add additional steps. Use these steps to send files for approval to multiple parties.note
If you include multiple approvers in your approval process, they
all
have to approve the process.Click
Add
to create your new template.
A message displays that the approval template was created successfully.

Your template is now active and available.
Enabling file approvals at site level
one-
Enabling file approvals at site level
To enable file approvals on your site, select enable approvals in the
Site admin
section. Navigate to Site admin
> Module settings
> Files
.
The
Admin - Files
screen opens; navigate to Advanced
Settings
. In this section you see two approval checkboxes; Enable approvals
and Require approval to add files to folders
.
If
Enable approvals
is selected, any files in the files module can be added to an approval process. Click
Save
to save your changes.Sending files for approval
On your site, navigate to the
Files
module.
Locate the files you want to send for approval and select them. Then select
Action
> Sent to... Approval
.
The
Send for approval
screen opens.
note
If you select a locked file, you'll see a message in the
Send for approval
screen.Click the
following files
link to see a list of files that are currently locked and cannot be sent for approval. In the
Send for approval
screen, select the template you want to use.
note
If the correct template does not exist and you have the correct permissions, click
Add approval template
to create a new template.The template defines the default approvers.

If the template includes a default due date, the calculated date is shown in the window.

If a due date is not defined in the template, select
Assign due date
, then select the desired date. Click Add
to add one or more reminders.
Add a note for the approvers. For example, you could say 'Can you please review and approve these files ASAP'.

Click
Send
once you have entered all of the required information. You'll receive a message that your files are pending approval.
Open the
My requests
tab in My approvals
to see the status of your requests.Notifications and reminders
Assigned approvers receive notifications and emails for items awaiting approval or overdue, and can see an overview of approval requests in My Approvals.
If reminders are selected for the approval request, approvers also receive one or more reminders before the due date.
HighQ notification:

Email:

As of June 2023, if One-click approval is enabled, users can approve or reject changes directly from a notification email. or, as of November 2023, directly from a Microsoft Teams message.
note
The current document approval status is shown at the top of the message panel.
If you have overdue approvals, you receive notifications every day until you approve, reject or reallocate overdue items.
Adjust notification settings
To adjust
notification settings
, click Settings
in the notification pop-up.
Set
Email
, Online
and Push
options in the Sends content to me for approval
, Has an overdue approval
and Has an approval request reminder
rows to change how you receive approval notifications.Approve or reject the document
As of June 2023, if
One-click approval
is enabled, users can approve or reject changes directly from a notification email in Outlook; or, as of November 2023, directly from a Microsoft Teams message.Set up one-click approval
As of February 2024, one-click approval is enabled by default. However, a system admin must still configure permissions in Microsoft 365 to allow users to access the service.
note
If necessary, this feature may be disabled by a system admin; if one-click approval is disabled, please use My Approvals to approve documents.
Set permissions
A Microsoft 365 admin must approve permissions for the app in the Microsoft admin center.
note
This step needs to be done only once by the Microsoft 365 admin of your organization. Once the TR Legal Communication Hub app has been approved by the admin, each user does not have to explicitly install the app. It will automatically install the app when an approval is sent for the user, and one-click approval for Teams is enabled.
In the Microsoft Teams admin center select
Teams apps
then Manage apps
.
Search for
TR Legal Communication Hub
.
Click
TR Legal Communication Hub
. 
Select the
Permissions
tab.
Click
Review permissions and consent
.
Review permissions and click
Accept
.:
Disabling one-click approvals
If one-click approvals are not required, a system admin can disable one or both approval methods. If one-click approval is disabled, please use My Approvals to approve documents.
Open
System Settings
in System Admin
and change ON to OFF for Enable one-click approvals through MS Outlook
, Enable one-click approvals through MS Teams
, or both.
Save your changes
Approving requests in Outlook or Teams
Depending on the enabled service, you receive an email in Outlook or a message in Teams (or both). Open the email in Outlook or the
TR Legal Communication Hub
app in Teams to see the approval request.The current document approval status is also shown at the top of the email, as it is possible another recipient approved the document before you opened the email.
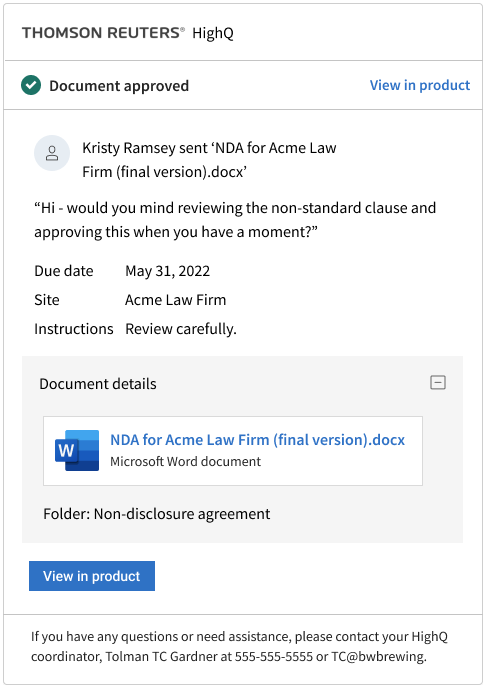
Select
View in product
to open the document in HighQ.After you have checked the document, return to the message and click
Approve
or Reject
to change the approval status of the document.If you
Reject
the document, you can add a Reason for rejection
before you submit the update.
note
If you cannot use the email to change the status or want to see an overview of your approval requests, please open My Approvals.
A notification is automatically sent to the next stage of your approval process.
My approvals
The
My approvals
section is found in your profile drop-down > My approvals
.
This is where you manage your requested approvals, and items you need to approve.
The
My approvals
screen
You see the following tabs:
- To approve
- My requests
- My rejected
- Site Admins also see aSite Admintab
To approve
The
To approve
tab shows all files in your queue, awaiting action. If the approval is directly assigned to you, then you can approve the file directly. However, if the approval is allocated to a group and you are part of that group, before you can take any action, you must 'pick up' a file from More actions
> Pick up
.
A screen displays with a message asking if you want to pickup.

Click
Pick up
. The file is then picked up by you, and tagged.
You can either approve or reject files. To do so, select the files, click
Actions
then either Approve
or Reject
.
The
Approve
screen looks like this:
Click
Approve
to approve the document. The document is moved from your 'To
approve
' list.The
Reject
screen looks like this:
Enter any comments or reasons for rejection and click
Reject
. The file is rejected.Additionally, in the
More actions
tab, you can: - Returna file - which un-assigns the file
- Reallocatea file to another user or group
- View theApproval details, or
- Downloadthe file

My requests
In the
My requests
tab, you see all files that you sent for approval.
In this tab, you can either
Revoke
or Delete
your requests from the Actions
tab.
My rejected
In the
My rejected
tab, you see all files rejected by other approvers.
In this tab, you can also delete files from
Actions
> Delete
.
Or edit the file from
More actions
> Edit
.
Site Admin tab
Site administrators have access to a
Site admin
tab, where they can view all files that have been sent for approvals for which they are site administrators, and also Download
, Reallocate
and view the Approval details
of files.
Require approval to add files to folders
If the
Require approval to add files to folders
checkbox is selected, approval is required to add files onto the site. This uses the approval template created earlier.
Click
Save
to save your changes. In this case, when a file is uploaded to the files module, it automatically enters the approval process.

After it is approved, the file is only available in the files module.
note
If this file is rejected, it is not available in the files module but instead is visible in the requestors
My rejected
tab, under My approvals
, where they can Edit
and Delete
the file.Migrating existing site approvals
HighQ includes a default site approval template. This template mimics the pre-existing site approval flow.