
Files administration settings
The
Files admin
page is used to configure the corresponding Files module, the key content area of most sites.Select the
Admin
module, then Settings
(under Files
).
The
Files
administration page includes:- File and Folder permissions
- Metadata to display
- Advanced settings
- Default file and folder settings
- Digital rights management (DRM)
- Third-party services
- AI Hub services configuration
Once a change has been made to this page, make sure to hit
Save
to keep your changesFile and Folder Permissions

Choose the level at which permissions will be set in the Files module. This determination should be made based on the requirements of a given site. The options are:
- Site only(also known as site-level) - With this setting, the same permissions will apply to every file and folder on the site. In other words, every folder and file inherits the permissions of the ultimate parent folder. As a result, every user who has access to theFilesmodule can, at a minimum, view every file in the site. (If a group is not granted even file view access, then that group should not be given access to theFilesmodule at all.) However, some groups or users may have additional rights, like the ability to add or delete files and folders. All of these rights will be applied consistently across the entireFilesmodule. For example, if Group A is given edit access rights, it will have those same rights to every file and folder on the site. On the other hand, Group B may be given view-only access rights, and those rights will apply to every file and folder on the site.
- Site and folders(also known as folder-level) - With this setting, different groups (or users) can be granted different types of access rights to different folders. For example, Group A may have view-only rights to Folder 1, edit rights to Folder 2, and no rights to Folder 3. Group B can be given completely different rights to those same folders: edit rights on Folder 1, no rights on Folder 2 and view-only rights on Folder 3. Any access rights provided to a group for a given folder will apply to all files in that folder. This is known as 'inheritance'. Subfolders will inherit the access rights of the parent folder by default, but that inheritance can be broken by restricting or enhancing who can access the subfolder or what types of access rights those users have. For example, Group A may have edit rights on Parent Folder but only view rights on Child Folder. Group B may have view rights on Parent Folder but full folder administrative rights on Child Folder.
- Site, Folders and Files(also known as file-level) - This is the most granular permission level, and also the hardest to maintain. It is similar to the site & folder permission level, but permissions can be granted down to the individual file level. By default, files inherit the access rights associated with the folder they reside in, but that inheritance can be broken. For example, Group A may have view-only rights on Parent Folder but edit rights on the 'M&A Agreement' in that folder.
note
Only Site Administrators and Content Administrators can alter the permissions assigned to a site, folder or file, and only those users can modify inheritance.
How permissions are configured for folders and files, and for particular users and groups, is discussed here.
It is recommended that most sites start with folder-level permissions, which strikes a good balance between ease of maintenance and flexibility of configuration. File-level permissions are more difficult to manage, as it can be hard to identify when an individual file breaks inheritance. (That is similar to the reason it is easier to use
group-based security
rather than user-based security.) As a best practice, start with folder-level permissions and only move to file-level permissions if the situation warrants - the permissions setting can be changed later.note
Moving from file-to folder-level permissions has several drawbacks, as explained below.
An alternative to applying file-level permissions to the entire site, just so a handful of files can have unique security, is to simply create a subfolder for those files and apply permissions to that subfolder.
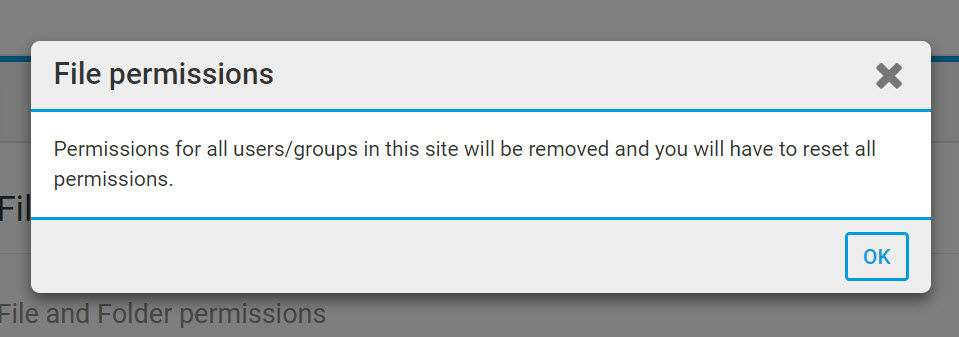
File permissions level can be changed after a site has gone live. If the permissions level is made more granular (moving from left to right along the radio buttons), there will be no immediate impact on the site. However, if the permissions level is made less granular (moving from file level to folder or site level, or from folder level to site level), all permissions on the Files module will be removed. You'll receive a warning on the screen.
note
If it is necessary to make permissions less granular, first place the site into 'Preparation' status, then reconfigure the permissions. That way, site users will not have access to content they should not see while site permissions are being changed.
This permissions setting does not govern how access rights are granted for other site modules (like blogs and wikis). To find out how to configure permission rights to other modules, see
Manage group permissions
.Metadata to display
The Metadata to display section controls what additional information is available in the
Files
module to all users who have view access rights.
note
If the Status metadata field is enabled, you cannot toggle the status of a file here, e.g. if a document has been signed. This can then be searched on when searching.
The
Files
module always shows the following information about every file:- The name of the file and file type icon. The file name is typically a link to download the file, unless download restrictions have been imposed.
- Afavourites
 button, to add the file to the user's favourites.
- TheMore actions
 menu:
menu:
The
File Metadata
section controls what additional file information is displayed in the Files
module to all users who have view access rights.
The Site Administrator can choose to show these additional pieces of information about every file:
- DMS- For clients that use a Document Management System (DMS). If a HighQ Appliance Connector is used, they can integrate with Collaborate and transfer documents from their DMS to Collaborate. IfDMSis enabled, this column displays the version number of the file from the DMS.

- Pages- The number of pages in the file.
- Size- The size of the most recent version of the file. Based on the size of the file, this is shown in bytes, KB, MB or GB.
- Author- This is the name of the person who uploaded the file. If versioning is permitted, then this is the name of the person who uploaded the last version of the file. If a file is uploaded from a file management system using a special tool, the author is the name of the user who initiated the upload, not the file author stored in the file management system.noteIf the cursor hovers over the Author's name, a tooltip shows the name of the author and the author's organisation; the date the file was uploaded may also be included.
- Last Modified- This is the date and time the most recent version of the file (if versioning is enabled) was uploaded to the site, not the date it was created or last modified on the computer where it was stored. The date is governed by the time zone associated with the instance of HighQ.
- Version number- This setting governs a few related features of theFilesmodule:
- If theVersioncolumn is shown in the list of files and any version information in the file information page. (The version number will be grey if the user has viewed the file; otherwise, the version number will be black.)
- If users with view-only access to a file can find information about prior versions of files or even if prior versions exist, using theVersion historymenu option.
Users with at least edit rights to files will be able to add new versions of a file (using theAdd versionmenu option) and view a file's version history. This setting also determines how each version will be referred to on the site, as either aVersionor aDraft.noteWhile these settings can be used to display (or not) certain information in theFilesmodule, do not rely on these settings for security purposes. These settings are best used to determine how 'clean' the user experience will be. The less information that is shown, the cleaner the experience for users accessing the site. But even if not configured to be displayed, this file metadata may be revealed in other parts of a site, such as activity streams, search results, etc.noteFile metadata will be available to Site and Content Administrators in the Audit History regardless of whether it has been configured to be shown to all users.
The
Email Metadata
section contains information about what type of metadata is kept when a user uploads an email file. Tick to enable email metadata, and then choose to either make this Default ON for all folders
or Default OFF for all folders
. You can also tick to confirm if you want the setting to apply to all existing folders.
In addition to the basic file information that is collected, you can now choose whether to see who the email is
From
, whom the email has been sent To
and who has been added to the Cc
field, when it was Sent
and when it was Received
. When you click on an email within the files section, email metadata that has been collected will display in the details section.
Users can also search for metadata using the
Search
tab. Use the filter to select which metadata type you want to search for within the current folder.
Advanced Settings
Use the settings in the
Advanced options
section to configure the behaviour of the entire Files
module, not just what information is displayed.
- Enable commenting- This setting determines whether or not comments can be added to files. If allowed, a file author can still determine whether to allow comments for a particular file. If comments already exist for any files and this setting is deselected, the existing comments will be hidden but not deleted.
- Enable file annotations- If this option is checked, a user can add annotations to files stored in theFilemodule.
 Click here to find out more about file annotations.
 - Enable auto-numbering- Use this setting to display all files and folders with an outline numbering scheme (1, 1.1, 1.2, 1.1.1, etc.). These numbers are added in front of every file and folder name, but stored file names arenotchanged to include the numbers. Reordering files and folders or adding new files will trigger automatic renumbering. The auto-numbering feature can be configured to determine at what level in the folder tree to begin the auto-numbering:

- By default, it starts at level 1 (the top-level folders beneath the root folder), but this can be changed to be any level from 1 to 9. For example, if the auto-numbering is set to level 2, then in this folder path: Root Folder > Top-Level Folder > Child Folder, 'Child Folder' will be the first to be numbered, which will start at 1. That also means there can be duplicate numbering in theFilesmodule.
- Enable PDF conversion- Check this box to make a PDF copy of every file that can be converted to PDF by the platform. (The originals will still be stored in the file repository.) Once selected, files will only be accessible in PDF format, and not in their native format, by users with view-only access rights. Users with edit rights can still download files in their original format. If any of the Digital Rights Management features are enabled, this setting will be disabled automatically. ThePDF conversion settingslink becomes visible when the PDF conversion settings option is enabled.
 Clicking on this link brings up a small window where the System Admin can enter the file type(s) to be excluded from PDF conversion for that site.
 This option is available as some file types do not render well in PDF or the Site Administrator deems it prudent to allow those files to be downloaded in their native format. This is often the case with Excel files. This setting applies to both theEnable automatic PDF conversionandConvert all files to PDF and encrypt with FileOpen pluginsettings.noteThePDF conversion settingswill no longer apply to the FileOpen DRM selection, only to the non-DRM PDF Conversion setting. Instead, untick theDisable savesetting to allow files to be downloaded in their native format, subject to FileOpen or Preview DRM.Start typing a file extension and any matching file types will be shown in a list. Multiple file extensions can be entered. For example, to exclude Excel files from PDF conversion, enter both "xls" and "xlsx".
 ClickSaveto exclude the extensions.
 - Enable bulk downloads- Enable users to download in bulk some or all of the files they have access to. If thePreviewis enabled, this setting will be disabled automatically.noteSystem and Site Administrators always have access to this feature, even if it has not been enabled on a site.
 Once enabled in theIndexarea of theFilesmodule, a user should select the checkbox next to the top parent folder (this will then select all child folders) and clickActions.
 Click theDownloadoption fromActionsto bulk download all files from selected files and folders.
 A window opens to allow users to select further options within the bulk downloads.
 ClickDownloadto download the files.
 - Enable OCR- This is set up on a site-by-site basis; to enable this please contact HighQ Support. The Optical Character Reader (OCR) takes a scanned image of a document and converts it into a PDF document with text that can be searched and edited.
 Once you have ticked this box,OCR conversion settingsopens. Select an option and clickSave.
- Require authentication to access files from emails- If this box is checked, a user must be authenticated in order to open a file from an email. This is the most secure setting. If unchecked, no authentication will be required to open a file from an email, although no other access to the site will be permitted without authenticating. If this is unchecked, then in order to access the file from the email link without authenticating, theFile title linkssetting must be set to download the file directly.
- Enable "force" and "suppress" email notification options- If this setting is checked, when a user adds a new file, an icon is displayed in theAdd fileswindow.
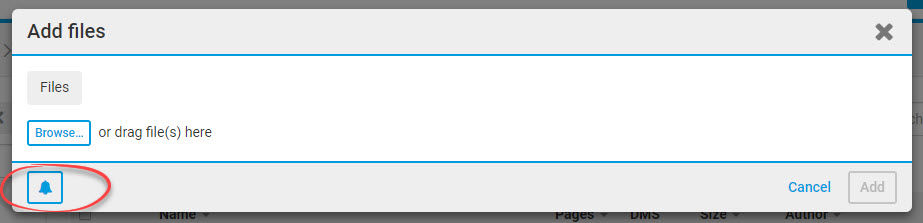 Click the icon to set alert preferences. These preferences will be used when files are added.
 The preferences are noted below:
- (Default)Respect user preferences- respect the alert preferences of other users
- Send to all users with access- send out an immediate alert to all other users with access to the file, overriding the other users' alert settings; take this action when an important file is added; or
- Suppress email alert- suppress any alerts, overriding the other users' alert settings; take this action when files or updated versions that are not considered significant.
noteIf the setting is unchecked, the icon will not display when adding a file and the default (to respect user preferences) is used.
- - TheEnable Open in Office Onlineopen in office onlinefeature enables you to provide a comprehensive, native and seamless experience, allowing you to add, view and collaboratively edit Microsoft Office documents online. You need a valid Microsoft Office online account to use this feature.
- Enable secure file sharing- select to share files with external users, with additional sharing options for security
- Users with view rights can share files- select to allow users that can view a file to then share the file
- Enable check in/check out- When enabled, check in/check out allows a user with edit rights to lock a file, so that no one else can edit or add a new version of that file. Only the user who checked out a file can check it back in (or cancel the checkout), although an Administrator can cancel a check out, if necessary
- Enable approval workflow- Use this setting to requirepublishing approvalfor any new files added or new versions of files uploaded by anyone other than an Administrator. When approval is required and a file is uploaded, it will not be published immediately; instead, Site and Content Administrators for the site will be allowed to accept or reject the page. Once accepted, the file will be immediately published. Use theSet Notificationslink to determine which Site and Content Administrators have the right to approve or reject a new file. The default is for all such Administrators to have this approval right.
- Enable document review workflow- If enabled in a site this feature allows Site Admins toassign document-review tasksfor one or more files at one time. This new feature also allows Admins to track the status of all previously assigned document-review tasks and provides a visual representation of those tasks.
- Enable site inbox- Use this setting to allow files to be sent to theFilesmodule as email attachments. To send files this way use theAddoption in theFilespage. Then chooseFiles via email.
 Each folder has a unique email address based on the email address of the inbox, for example, "bankfinancing1234 @sitepoint.mail.highqsolutions.com." This email address is shown at the bottom of each folder page.Files emailed to a particular folder by users with folder admin rights (or greater) will be added to the folder like any other files.Email attachments sent to a folder by site users who do not have the right to email files to the folder will be rerouted to the inbox.Email attachments sent by anyone who is not a member of that site will be rejected and they will receive a reply indicating that this has occurred.Two links are included: one for the site and one for the folder. By clicking on one of the links, the mail client opens, and a user can attach the documents, which will be uploaded to the inbox in theFilesmenu.The inbox itself, which is shown in theFilesmodule above the top-level folder, is a holding area that can be accessed by Site and Content Administrators.An Administrator will review the files in the Inbox and decide whether to file them in a particular folder or delete them entirely.More information about the Inbox can be found here.
- Enable index page- Use this setting to allow users to access the Index view.
Viewer Settings
Viewer settings
allow a user to choose to open files either with the standard HTML5 viewer or use a legacy flash-based viewer.
The default option uses the standard HTML5 viewer and a user has two further options: to
Open the PDFs in Adobe Reader
or to Use Adobe Reader for printing
. If a user chooses to use the legacy flash-based viewer, there is a further option to open PDFs in Adobe Reader.Import folders and file structure
From Excel
To read more about dataroom import, click here.

This feature must first be enabled by HighQ on an instance of Collaborate, upon request.
Default folder and file settings
This section is used to configure how folders and files are listed and sorted. The sort order, default view and permissions can all be configured.

The sort order can be arranged by
Creation date
, Last modified
or Alphabetical
. The folder view can be arranged by List view
, Column view
or Thumbnail view
. The default folder permissions can be set to inherit parent folder permissions or a user can select not to inherit. The default metadata view can be set as the default.If a user chooses to
Apply
the configuration to all existing folders or files, a confirmation box will be displayed as this will overwrite any existing folder settings.
You can also determine the settings for duplicate files that are added. If selected, the system can detect duplicate files with identical names that have been added, and in this scenario, you can choose to add the duplicate as a new version, or the system can ask you what to do with the duplicate. For more information on duplicate files, click here.
note
Please note that duplicate file detection should first be activated in System Admin / System Settings.
Digital Rights Management (DRM)
When a user can access a file on their own computer, they usually have full rights to that file. For example, they can view, print, download and share the file with others, and edit the file if it is in an editable format (such as Microsoft Word files, but not Adobe Acrobat files). When DRM is applied to a file, some or all of these rights may be removed, and the file may be changed through the addition of uneditable watermarks.

By default, no DRM restrictions are applied to files added to a site, but if DRM is enabled, further options are available. Restrictions can be applied per the selected file permission level and the group security settings.
- For example, if folder-level security and user-based security are applied, then the DRM options can be applied; for example, to allow User-X to preview the files in Folder-A but not download or print any of them, but all files in Folder-B may be downloaded and printed by User-Y.
- If file-level security had been applied instead, then File-1 in Folder-A might be printable, but File-2 might only be previewed. Moreover, if group-based security has been applied, Group-1 may be granted the right to preview, download and print all of the files in Folder-A, but Group-2 may only be able to preview those files. See the Watermark section below to set watermark options within the file.
- Enable Online viewer with DRM- With this option selected, users will be limited to previewing files in the browser and may not be able to print those files. No special plug-in, besides Adobe Flash, is required on a PC or Mac. Files will no longer be accessible in their native format. Also, watermarks may be added to files. If printing is restricted, every file will get this watermark:Printing disabled. IfEmailandIPwatermarks are enabled, every file will get a watermark that contains the viewer's email address and IP address. DRM settings can be configured to allow files to be printed, but with other watermarks added. See the Watermark section below to set watermark options within the file.
Clients should have implemented the Seclore plugin, and once a document is shared, it is encrypted by Seclore. When a user clicks to download the file, the user is prompted that the document is corrupted. Permissions will be checked in Collaborate to determine if they have rights to view, edit or print the file. Click
Okay
to see a holding page in the native application for the specific file.
Users must download and install the Seclore light client to view the Seclore-protected file. System admin rights are not needed to install this client application.

On installing the plugin, when the user tries to open the Seclore-protected file, they will need to confirm their HighQ login and once provided, can then view the encrypted file. For
Seclore troubleshooting
information including opening a protected file, please click here. The document permissions are automatically applied in the user's native application. The ability to print, edit, or view the document with or without a watermark is determined by Collaborate settings.See the
Watermarks
section below to set watermark options within the file.
- Encrypt PDF files with FileOpen pluginandConvert all files to PDF and encrypt with FileOpen plugin- Otherwise identical, the other two DRM options differ in one respect. The first option applies only to files added to the site in PDF format and not to any other types of files. The second option makes a PDF copy of all files. (The originals will still be stored in the repository.) Both options apply encryption to PDF files using the free FileOpen plugin for Adobe Acrobat Reader. Once encrypted, a user can download files in PDF format, but to view these files, the user must be authenticated using their Collaborate username (email address) and password. Once one of these options is selected, the right to print the PDF files can be restricted, and watermarks can optionally be added. If a user's access to a site is later removed, they will no longer be able to open the encrypted PFD files they have already downloaded. Note that files encrypted or locked before being uploaded, using FileOpen or another technology, cannot be encrypted using the FileOpen technology. See the Watermark section below to set watermark options within the file.noteFileOpen and Seclore encryption are not available on instances that use Thomson Reuters Accounts, please useOnline viewer with DRM.SelectEnable online viewer with DRM.

Watermarks
If any of the DRM options are selected,
Watermark
options open.
This section permits the Site Administrator to determine what watermarks will appear in a file if (a) the enable Online Viewer with DRM option has been selected and (b) the file permissions have been configured such that watermarks will appear on that file for the affected user or security group.
note
Watermarks do not appear by default when DRM has been enabled. They must be enabled in the
Watermark settings
section.Click
Save
in the Files Admin
page to keep any changes made.The following watermarks can be added to the file. Any or all of these can be enabled at the same time:
- The user'sIP address
- The user'semail address
- Printing disabled, but only if printing has been disabled for the affected user. By default, printing is not disabled.
- Confidential
- Custom text- up to a maximum of 40 characters
Depending on the options chosen as described above, if permissions have been set correctly, Watermarks will be displayed on each page of the file when downloaded.


AI Hub services configuration

For more information on HighQ's AI training, please see the AI Hub overview.