
Electronic signature with DocuSign
eSign integration allows users to securely send a document for signature from the Files module.
note
Enable and Authorise DocuSign
After the eSign service has been enabled by HighQ support, you must authorise the service using your eSign account credentials.
note
The Adobe Acrobat Sign service is also available to sign documents.
Sending documents for signature
If at least one eSign service is enabled, the
Send to... Signature
or Send to DocuSign
option is available. Select one or more files, or a folder, then open the Action
menu (either at the top of the page for one or more files or the More actions
menu for a single file or folder).
Select
Send to DocuSign
to open eSign services (or select Signature
if more than one eSign service is enabled).note


Sending files and folders from multiple folders via the Index view
In the
Files
module index view you can select multiple files and folders, including files from separate folders, to send for signature.In the
Files
module, select Index view
.The
Files
module Index view
opens. Select multiple files and folders.Once you have selected all your files and folders, click
Actions
> Send to... Signature
.Please note that you may be asked to select a matching template. This is because some of your documents may have already been created from an existing template, and this enables you to use that template for your new documents.
Multiple eSign services - Send to DocuSign
If more than one eSignature service has been configured, the
Send to
screen opens. This shows all the files you selected, including all of the files within the folders you selected, and allows you to select an eSignature service.
note
If
multiple items
were selected, the Send to
window shows all the selected files, including the contents of selected folders.If a file is not required, select the red
x
to remove the file from the list.Check file size
Before you send files to DocuSign, check the total size of all documents. The total size cannot exceed 50 MB.
If necessary, click the red
x
to remove documents so the total is less than 50 MB, then select DocuSign
.note
If a document is larger than 50 MB and requires signature, check the document for contents that can be compressed or can be removed, then resave the file.
Select
DocuSign
to continue.Select recipients
The main
Send to
screen opens.
Enter the recipient's name and email address. Select the task for the recipient from the drop-down menu next to the
Name
field.
Select
Add recipient
to add further recipients and tasks.You may add a custom message to the
Message
box.Confirm the recipient's information and select
Send
.note
- The recipient of the document doesNOTneed to be a member of the site or a user of HighQ to receive and sign a request.
- After a document has been sent for signature, that document isLocked. This means that a new version of the file cannot be added without first revoking the signature request or when the recipient completes the signature process.
Add signature fields
You will see either the DocuSign file upload page or jump straight to the DocuSign recipient tagging page
note
The default landing page for DocuSign is set in
Files module settings
by a site administrator.DocuSign file upload page
If you see the
File upload
page, check the information.
Make any required changes then select
Next
to add fields to show recipients where to sign or enter information in the DocuSign tagging interface
.note
Please refer to DocuSign help for further information.
DocuSign tagging interface
If you see the
Tagging interface
page, you may add fields for signatures, dates, or other information.
These fields show recipients where to sign or enter information; add fields as required by your signature process, then select
Send
to send the document.note
If you select multiple files or a folder, you see a list of all the files on the left of the interface. Select each file in turn to areas to be signed in each one.

Once you have added each signature request, select
Send
to send the documents for signature.note
Please note that if the documents in the folder are checked out or locked due to other activity, then you cannot send the folder for signature.
Each recipient receives the document and must respond according to the requested action.

Notifications
Once the document is sent, you are notified in the top right corner of the page with a
Sent to DocuSign
message.
The document is now labelled
Sent for signature
(if this setting has been enabled by an administrator, see below).note
If this is not enabled, you can view the status in the details pane on the right-hand viewer panel.

Document status
When you select a file in the
Files
module, the Details screen opens.
You can see the status of the file and, if necessary, revoke a signature request.
note
To view the status of the file in the 
Files
module, enable the status column in Admin
> Files
> Files and folder metadata
.
You can also view the status of a file from the Files home page and in the details pane on the right-hand viewer panel.

Click on the
Sent for signature
link to open the recipient status window. This will show you who has signed the document, who is awaiting the document and who has auto-responded. Please click here to see the DocuSign status types, along with their meanings.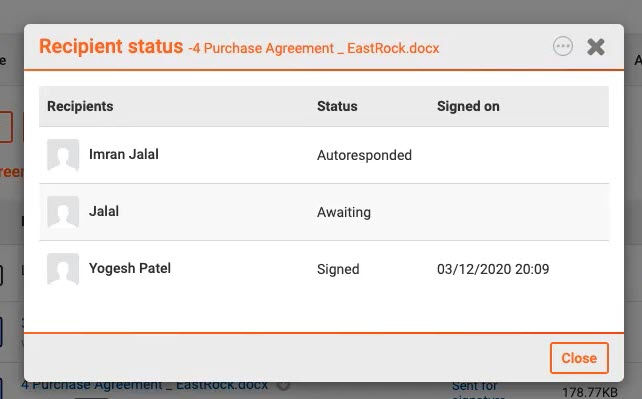
If a document is rejected for signature this is also displayed alongside the recipient who has declined to sign.
You may use the Signed status as a filter in the search/filter field in the top-right corner of the
Files
module.
Select
Sent for Signature
to see all documents that have been sent for signature but are not signed.We improved and renamed the
Sent for signature
section, which is now called eSignature tracking. This update gives users working on a transaction the ability to track the signature status for each document that is part of the transaction. Additionally, we have also added the ability for users to mark documents as 'ready for signature'.note
Please note that an eSign service must be enabled on your site for these features to be available.
eSignature tracking in the files module
To view the eSignature tracking section, in the
Files
module, select the eSignature tracking
option in the left-hand panel.
The
eSignature tracking
screen opens.
Here, you can now easily see at a glance, which files and the current status. Additionally, this view shows you when the file was sent, by whom and the recipient(s) of the file.
The following statuses are available:
- Draft - This is a draft document, that has not been sent or received
- Sent for signature - This document has been sent for signature
- Voided - This document has been voided
- Signed - This document has been received and signed
- Declined - This document has been declined and sent back to the sender
Managing documents sent for eSignature
In this screen, you can also manage documents. Click
Envelope details
.
The
Envelope details
screen opens.
Which shows easily digestible information relating to the file and its process.
note
Please note that any changes made to the envelope in DocuSign are updated and reflected within HighQ.
note
As of July 2024, the
Agreement details
includes the name of the eSign service used to facilitate the signatures.Additionally, you can select
More actions
.
On a single file, or select multiple files and select
Actions
.
To complete a multitude of actions.
Send

Selecting a file and click
Send
to open the Send to
screen:
Where you can select one of the eSignature services. The
Send to
screen opens.
Enter the name, email addresses and a message for the recipient.

You can also select what the recipient needs to do with the document.

Select
Send
to send the document.note
Please note that if the document has already been sent and declined or voided, the option will say
Resend
instead of Send.
Remind

Click
Remind
to open the Send reminder screen.
Where you can choose to send a reminder to the original recipients.
note
Please note that for certain files, you will not be able to send a reminder.
Revoke
Click
Revoke
to open the Revoke sign request screen.
Where you can revoke the request sent for the document.
note
Please note that for certain files, you will not be able to revoke the request.
Edit status

Click
Edit status
to open the Edit status screen.
Where you can change the signature status of the file.
note
Please note the list of statuses depends on the current status; e.g. a document that is 'Voided' cannot be changed to 'Signed', etc.
View certificate
Via
More actions
> View certificate
.
You can view the certificate of a
Signed
document.note
Please note that you can perform bulk actions for multiple documents via the check boxes next to each document. But, if the documents have different statuses, the action will only be performed on the document(s) with the relevant status.
note
Also, please note that you cannot view the certificate of an unsigned document.

The
Sent for Signature
screen also displays the same link in the status column along with the document Name
, Version
, when it was sent for signature, Sender
and Recipient
information.
note
Please note that signature tracking capability is only available for DocuSign and not for Adobe Acrobat Sign.
Signing a document
The recipient receives an email from the selected eSign service and they follow the signature process for that service.
note
For more information on this process, please refer to the documentation for the eSign service.
During the signature process, the status of the document is tracked in HighQ and updated in all locations where it is displayed.
Once the document has been signed, it is returned, added as a new version and unlocked. The sender also receives an email to confirm that the document is signed.
DocuSign Certificate of Completion
In addition to the signed document being added as a new version, the DocuSign
Certificate of Completion
is downloaded and stored in HighQ. The Certificate of Completion
can be accessed via the file's Audit History
> Audits tab
> Signed in DocuSign
link in the Action
column.Revoking and reminders
You can revoke an individual file or send a reminder to the recipient. From the
Sent for Signature
page, select More Actions
> Revoke
or Remind
.
Revoking
Select
Revoke
to revoke the request to sign the document sent to the recipient. The document will be unlocked.Reminders
Select
Send
to send a reminder email to the recipient.Audit history
In the file's
Audit History
> Audits
tab there are audit entries for:- Sent to DocuSign
- Signed in DocuSign
- Sign request revoked
- Sign lock removed
'Sent for signature' system audit
A system admin can see which documents have been sent for signature across the whole instance. To access this panel, navigate to your profile dropdown >
System admin
.
Navigate to
System audits/reports
.
Then select
Sent for signature system audit
.
The
Sent for signature system
audit screen opens.
You can filter the results or search for items.
You see the site, the name of the recipient, the name of the document, and the status of the document. Additionally, you can
Revoke
the request, or Remind
a user that you require an action, via More actions
> Revoke
or Remind
.