
Managing tasks
The Tasks module helps you manage your tasks so that you can work with others in your team to achieve a common goal.
The Task window
The main tasks interface is the task window, which shows all the information about a task. Users with edit rights may edit a task from the task window.

Listed below are the key task fields:
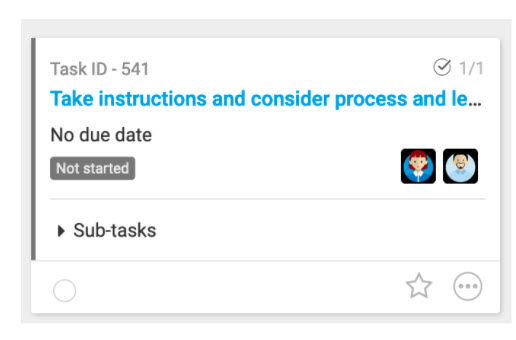
- Title- a free text field that is used to identify tasks in different views and notifications
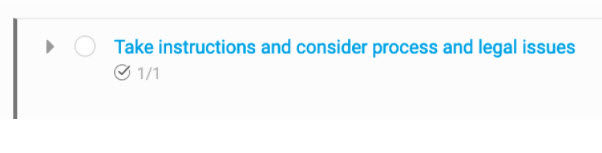
- Task ID- a unique incremental value. Tasks may have duplicate titles, so the ID is useful for identifying specific tasks when importing or bulk updating tasks, creating dependencies and adding sub-tasks
- Status- shows thecurrentstatus of the task and the drop-down menu shows available statuses. ClickAdd new statusto create a new status option. A task becomes overdue if the due date has passed and the task is incomplete
- List- set upliststo categorise tasks for navigation and to manage task permissions
- Priority- high, medium or low, this can be used for sorting tasks
- Start date- this is available when the timeline view is enabled, a start date can have a dependency on another task's start or due date. Reminders can be set against the start date
- Duration- this is available if Timeline View is enabled and the task has adependencyon another task. This will automatically calculate the start or due date, whichever doesn't have the dependency
- Due date- due dates are used to calculate when a task becomes overdue. It is possible to set up a task's due date to be dependent on another task date. Reminders can be set against the task due date
- Assignees- a task may be assigned to one or more site users or to site groups. Assignees will receive notifications and reminders
- Description- click the Edit icon to open a text box where you can enter a description of the task
- Sub-tasks- you can add up to 20sub-tasksper task. Sub-tasks have all the same fields as a parent task
- Reminders- reminders may be used to email the assignee with a reminder to pick up the work on a date calculated from the start or the due date of a task
- Tags- tags enable searching across all content types
- Attachments- attach multiple files to a task
- If a document is attached to a task, the window also includes document status
- Comments- if the Site Administrator enabled comments for the Tasks module, then the comments section will be displayed, along with any comments that have been added previously
note
Use the Tasks admin page to configure the Tasks module, including views, the default appearance, lists and statuses
Document status in the task window
If a document is attached to a task, a panel displays information about the document.
Key information about the document from other HighQ modules is included in the Task window for quick reference.
The attachment panel includes:
- Basic document information and a link
- Document version
- Tags to show document status

note
The document status tags can include:
- Document review status
- Approval status
- Signature status
- Doc Auto / Contract Express status
- AI status
- Checked in or out status
Add a task
There are several ways to add a new task.
From the Tasks module
You can add a task by clicking the
Add
button in the Tasks module.
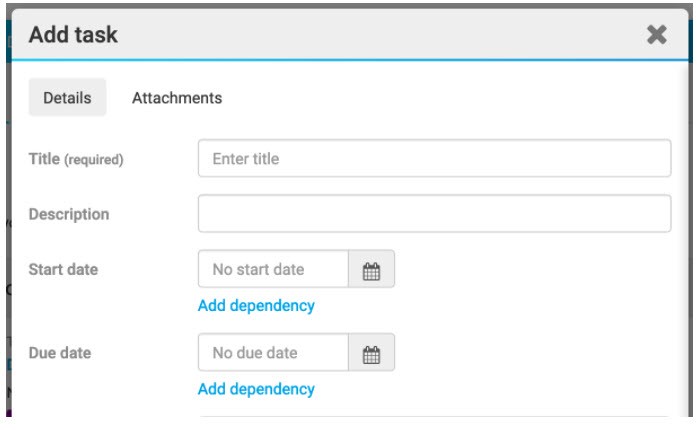
This opens the
Add task
window. A task title is needed to save the task, and you can also enter any other task details such as sub-tasks and/or attachments as needed. 
note
As of May 2024, click
Assign to me
to quickly add yourself to the Assignee field.If you are adding multiple tasks at once, tick the
Add another task
checkbox before clicking Add
. This will create the task, and open up a new task window pre-populated with the same Assignee, List and Status as the previous task, which you can edit before saving.Once a task is created, the assignee will receive an email and a system notification. If no task list was set when adding the task, the task will default to the list titled None.
From Card View
You can add a new task to a list directly via Card View by clicking either the
Add task
link at the bottom of each column or use More actions then Add task
. 
Add a personal task
You can create personal tasks that are only visible to you.
Navigate to the Tasks section on the dashboard. Select the plus icon in the top right corner of the section to add a new task by entering the task title and the due date (optional). Once you hit enter, the task is created.
Personal tasks are given a priority of Normal and a status of
Not started
by default. You can edit the task information by clicking the task title, which will open up the task in My tasks. note
Please note that tasks created from the dashboard will not be associated with a site, and personal tasks may not be assigned to another user
From My tasks
You can create personal tasks, or add new tasks to any site that you are a member of (depending on your permissions), by selecting
Add
on the My tasks page.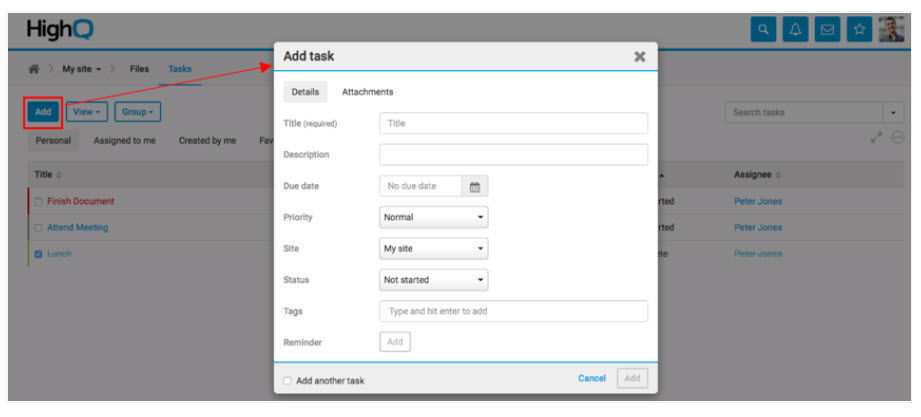
My site is selected as the default site, which creates a personal task that cannot be assigned to another user.
If another site is selected, the task lists from that site will be made available for selection. The task will be assigned to you by default.
Import tasks
It is possible to
import
a task list to add tasks in bulk.Using a workflow rule
With the workflow automation engine, you can create business rules to add a task automatically. See the
Workflow overview
for more information. Via the document review workflow
This is a pre-configured system workflow that enables you to assign review tasks directly from the files index.
Add files as attachments
When you upload a task, by default it is stored in the
Attachments
section in the Files module.Select the
Attachments
tab.
Either drag the file or files to the
Add task
window or select Browse...
to find the file on your computer.
You can access and manage the attached file directly from the task.
note
Either return to the As of October 2023, a site admin can set where files are uploaded, either to the default Attachments section, a single folder for all attachments, or to a custom destination for each task list.
If attachments are uploaded to a folder, then
folder permissions
apply, and attachments can trigger workflow rules
.Details
tab to finish creating the task or click Add
to add the task.Edit a task
To edit a task, select the title of the task. The task window opens and you can edit the task details.

Select the  next to a task field to change the contents.
Edit
icon next to a task field to change the contents.Once you have submitted the task edits, the assignee will receive an email notification showing the changes.

Each time the task is changed, an email alert is sent.
Delete a task
You can delete a task by selecting
More actions then Delete
in the task window. 
note
If a parent task is deleted, all sub-tasks will also be deleted. Please note that this action is irreversible.
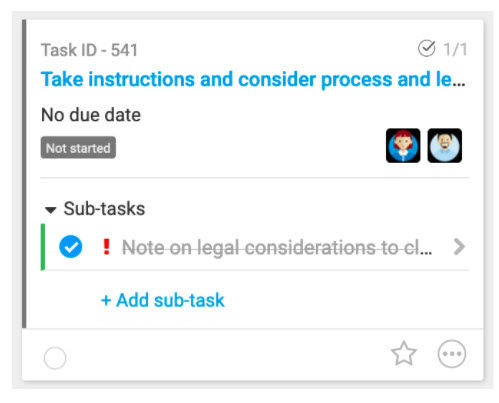
Sub-tasks
Sub-tasks are helpful when you need to break up a task into smaller parts and divide it between different assignees. You can include the same types of information in a sub-task as a parent task. Each task can have a maximum of 20 sub-tasks.
Add or edit a sub-task
There are several ways to add or edit a sub-task:
- From the task window- Click+ Add sub-taskin the Sub-tasks section of a task window. Type the title of the sub-task and hit enter to add the sub-task. You can click the arrow to access and edit the sub-task information

- From List View- You can add a sub-task to any task in List View by toggling open the task and clicking+Add sub-task. Hit enter to add the sub-task, and click on the title to access and edit the sub-task information

- From Card View- If a task already has sub-tasks attached to it, toggle open the Sub-tasks section in a card and click+Add sub-task. Hit enter to add the sub-task, and click on the title to access and edit the sub-task information
If a task doesn't have any sub-tasks attached to it, click
More Actions then Add sub-task
to create a new sub-task. 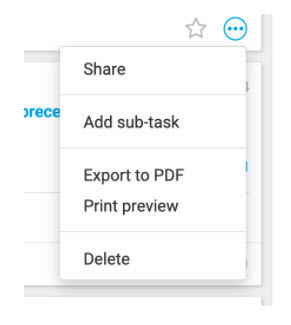
note
To turn off sub-tasks in a task metadata iSheet, please click here.
Track sub-tasks
You can view the number of sub-tasks in a given task from the top shortcut menu in a task window.
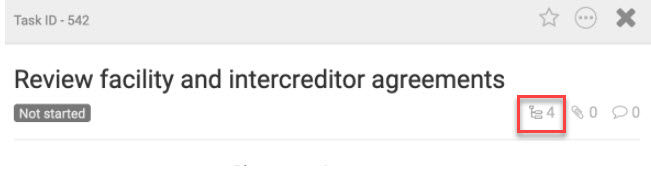
You can also track the number of sub-tasks completed in a given task via the sub-task progress icon in List View and Card View.
As of July 2024, by default, sub-tasks are displayed in the
Assigned to me
tab, even if you are not assigned the parent task.In the
Tasks
module, select the Assigned to me
tab.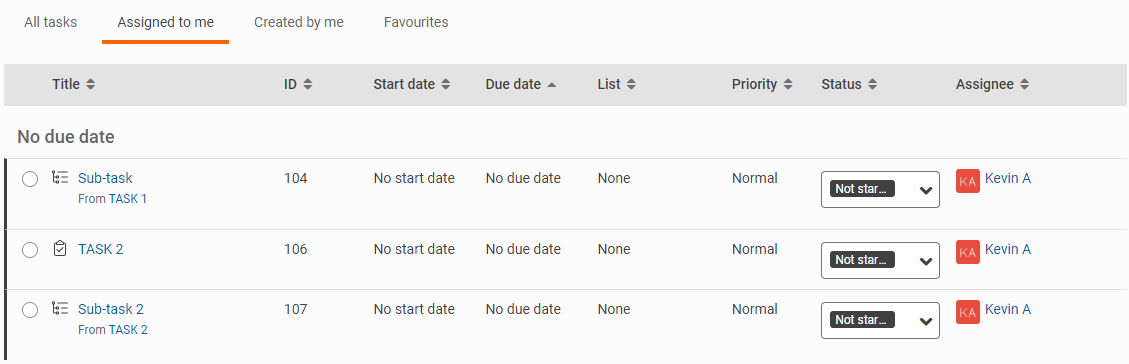
The list contains all tasks and sub-tasks assigned to you.

note
You can also filter and search for both tasks and sub-tasks in the
Assigned to me
tab.Completing sub-tasks
When all sub-tasks are completed, you can choose to complete the parent task, and when a task is completed, you can choose to complete all sub-tasks:
- When all sub-tasks are marked asComplete, you can choose to mark the parent task asComplete
- When the parent task is marked asCompleteyou can choose to mark all sub-tasks asComplete
- Also, if a sub-task is changed fromCompletetoIn Progress, the parent task is also changed toIn Progress

Task statuses
The default task statuses are Not Started, In Progress and Complete. It is possible to rename, reorder, colour-code and add custom statuses.
A fourth default status, Overdue, is a virtual status. A task becomes Overdue when it is not set to Complete and the due date has passed. Completed tasks titles are struck through and when a task is set to complete, it can no longer become Overdue.
Add a custom status
You can add custom task statuses that are colour-coded. These can be added by using the
Add column
button in Card View when grouped by Status.
You can also add custom task statuses in
Admin, Tasks, then Custom statuses.

A user can create a custom status with the
Add
button and choose a name and background colour for that status from a list of predefined colours, or select their own custom background and text colour. Once a name and colour have been selected, click Add
to add the new status.
Delete a custom status
To delete a custom status, select on
More actions, Edit within Admin, Tasks, then Custom statuses
. 
If a user attempts to delete a status that is associated with one or more tasks, a window will display asking you if you're sure you want to remove the task status.
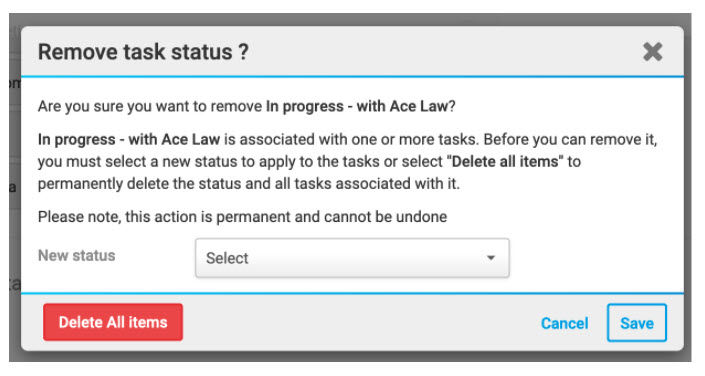
You can either delete all of the associated tasks by clicking
Delete All Items
or you can select a new status within the New Status
drop-down menu and click Save
to move them to the new status and to complete the delete process.Task dependencies
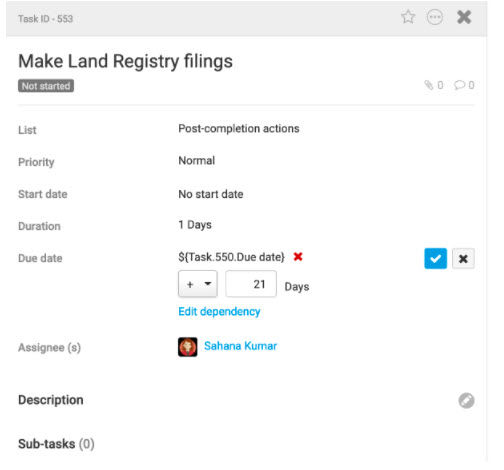
When a task depends on the start or the completion of another task, you can use the
Add dependency
feature within the Start date and Due date fields in the task window to set this relationship.This means that once a first task is started or completed, the assignee for a dependent task can be notified to start on their task.
A parent task can be dependent on the start or due date of any other parent task, but not a sub-task.
A sub-task can be dependent on the start or due date of its parent task, or any of the other sub-tasks it shares a parent task with, but not another parent task.
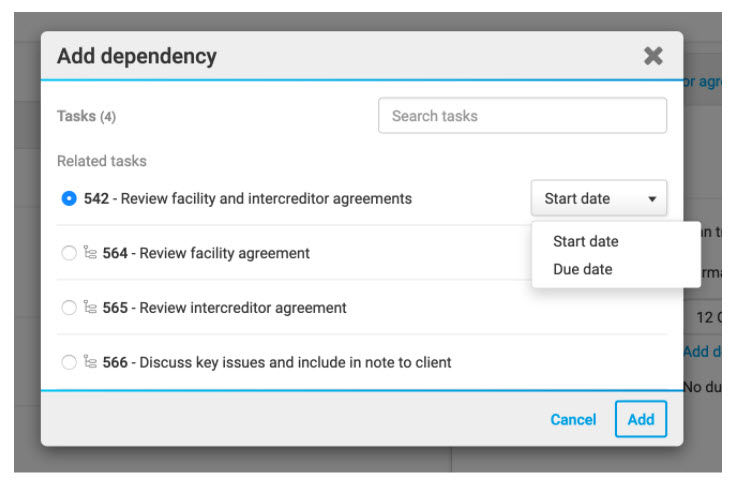
You can also set the start or due date of a task to calculate a selected number of days before or after the reference date of a dependent task. For example, the due date for the task "Register security" can be set as 21 days after the due date of the task "Sign security agreement".
Task lists
Lists and sub-lists allow you to categorise tasks and sub-tasks for better project management. Lists can be used to describe the bigger workstreams, or phases, within a transaction or matter.
For example, in a litigation matter, you could set up a list for disclosure, one for witness statements, and one for expert reports. You can further break down individual lists into sub-lists to categorise the tasks within them. Within the 'Witness statements' list, you can break that down and have a sub-list for 'Drafting', one for "Information gathering", and one for 'Interviews', and then allocate tasks within those sub-lists.
note
Lists and sub-lists are best viewed using the Hierarchy View, where the multi-level hierarchy is displayed in full.
All lists and sub-lists have a title and a position (with regard to other lists).
Add a list/sub-list
You can create up to five levels of lists (i.e. lists and sub-lists) and each level can have up to 20 sub-lists.
Lists and sub-lists can be created in four ways:
- From Tasks admin - Top-level lists can be created fromAdmin > Tasks > Lists. By default, there is a None list for any tasks that do not have an associated list. Type in the name of your list and hit enter to create the list.
- From the Add task modal window - When creating a task in the Add task modal window, if a list does not already exist, you can clickAdd new listand select where the new list/sub-list should be located for the new task to be added to it.
- From Hierarchy view - From the Add button in Hierarchy view, you can choose to add a list. AnAdd listmodal window will open, where you can type in the list name and select its location to create a list/sub-list.
- From Card View - When Card View > Group by: List is selected, you can clickAdd columnto add a new top-level list.
Once a list is created, you can select it from the List field when adding or editing a task. If a top-level list is created, you can also group and view tasks belonging to this list in the different view settings.
Edit or reorder a list/sub-list
Lists can be edited or reordered via the following:
- From Tasks admin - Top-level lists can be renamed and reordered fromAdmin > Tasks > Lists.
- From Hierarchy View - You can edit a list/sub-list by clickingMore Actionsagainst the relevant list in Hierarchy View. TheEdit listwindow opens, where the list name and location can be changed.
- From Card View - When Card View > Group by: List is selected, you can clickMore Actions > Renameagainst the relevant list title to rename it, or drag and drop a list column to reorder the lists.
note
Use the Tasks admin page to archive or delete lists and set list permissions.
Import, Export and Share tasks
Import tasks
Tasks can be imported from Excel, allowing you to quickly create or update many tasks.
note
To import a great number of tasks, we recommend you divide the tasks into convenient batches and use multiple Excel files to spread out processing requirements.
Import tasks from Excel
If you already have a set of tasks in an Excel spreadsheet and you wish to import them into the site, first download a blank import template from the Tasks module via
More actions then Export as template
.
Follow the instructions below to set out the details of your lists, sub-lists, tasks and sub-tasks in the correct format in the
Excel template
, then follow the steps to import the tasks.If you wish to import tasks from an existing site, you can either use the task templating method, or import tasks via Excel. To import tasks from Excel, first, export your tasks from an existing site using the
Export as template
function.This will export and download the tasks to your machine. To prepare the Excel template for import into a new site, delete all the numbers in the ID column in the Excel Spreadsheet, as well as the
None
list.

note
If
Timeline
view is enabled within the existing site, the tasks will have both start dates and due dates. To import the dates into the new site, make sure that Enable Timeline view
is selected in the Tasks admin
section.Once the Excel template is ready, in the Tasks module within the new site, click
More actions
then Import from Excel
. The Import
screen opens.
Browse
your computer for the file to import, or drag and drop the file to the Import screen.You may choose to import start and due dates and assignees, but assignees must first be a member of the site if this option is chosen. Click
Next
to import the files.An Import screen is displayed, detailing the number of records that you will import, any new records to add, how many records to update and also any warnings or errors. Click
Import
to import the data.Any custom lists and statuses will be automatically created as part of the import process if they do not exist on that site.
Bulk editing tasks via Import from Excel
To bulk edit tasks using the Import from Excel function, navigate to
More actions
then Export as template
. 
This will open the tasks in the Excel template format.
Make the changes you require in the Excel file - please follow the format documented here. Do not delete the IDs in the ID column if you are bulk editing as the system will use the ID to match the items to update on import. Any line items without an ID will be treated as a new record on import.
note
Please note that it is not possible to delete lists, sub-lists, tasks or sub-tasks using the Import from Excel method, so any deletions made in the Excel template will not be reflected on import.
Once the changes are made, navigate to
More actions
then Import from Excel
.
And select the file with the amendments to import.
note
When tasks are updated in bulk using Import from Excel, the modified by and modified date for every task will be updated by the import. Please consider any workflow rules that may be triggered by these fields as well as any notification settings.
Export tasks
There are several ways to export tasks:
- Export to PDF- this function is available in List view and Card view viaMore actions>Export to PDF. Exporting to PDF will display tasks as individual cards in the PDF, with sub-tasks displayed within them. Any filters applied to the view at the point of export will apply.
- Export to Excel- this function is available in all views viaMore actions>Export to Excel. Exporting to Excel will display tasks and sub-tasks as line items in an Excel spreadsheet. Any filters applied to the view at the point of export will apply.
- Export as template- this function is available in all views viaMore actions>Export as template. See below for more information.
note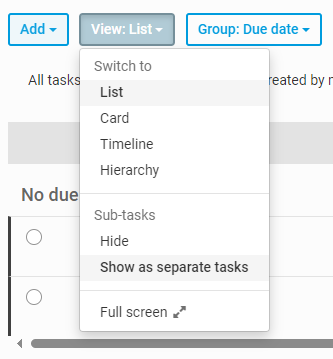
As of July 2024, by default, tasks and sub-tasks are displayed as separate items when you search the List view and also in the exported list.
Export as template
The
Export as template
function allows you to export all lists, sub-lists, tasks and sub-tasks, including any data hidden from an applied filter, into an Excel template. This template can import the tasks into a new site or bulk edit tasks in the current site. To export tasks as a template, navigate to More actions
then Export as template
.
The lists, sub-lists, tasks and sub-tasks will be displayed as they are shown in Hierarchy view, with outline numbers governing the hierarchy of lists and sub-lists.
note
Please note that if you wish to edit tasks using the Export as template method, do not delete the IDs in the ID column as the system will use the ID to match the items to be updated on import.
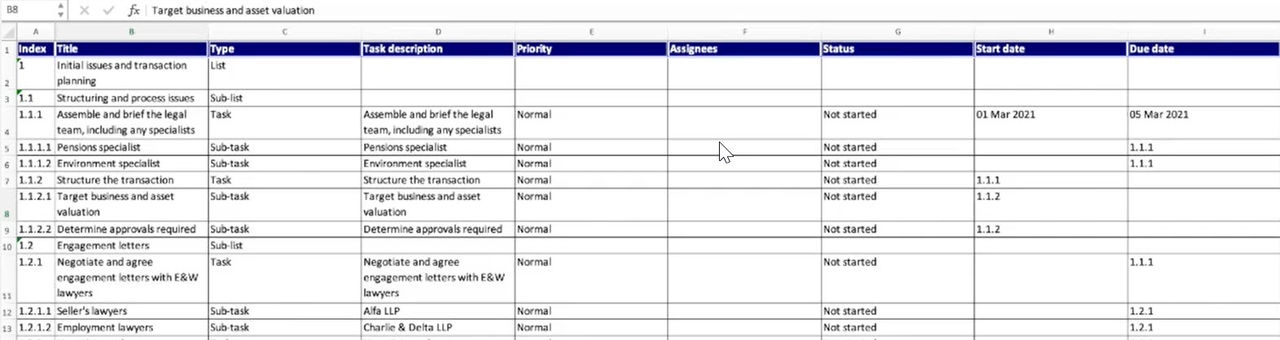
The columns in the Excel template should be completed as follows (* denotes a required field):
- Index* - this manages the hierarchy and relationship between lists, sub-lists, tasks and sub-tasks. The outline numbering system is used to specify different levels, with integers always representing lists
- Title* - this is the title of the list, sub-list, task or sub-task
- Type* - this is where you specify if the line item is a list, sub-list, tasks or sub-task
- Task description- this field is only applicable to tasks and sub-tasks. You can fill in a description of the task and include any hyperlinks if required
- Priority- this field is only applicable to tasks and sub-tasks. You can set the priority as High, Medium or Low
- Assignees- this field is only applicable to tasks and sub-tasks. Enter the email address of an assignee, or the name of a site group followed by "[Site group]"
- Status- this field is only applicable to tasks and sub-tasks. You can use the default statuses of Not started, In progress or Complete, or you can set custom statuses in the template, which will create the status when the template is used in a site
- Start date- this field is only applicable to tasks and sub-tasks. If start dates are used in the template, then Timeline view must be enabled for the start dates to be included when using the template. You can specify actual dates in the template. You can also set a task's start date to be dependent on another task's start or due date. To set a start date dependency, specify the Index number of the task on which it is dependent in the cell (e.g. 1.3.2)
- Due date- this field is only applicable to tasks and sub-tasks. You can specify actual dates in the template. You can also set a task's due date to be dependent on another task's start or due date. To set a due date dependency, specify the Index number of the task on which it is dependent in the cell (e.g. 1.3.2)
- Dependent on- this field is only applicable to tasks and sub-tasks. If a dependency to another task is set in the start or due date field, you will need to specify whether it is dependent on the other task"s start date (input "startdate") or due date (input "duedate")
- Days from dependent- this field is only applicable to tasks and sub-tasks. If a dependency to another task is set in the start or due date field, you can set the start or due date to be a specified number of days before or after that reference task. For example, for 5 days before the reference task, input "-5"; for 10 days after the reference task, input "10"
- IgnoreWeekend- this field is only applicable to tasks and sub-tasks. The duration calculation (see "Duration" below) can be set to ignore weekends (input "Yes") or not (input "No")
- Duration- this field is only applicable to tasks and sub-tasks. If a dependency to another task is set in the start or due date field, you can specify the duration of the task for the system to calculate the corresponding start or due date. Input whole numbers for the duration of the task
- ID- this is a system-generated field. Do not delete the ID if you wish to edit the template as the system will use the ID to locate the list/sub-list/task/sub-task to be updated on import
Share tasks
You can share your tasks the same way you would as if you were in Card view or List view. Navigate to
More actions
then Share
.
The
Share
screen opens.
From this screen, you can share via
Email
, Link
, Message
and Microblog
. Enter the recipients and the optional message and click Send
. Printing and Print preview
You can print an individual task. Navigate to print preview by clicking
More
actions then Print preview
in the task window.
You can print the individual task from print preview.

You can also print all of the tasks shown in Card View or List View by clicking
More actions then Print preview
. This will apply any filter or grouping selected. 
note
As of November 2023, links in the print preview open the original URL defined in the task.