
Configuring alerts
Alerts are email notifications that are set up by Administrators about certain events and actions for a Document. Authors can enable alerts for their Templates and these alerts will be automatically applied to all Documents, created from these Templates. Users can then subscribe to alerts for Documents to receive email notifications when alert has been triggered.
Creating new alerts
To create a new alert:
- Go toAdmin>Alerts.
- Define the parameters of the alert:
- Title- name of the newly created alert (mandatory parameter). It is recommended to give the alerts meaningful names so that it is easier to understand what the alert is for.
- Description- use this parameter to explain the purpose of the alert.
TitleandDescriptionof an alert is displayed for all users with sufficient access rights to view a template and/ or a document that use this alert.
Triggers
The alert trigger defines a condition, upon which the system will send an email notification. Notifications can be sent immediately or with a configured delay.
To define the trigger rule for an alert:
- In theTriggersection select a variable or metadata field by clicking on the more options icon
 .
. - Choose the operator for the condition by selecting the second dropdown menu.
- Enter the value that defines the condition, which when true, will send out email notifications.
If you need to add multiple trigger conditions, click
+
to add another row. Select the operator to combine two trigger rules:- - all conditions must be true for this alert to be triggeredAND
- OR-at least one condition must be true for this alert to be triggered
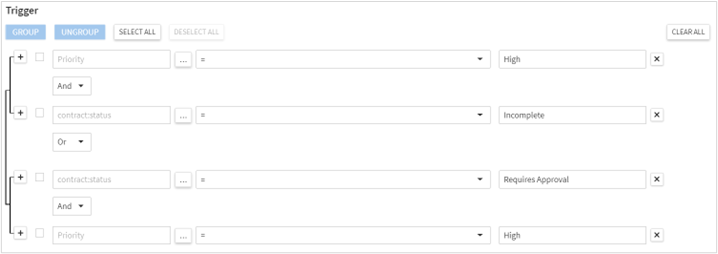
Where there are multiple conditions, you can group them to determine the order in which they are applied. For example, to get an email notification about new documents with high priority, we can configure the trigger as follows:
- The Document status is either Incomplete or Requires Approval.
- The value of a template variable Priority is set by the User toHigh.
To configure this trigger, we need two groups of conditions defining the Status and the Priority value, where Status is Incomplete, the template variable Priority is High and where Status is Requires Approval and the template variable Priority is High. Defining this in the Trigger rule, we would:
- Add a row with “Status”+“=”+“Incomplete”.
- Add a second row with “Priority”+“=”+“High”.
- Add a third row with “Status”+“=” + “Requires Approval”.
- Add a fourth row with “Priority”+“=”+“High”.
- Select the checkbox for the first and second rows.
- ClickGroupto group the first 2 conditions together.
- Select the checkbox for the third and fourth rows.
- ClickGroupto group the second 2 conditions together.
- Select “Or” in the last dropdown menu of the first group.
Contract Express evaluates the trigger for documents created using templates that have this alert enabled every time someone changes the document. You can define whether Contract Express should send an email notification every time the Document has been changed and still meets the alert trigger condition, or only the first time the alert is triggered. Check
Send alert every time it meets the criteria above
to send email notification every time the Document changes and still meets the alert trigger condition.Send-out rules
Alert notifications can either be sent immediately when the Document is changed in a way to meet the criteria defined in the trigger condition or sent after a specified period.
To configure the rules for sending out email notifications for an alert:
- If you want the system to send an email notification straight after the trigger condition has been met: in theSend-out Rulesection, chooseSend immediately.
- If you want the system to send an email notification with a delay: in theSend-out Rulesection choose theSend with delayoption, and configure the delay below:
- Set the duration of the delay. Input a number of units (days/ months/ years) or select a variable or metadata field by clicking on the…icon in theNumbercolumn.
- Select the units (days/ months/ years) in which the delay is calculated in theUnitscolumn.
- Define in theBefore/Afterdropdown whether you want the system to send the notification before or after the Date variable.
- SelectDate variablein the corresponding column – this date is used as a basis for calculation of the delay. Click the…icon and select a template variable or metadata field.
noteYou may use the metadata fieldTrigger dateto calculate a delay based on the date when alert has been triggered. At that, the notification can only be sent after the trigger date, i.e. if you have chosenTrigger date, you can only chooseAfterin theBefore/Aftercolumn.
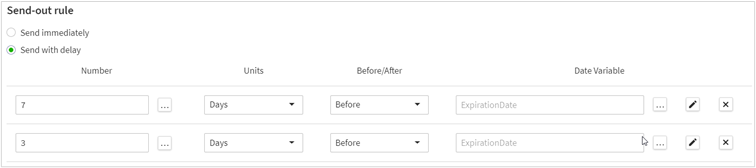
You can configure multiple notifications for an alert. For example, if you want the system to send the notifications twice, 7 days before the “Expiration date” (template variable) and 3 days before the “Expiration date”, you should configure the send-out rule as follows:
Using CEML Editor to calculate Date Variable
If there is no appropriate date variable for calculation of the send date, you can calculate it using CEML Expression Builder.
CEML
(Contract Express Mark-up Language) is a distinct set of functions and variables using which, one can easily create expressions to evaluate the time of delivery of the alert. These are the same variables and functions, which are used during the template authoring process.To create a CEML Expression:
- Launch CEML Expression Builder by clicking
 button in the Date Variablecolumn in theSend-out Rulesection.
 - Insert needed CEML function by clickingInsert functionand choosing the function from the dropdown list. You can nest functions (use one function as an argument of another function), if needed.
- Insert template variables, if needed, by clickingInsert variableand choosing the template and the variable from the dropdown lists.
note
Make sure that the CEML Expression you have created returns a value of date type. To do that, check in the specification that CEML function you use returns date.
For example, if there is no template variable that indicates contract expiration date, but you have a variable “SigningDate” that indicates the signing date, you can calculate expiration date for 1-year contract using “YearsAfter” function.

You can find the description of CEML functions in the Contract Express Author Help, available from the “Getting Started” button in the Contract Express ribbon in Word (you will need Contract Express Author installed).
Contract Express Author supports an extensive list of functions. CEML Editor in Contract Express supports a selected set of functions focused on date calculation, that is:
Function Category | Function | Description |
|---|---|---|
Arithmetic | * | arithmetic multiplication |
+ | arithmetic addition | |
- | arithmetic subtraction | |
/ | arithmetic division of a first number by a second number | |
// | arithmetic division of a first whole number by a second whole number rounded down to the nearest whole number | |
Abs | the non-negative or absolute value for the given number | |
Larger | the larger of the two numbers | |
Mod | the remainder after the first number is divided by the second number | |
Power | the first number raised to the power of the second number | |
Sign | determines if a number is positive, negative or zero | |
Smaller | the smaller of two numbers | |
Sqrt | the square root of a number | |
Round | round a number up/down to the nearest decimal place | |
RoundDown | round a number down to the nearest decimal place | |
RoundUp | round a number up to the nearest decimal place | |
Truncate | truncate a number to a decimal place | |
Data Type | DataType | the datatype of a value |
Date Functions | Date | construct a date value from year, month and day components |
ISODate | convert a text value in ISO format to a date value | |
Today | today's date | |
Day | the day component of a date value | |
Days360 | the number of days between two dates assuming 360 days in a year | |
DaysAfter | the date which is a number of days after a date | |
DaysBefore | the date which is a number of days before a date | |
DaysBetween | the number of days between two dates | |
NearestWeekdayAfter | the date of the nearest weekday after a date | |
NearestWeekdayBefore | the date of the nearest weekday before a date | |
Weekday | the weekday number of a date | |
EndOfMonth | the last day of the month as a number | |
Month | the month component of a date value | |
MonthsAfter | the date which is a number of months after a date | |
MonthsBefore | the date which is a number of months before a date | |
MonthsBetween | the number of months between two dates | |
Year | the year component of a date value | |
YearsAfter | the date which is a number of years after a date | |
YearsBefore | the date which is a number of years before a date | |
YearsBetween | the number of years between two dates | |
Logic | Is | test that a value equals another value |
IsAtLeast | test that a value is more than or equal to another value | |
IsAtMost | test that a value is less than or equal to another value | |
IsLessThan | test that a value is less than another value | |
IsMoreThan | test that a value is more than another value | |
IsNot | test that a value is not equal to another value | |
Not | boolean negation | |
Or | boolean disjunction | |
And | boolean conjunction | |
If | if a boolean then return a value else return another value |
Notification settings
To configure the notification settings for an alert:
- Scroll down to theNotificationsection of the alert details page.
- SpecifyRecipients, if needed.
- All users creating a document from the template associated with the alert will be automatically subscribed to this alert. If you want to subscribe someone specifically, you can add them as aRecipient.

- Recipient can be defined as a User, Group or Variable. When the variable option is used, the recipient will be derived from a computable variable which contains questionnaire inputs. This computable is defined in the same way as variables used as approvers. For more information, see Author Help article “Allow users to select an approver during the questionnaire”.
- To make the recipient conditional upon a rule that is based on questionnaire inputs, add recipient as a Data driven recipient. In this section you need to specify the rule which will be tested to decide if the recipients added below the rule are valid for the specific contract. Note that you can only use Yes/No variables to define the rule.noteYou can only use Yes/No variables to define the rule and the person you set as a recipient or data-driven recipient will get the notifications generated by the alert regardless of whether the document has been shared with them.
- Add theSubjectfor the email.
- You can use values of template variables or metadata parameters in your Subject. To insert them, clickAdd variableand choose the needed parameter.
- If you have not specified the Subject, the system will use the default subject that is displayed as a placeholder in the Subject field.
- Add theBodyfor the email.
- You can use values of template variables or metadata parameters in your Body. To insert them, clickAdd variableand choose the needed parameter.
- If you have not specified the Subject, the system will use the default subject that is displayed as a placeholder in the Body field.
Alert usage
Administrators can view the list of templates that use an alert in the
Used in Templates
column on the list of alerts, or in the Used in Templates
section of the alert details page.