Using the Markup Editor
The
Markup Editor
provides a way for you to view, edit, insert or delete fields and spans in the template. To open the Markup Editor
, click on the Markup Editor
icon from the Contract Express
tab.
With the
Markup Editor
you can:- View all spans and fields in the template
- Edit existing spans and fields
- Insert fields and spans into the template
- Delete spans and fields in the templatenoteNote that deleting or editing fields that are variables will not edit the definition of the variable in the dictionary. Variable definitions should be edited or deleted via the Dictionary Editor
As you move your cursor around the document, Markup Editor will refresh automatically to display the expression that the cursor is on. When you start to make an edit to an expression, automatic navigation will pause to ensure you don’t lose your changes. For more information, see below,
Updating markup using the Markup Editor
.Docking and undocking the Markup Editor to the task pane
When the Markup Editor is opened for the first time, it floats over the top of the Microsoft Word Document in an "undocked" state. This mode works very well if you are using dual monitors as the Markup Editor can be opened on one screen with the document open on another screen.
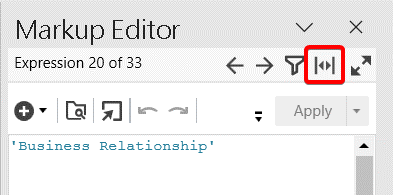
For those users who only have a single screen you may wish to "dock" the Markup Editor into a task pane. To do this, click on the Dock icon in the Markup Editor Toolbar as highlighted below:
When the Markup Editor is docked it will appear in the task pane on the right side of Word. You can undock again by clicking the dock button in the Markup Editor Toolbar.
Choose what markup is displayed using the Markup Editor
Applying a filter and/or a search to the Markup Editor will determine what type of markup is selected when navigating through markup. Most of the filter parameters can be used in conjunction with each other to build a search query. To apply a filter or search click on the filter icon from the toolbar.
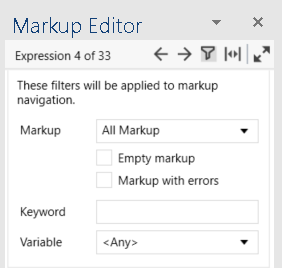
The first dropdown allows you to choose whether to navigate to only fields, only spans or all markup. This selection will be used in combination with other filter/search settings. Select the appropriate option.
The next option allows you to choose whether to display:
- Only empty markup
OR
- Only markup with errors
This option is sensitive to the selection from the Markup dropdown. For example if "Spans only" is selected from the Markup dropdown menu and "Only markup with errors" is selected, the Markup Editor will only navigate to spans that have errors. This option cannot be used in conjunction with the Keyword and Variable parameters below.
The Keyword field allows you to perform a free text search across the markup. This option is sensitive to the selection from the Markup dropdown. For example if "Fields only" was selected from the Markup dropdown menu and the text "NDA" is entered, the Markup Editor will only navigate to fields that contain the text "NDA".
The Variable dropdown menu allows you to search for markup that contains the selected variable. This option is sensitive to the selection from the Markup dropdown. For example if "Fields only" was selected from the Markup dropdown menu and the variable "NDAPurposeOther" is selected, the Markup Editor will only navigate to fields that contain the variable "NDAPurposeOther". When a variable is selected, the navigation order of the markup can be set by choosing whether the navigation starts with the most constrained occurrence of a variable or least constrained occurrence of a variable by selecting the appropriate option.
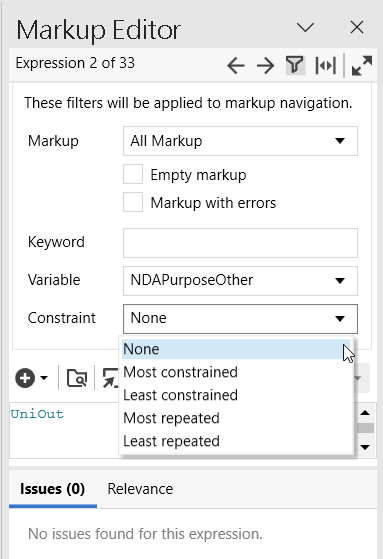
Choosing "Most constrained" will navigate to the occurrence of the variable that has the most relevance conditions. Using the right navigation button, this will navigate to the next occurrence of the variable that has the next most relevance conditions until it navigates to the last occurrence of the variable that has the least relevance conditions.
Similarly, the "Least constrained" option will navigate to the next occurrence of the variable that has the least relevance conditions.
Click on the Filter icon to remove all search and filtering.
Walking up the tree structure of nested spans of text
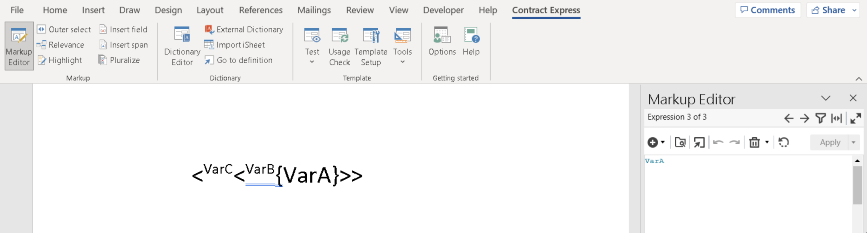
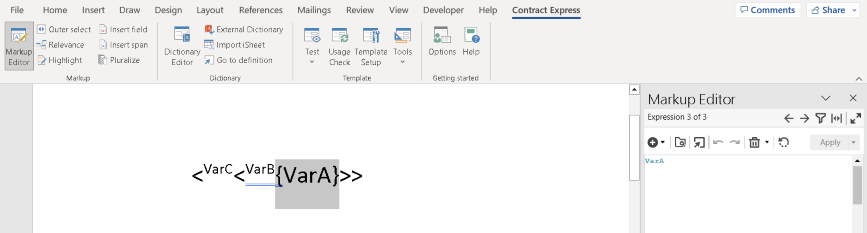
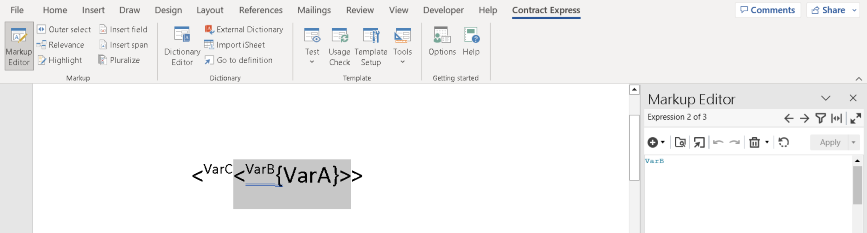
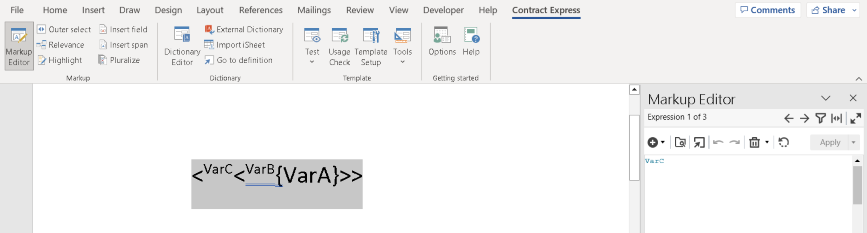
It is possible to create deeply nested spans of optional or repeating text within a Contract Express template. When deep nesting occurs it is important to be able to walk the structure of the nested optional spans from the innermost span to the outermost span. The “Outer select” button on the toolbar of the Markup Editor performs this walking of the nested structure.
In the following simple example the cursor is placed inside the field containing the variable VarA. The “Outer select” button is then pressed and the variable is highlighted. Pressing again selects the repeat span and this continues until the outermost span is highlighted.
Updating markup using the Markup Editor
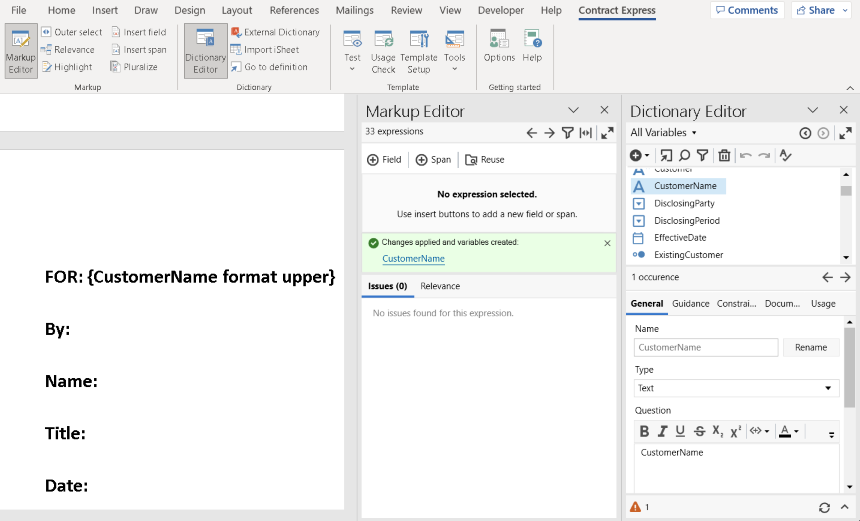
It is possible to update markup using the
Markup Editor
. To do this, click the Markup Editor
in the Ribbon and navigate to the span that you would like to update using the left/right arrows or by clicking into the span in the document.
Edit the text in the Markup Expression field then click
Apply
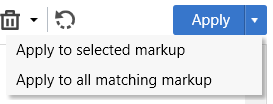
at the top of the task pane.By clicking on the arrow on the Apply button, you can choose whether to only update that single occurrence of the span/field that is selected by clicking
Apply to selected markup
. Alternatively, you can choose to update all occurrences in the template of the selected span/field by clicking Apply to all matching markup
.
You can revert any edits that have been made to the markup before clicking update by clicking on the Reset icon 
When you start to make changes in the Markup Editor, automatic navigation will automatically pause to ensure you don’t lose your changes. The following message will appear at the bottom of the Markup Editor to indicate this change:

If at this point you try to navigate away from your edited expression using the previous and next occurrence buttons, the outer span button, or the filter button on the Markup Editor toolbar, you will be presented with the following options to ensure you don’t lose your work:
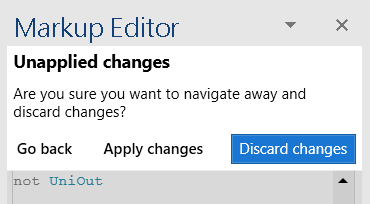
- Go backwill take you back to the originally selected expression in the Markup Editor so you can continue to make edits.
- Apply changeswill apply your changes to the originally selected expression in the document and will move the cursor to the new expression you were trying to navigate to.
- Discard changeswill discard any changes you made to the originally selected expression and move to the latest one you clicked into.
note
Note that it is not possible to edit the definition of a variable that is in a field. This must be edited using the Dictionary Editor.
Inserting markup using the Markup Editor
It is possible to insert spans and fields into your template using the
Markup Editor
.Inserting a new span
To insert a new span using the Markup Editor, highlight the text in the template that you want to be controlled by the span.
If the text you have highlighted does not contain any markup, Markup Editor will automatically display a button to add a new 
Span
.
If the text contains markup, press the add icon  in the Markup Editor toolbar and select
Insert span
from the dropdown.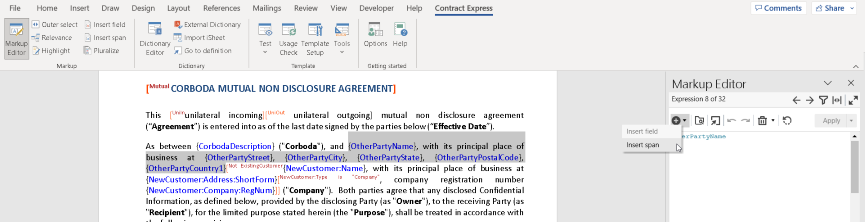
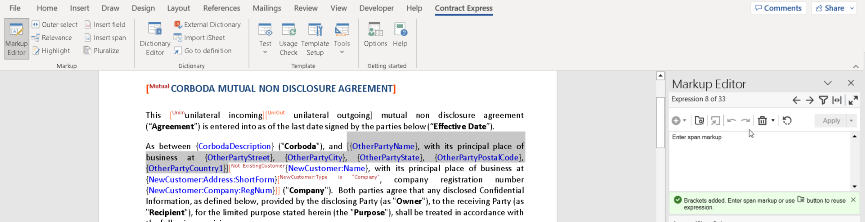
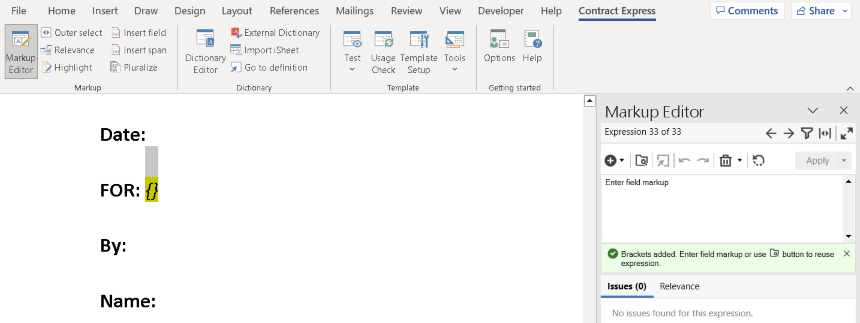
This will automatically place span brackets around your selected text and the Markup Editor will display “Enter span markup” where you can type the span rule.
Inserting a new field
To insert a new field using the Markup Editor, place your cursor where you wish the field to be inserted or highlight the text you want to replace with the field, then press the  in the Markup Editor toolbar.
Field
button in the Markup Editor toolbar.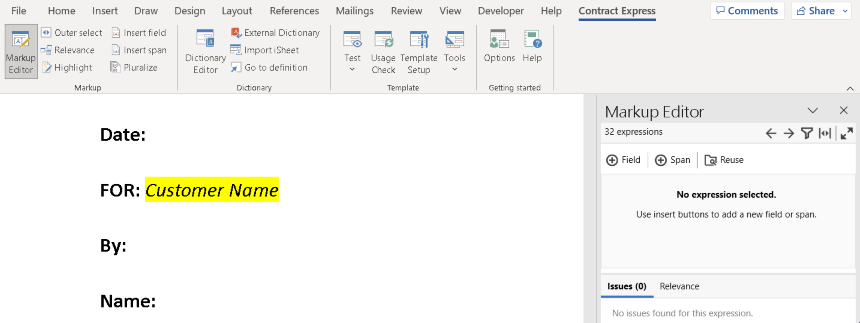
This will automatically replace any selected text with field brackets and the Markup Editor will display the placeholder text “Enter field markup” where you can type in your field.
Reuse a field or span
To insert an  in the Markup Editor. The reuse tool contains all the fields and span rules currently used in the template plus any Yes/No type variables that exist in the dictionary.
existing
field or span around your highlighted text, select Reuse button in the Markup Editor. The reuse tool contains all the fields and span rules currently used in the template plus any Yes/No type variables that exist in the dictionary.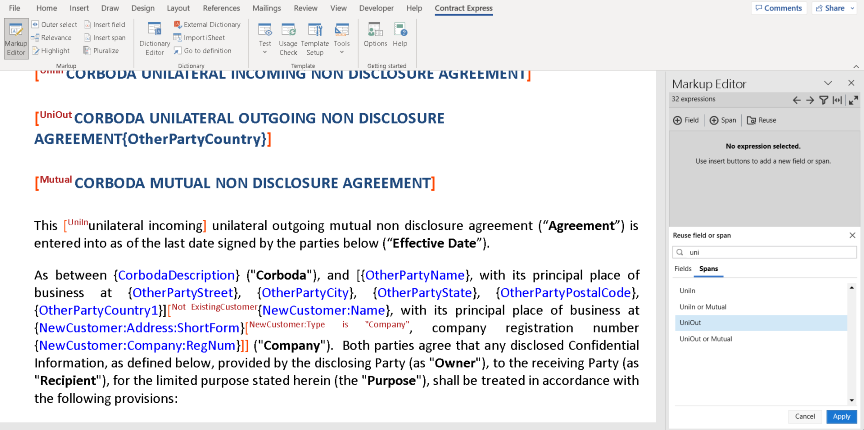
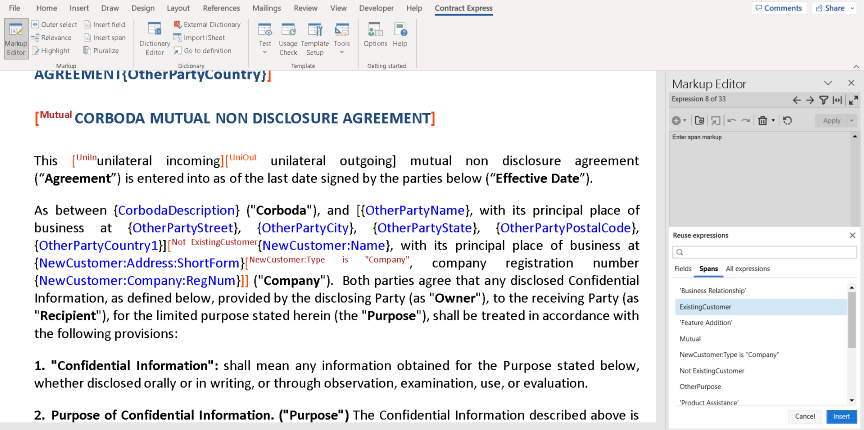
To add a field or span from the reuse window, double-click the rule or select it and then click
Apply
.You can also access the Reuse tool when editing an existing or new expression by clicking on its icon  in the toolbar. Either double-click the rule or select it and then click insert. This will add it to the Markup Editor where you can tweak it as needed.
Finally, click
Apply
to insert the expression drafted in the Markup Editor into the document.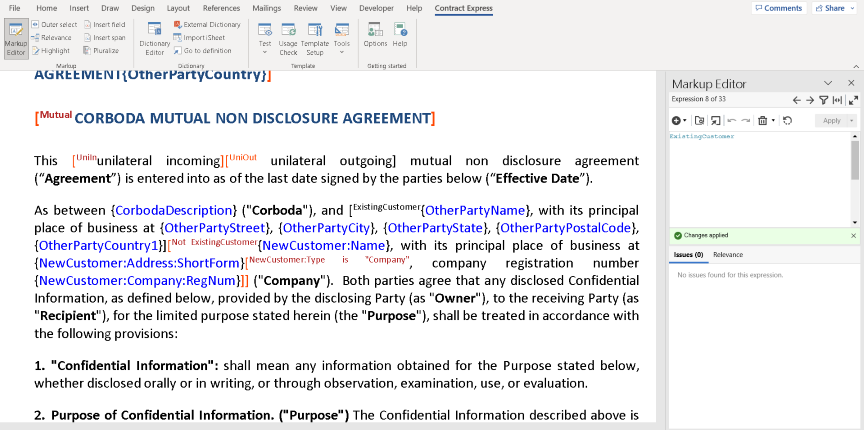
New variable detection
You can enter new variables into the document using the Markup Editor. When you apply an expression that contains a new variable name, a new variable will be automatically created in the Dictionary.
The Markup Editor will display the link to the newly created variable at the bottom of the panel, click the link to navigate to the variable in the Dictionary Editor and edit the details as needed.
Deleting Markup using the Markup Editor
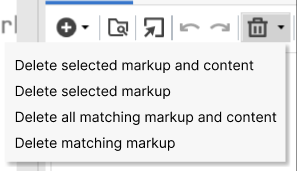
To delete a field or a span, click the Markup Editor in the Ribbon and use the left/right arrows to navigate to the field/span that you would like to delete.
Click on the Delete option  in the toolbar to delete that field/span. By clicking on the arrow on the Delete button, you can choose whether to:
- Delete selected markup and content:this will delete the markup and the content within the markup for this single occurrence only
- Delete selected markup:for this single occurrence, the markup will be deleted but the content within the markup will remain as plain text
- Delete all matching markup and content:this will delete the markup and the content within the markup for all occurrences
- Delete matching markup: for all occurrences, the markup will be deleted but the content within the markup will remain as plain text
note
Note that it is not possible to edit or delete the definition of a variable that is in a field from the template dictionary. This must be deleted using the Dictionary Editor.
Relevancy at a point in the document
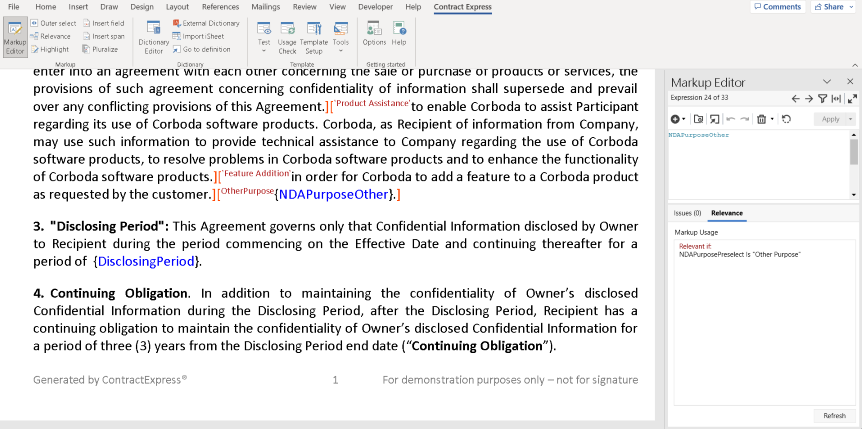
A key component of the Contract Express solution is the automatic determination of relevancy between variables. This relevancy information is necessary for Contract Express to automatically generate the decision tree within the questionnaire. Using the Dictionary Editor to find out how to determine the overall relevancy of an individual variable within the dictionary. In addition to the overall relevancy of an individual variable it is often useful to select individual points in a document and find out the relevancy statement at that point. For example, the questionnaire may not be behaving exactly as you expect. The reason for this might be due to the location of a single instance of a variable in the document not being within the correct spans as the others. The Usage tab in the Markup Editor can assist with troubleshooting issues like these.
To determine the relevancy at a particular point in the document, open the Markup Editor and use the navigation buttons to navigate to the field/span occurrence of interest using and click on the Usage tab. In the simple example below, the Usage tab is selected for the field {NDAPurposeOther}.
note
Note that this is looking at the local relevance of this location in the document and not the overall relevancy of all instances of the NDAPurposeOther.
Navigate between uses of markup in the template
Use the forward and back arrows in the Markup Editor Taskbar  to highlight the next/previous instance of markup in the template. Note that if a filter has been applied this will affect the navigation (e.g. if the filtering is set to only display spans, the navigation will only ever pick up spans and will bypass fields).
to highlight the next/previous instance of markup in the template. Note that if a filter has been applied this will affect the navigation (e.g. if the filtering is set to only display spans, the navigation will only ever pick up spans and will bypass fields).Go to definition
Place the cursor inside a variable name in the Markup Editor and click on the go to definition icon  in the Markup Editor toolbar to navigate to the variable’s definition in the Dictionary Editor.
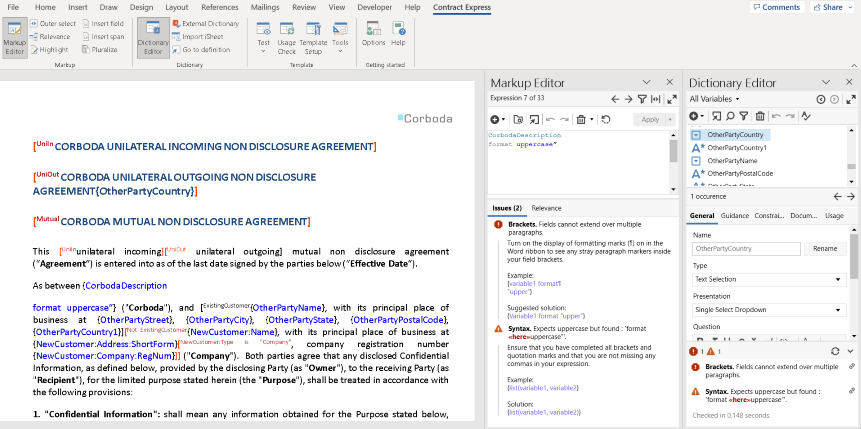
Review Issues of Selected Expressions
The Issues section in the Markup Editor will show any Usage Check errors related to the current expression displayed, as well as additional troubleshooting information to help you resolve them.
Click the refresh icon in the Dictionary Editor Taskbar  or the Usage Check button in the ribbon to scan the mark-up in the current document and refresh the dictionary.
Clicking an issue in the Usage Check list that can be resolved using the Markup Editor will automatically open the related expression in the Markup Editor.