Troubleshoot: Unable to add documents to binder or TaxCaddy Client Profile
Document Validation
When uploading files on the
Create New Binder
and
Add Documents
window in FileRoom, SurePrep automatically begins checking files for errors and compatibility. Similarly, when you or your client upload documents to the client profile in TaxCaddy (default 1040 tax return profile only), SurePrep will automatically begin checking files for compatibility.
Validating files during upload helps catch files that are damaged, unsupported, or password protected. If you see an error message in FileRoom or a tooltip in TaxCaddy, update the file to address the issue, then try again.
You may see the following warning conditions if the uploaded file needs to be corrected:
The file is a PDF Portfolio and could not be processed by SurePrep.
The file is damaged and could not be processed by SurePrep
The file is password protected and could not be processed by SurePrep
The file is digitally encrypted and could not be processed by SurePrep
[File] could not be found due to an upload error
This file contains a protected sheet/workbook and could not be processed by SurePrep
FileRoom Sample
Documents are validated on the
Create New Binder
and
Add Documents
window.
TaxCaddy Sample
TaxCaddy only validates documents uploaded to the 1040 tax return profile.
note
Delete the incompatible document from your
Uploaded Documents
files once you've made the corrections and successfully uploaded a new copy.
PDF Portfolio
Description
A PDF Portfolio contains multiple files assembled into a hybrid PDF. The files in a PDF Portfolio can be in a wide range of file types created in different applications. For example, a PDF Portfolio can include text documents, email messages, spreadsheets, and PowerPoint presentations. The original files retain their individual identities but are assembled into 1 PDF Portfolio file like a ZIP file. You can't upload PDF Portfolios to SurePrep binders.
In FileRoom
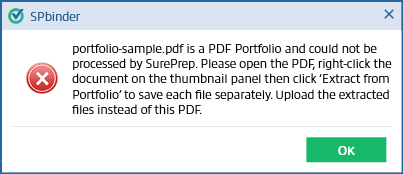
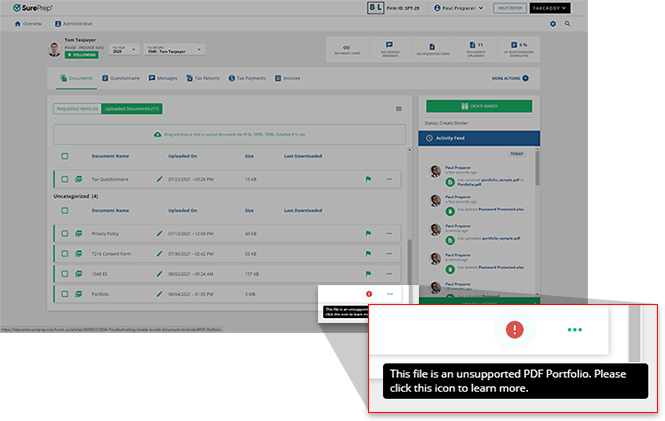
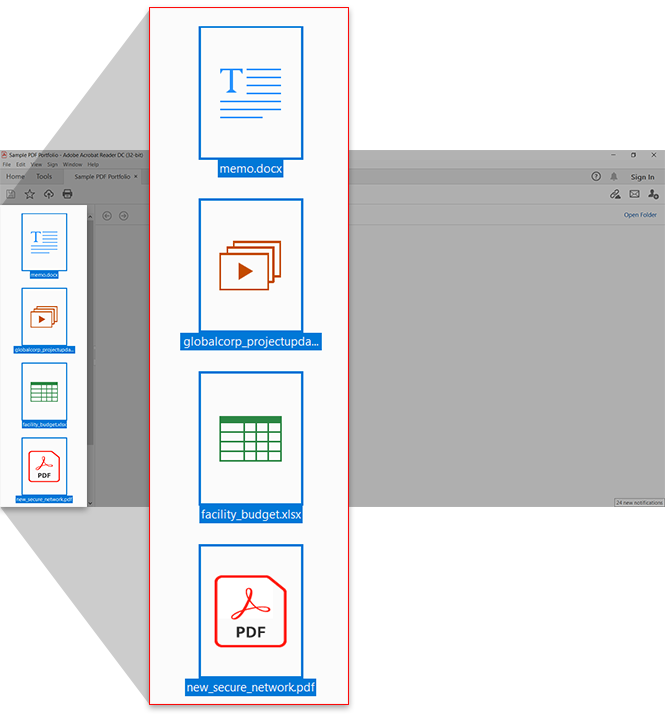
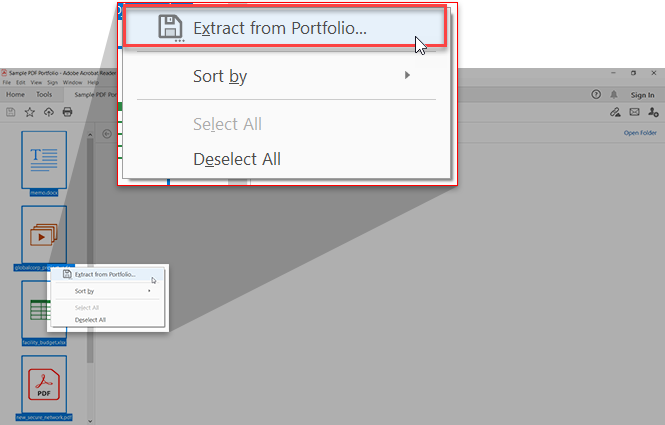
[The file] is a PDF Portfolio and could not be processed by SurePrep. Please open the PDF, right-click the document on the thumbnail panel then click 'Extract from Portfolio' to save each file separately. Upload the extracted files instead of this PDF.
TaxCaddy
Tooltip: The file is an unsupported PDF Portfolio. Please click this icon to learn more
.
Resolution
Extract the individual files out of PDF Portfolio and upload them individually to your binder. If you are using Adobe Acrobat, then you can follow these steps to Extract PDF Portfolio files:
Open the PDF file that was detected as a PDF Portfolio.
Select all files in the left navigation panel.
Right-click and select
Extract from Portfolio...
on the PDF Portfolio toolbar.
Select a location to extract all the files.
You can now upload the extracted documents on the
Create New Binder
window. Note: You can only upload supported document types.
This notification appears if the uploaded file is damaged and can't be viewed and/or processed by SurePrep.
FileRoom
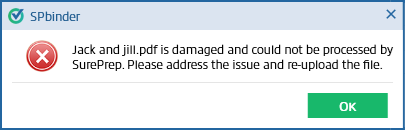
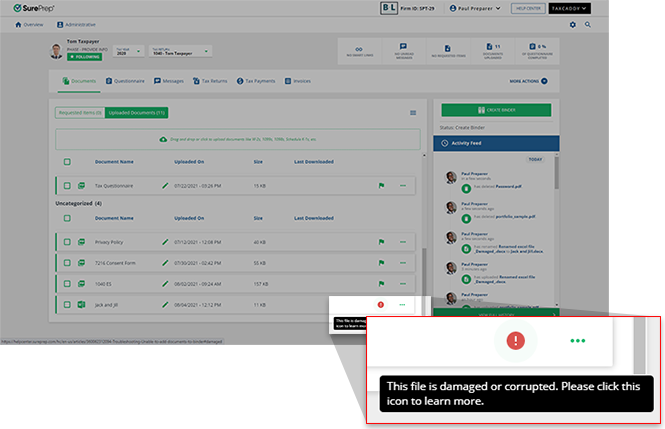
[The file] is damaged and could not be processed by SurePrep. Please address the issue and re-upload the file.
TaxCaddy
Tooltip: This file is damaged or corrupted. Please click this icon to learn more.
Resolution
You can try the following methods to resolve the issue:
Provide a new copy of the document.
Open the original file on your machine then select
Save As
to save a new copy of the document. If you are not able to open the damaged file then request a new scanned copy of the document.
Ensure the document has the correct file name extension (for example, PDF).
Password protected
Description
SurePrep can't access and process password-protected documents. A PDF can have password protection when opening the PDF and/or permissions password that restricts printing, editing, and copying content in the PDF.
FileRoom
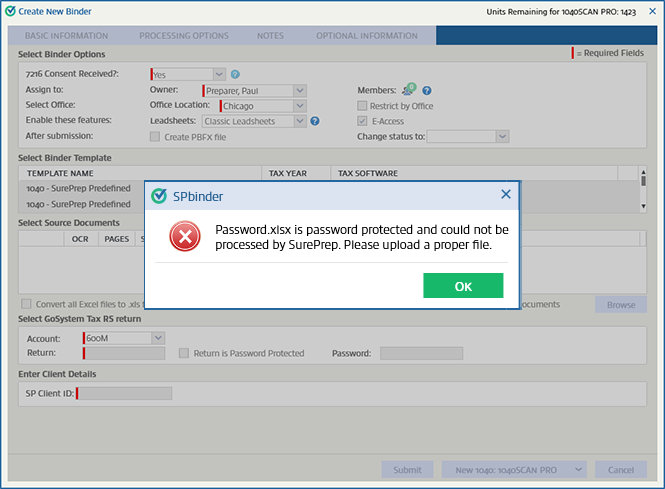
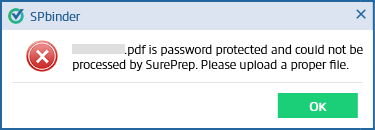
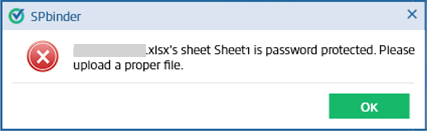
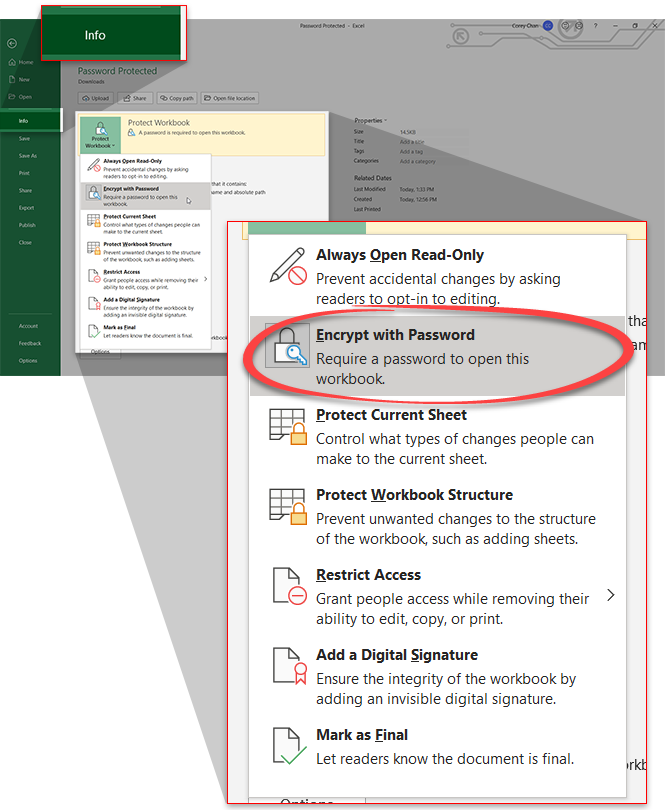
Error: [The file] is password protected and could not be processed by SurePrep. Please upload a proper file.
TaxCaddy
Tooltip: This file is password protected. Please click this icon to learn more.
Resolution
Open the document, remove password protection, then save a new copy without a password.
If you are using Adobe Acrobat, then you can follow these steps to remove the password:
Open the PDF in Acrobat.
If the document has Document Open password protection, then enter the document password to access the document.
Go to
Tools
, then
Protect
.
Select
Advanced Options
, then
Remove Security
.
The options vary depending on the type of password security attached to the document.
If the document has a Document Open password, select
OK
to remove it from the document.
If the document has a permissions password, type it in the
After you remove the password, save the document and upload the new copy.
Digitally encrypted
Description
The file could be digitally encrypted through a third-party application (for example, Antivirus).
FileRoom
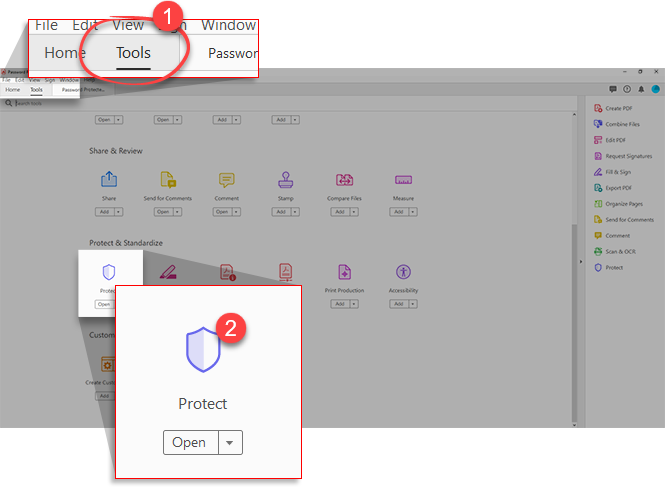
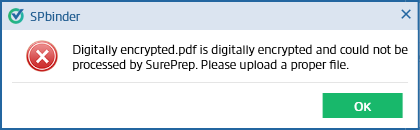
Error: [The file] is digitally encrypted and could not be processed by SurePrep. Please upload a proper file.
TaxCaddy
Tooltip: This file is digitally encrypted. Please click this icon to learn more.
Resolution
Open the document then decrypt the document or save it as an unencrypted document. Upload the new copy. If you or your client originally used a third-party application or service to encrypt the document, then you may need to use the same application/service to decrypt the document.
Upload error
Description
This notification appears if the files uploaded by the user didn’t completely upload to the SurePrep server. For example, You upload 4 files (a, b, c, and d) out of which only files (a and b) make it to the Server, files (c and d) didn’t. SurePrep skips failed uploaded files (c & d) and shows ‘[Filename] couldn’t be found due to an upload error’ message.
FileRoom
[File] could not be found due to an upload error.
Resolution
If the binder is already created, then use the Add Documents feature to add additional documents to the binder.
Password protected sheet/workbook
Description
One of the sheets or a workbook is password protected in Microsoft Excel.
FileRoom
Error: [The file] is in read-only mode and could not be processed by SurePrep.
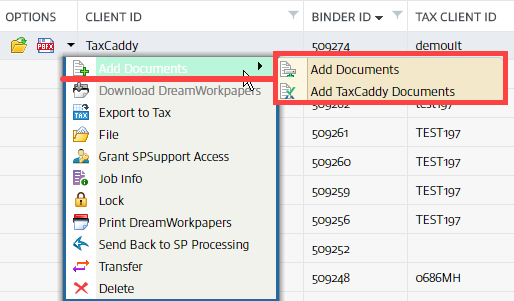
Resolution
Remove the password protection, save a new copy, then upload the Excel file again.
Select
File
Info
Encrypt with Password
.
Delete the current password in the textbox, then select