You can add documents to an existing binder using the
Add Documents
feature in
FileRoom
.
Add documents in FileRoom
The following steps will vary depending on whether you want to add documents from your local computer or a network folder, add documents from TaxCaddy, or add documents from GoFileRoom.
Locate the binder in
FileRoom
. Go to the
Options
column and select the
caret
. Select
Add Documents
. Some people might see a submenu. If you do, select
Add Documents
to add local or network documents. Select
Add TaxCaddy Documents
to add documents uploaded in TaxCaddy.
Select
Add GFR Documents
to add documents from GoFileRoom. Not everyone will see all the options.
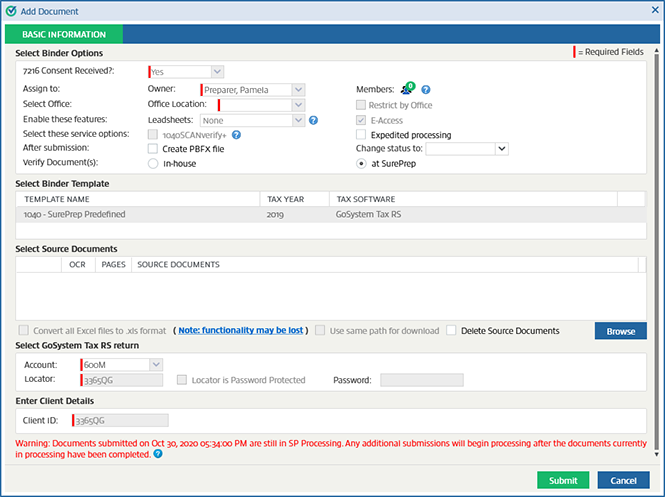
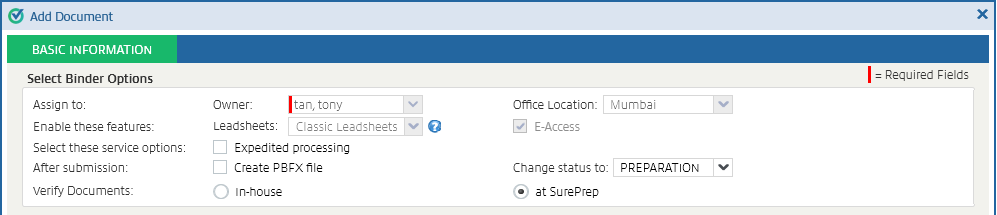
The
Add Document
window will open with the
BASIC INFORMATION
tab visible. The screen might look slightly different for you depending on your settings. Binders with leadsheets won’t have any other tab.
Binders without leadsheets will also show the
PROCESSING OPTIONS
tab if the binder is not in
SP Processing
status.
The
Assign to
under
Select Binder Options
, the
Select Binder Template
section, and the
Enter Client Details
section will populate automatically and gray out. For binders with leadsheets,
E-access
under
Select Binder Options
will populate automatically and gray out as well. For binders without leadsheets, you can select
E-Access
to enable E-access for the additional documents. Remember that this window might look slightly different for you.
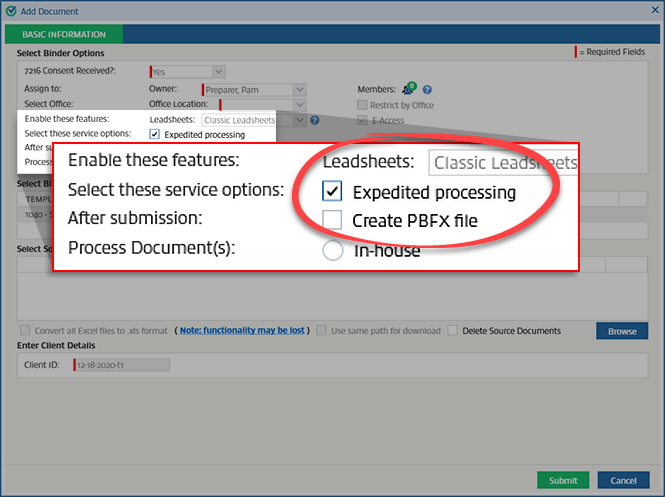
Outsource returns will have an option for
Expedited processing
. Select this option to reduce the processing time of a binder from 3 business days (the standard time required for SurePrep to process a binder) to 1 business day. Mark the
Expedited processing
checkbox to enable this option.
note
Additional fees apply for expedited processing.
note
While adding documents for binders without leads, if the system identifies that you haven't started the Review Wizard for the 1st submission, then the
Expedited processing
checkbox is not available. However, if you already started the Review Wizard, then you can mark or clear the
Expedited processing
checkbox as needed. This only applies to GoSystem and CCH Axcess binders.
Select your preferences for what to do after submission.
Create PBFX file
: Select this option to create a PBFX file of the SPbinder at a specific location. You can open this SPbinder without using
FileRoom
.
Change Status to
: This changes the binder status to a custom status once the verification is complete. The list will display custom statuses added through
Admin
Account Setup
Custom Status
.
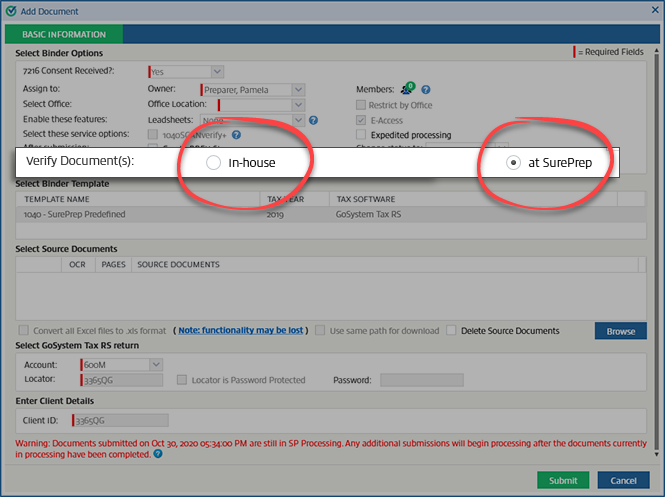
1040SCANverify and Outsource binders will have a selection of
Services
. If you're using one of these service types, select either
In-house
or
at SurePrep
.
In-house
: Select this option if your firm will verify and process these documents without sending the documents to SurePrep.
At SurePrep
: Select this option to submit the documents to SurePrep for processing.
For 1040SCANverify Onshore/Offshore services
: The
at SurePrep
option is selected by default. If this is selected, it will be submitted to SurePrep for verification. If you want to verify the documents in-house, select the
In-house
option.
note
After you resubmit the documents to SurePrep for 1040SCANverify, you can continue working on the same binder. Once the documents process, you will receive a message to reload the subsequent documents.
For Outsource Onshore/Offshore services
: The
at SurePrep
option is selected by default. If you select this, the documents are submitted to SurePrep for preparation. If you want to process the documents in-house, select
In-house
.
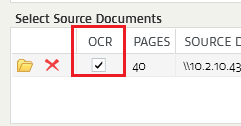
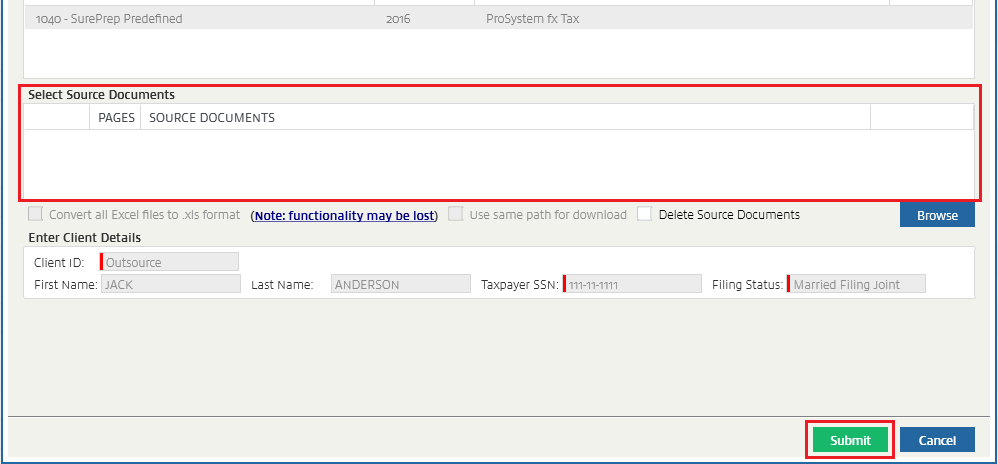
This step describes adding local or network documents. If you're adding TaxCaddy documents or GoFileRoom documents, skip to the next step.
Select
Browse
for
Select Source Documents
and select documents to upload. You can upload the following types of files: PDF, TIFF, EXCEL, WORD, and EML.
note
Excel files with hidden sheets are not supported. Delete the hidden sheets from the Excel files before uploading the files, make the hidden sheets visible before uploading the files, or don’t upload those files.
Select
Submit
to upload the file.
If you want to send the documents through OCR, mark the
OCR
checkbox.
note
For Outsource Onshore/Offshore services, attaching source documents is not mandatory if you select the
at SurePrep
option. You may resubmit the binder to SurePrep for corrections or modification through this process.
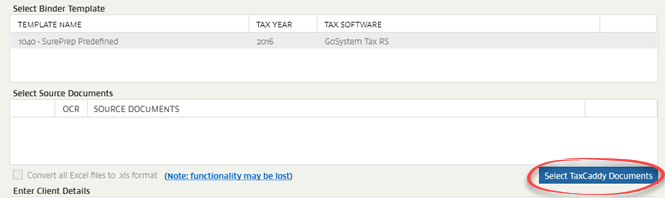
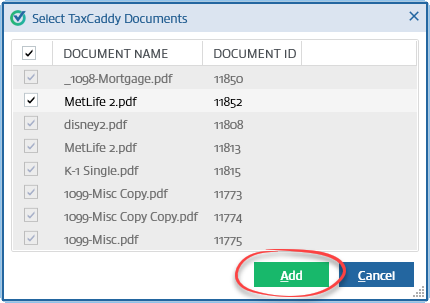
This step describes adding TaxCaddy documents. If you're not adding documents from TaxCaddy, skip to the next step. Select
Select TaxCaddy Documents
under
Select Source Documents
.
Select the documents to upload. When selecting documents, mark the checkbox to
select all
TaxCaddy documents. You can't add DOC files from the
Select TaxCaddy Documents
window. After you've selected the documents, select
Add
.
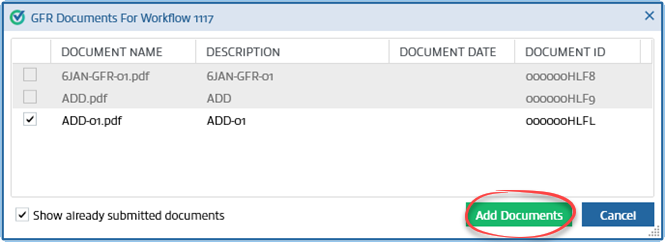
This step describes adding GoFileRoom documents. If you're not adding documents from GoFileRoom, skip to the next step. Select
GFR Documents
under
Select Source Documents
.
You will see a list of new documents you can add. Select
Show already submitted documents
to see already submitted documents grayed out in the document list. After selecting your documents, select
Add Documents
.
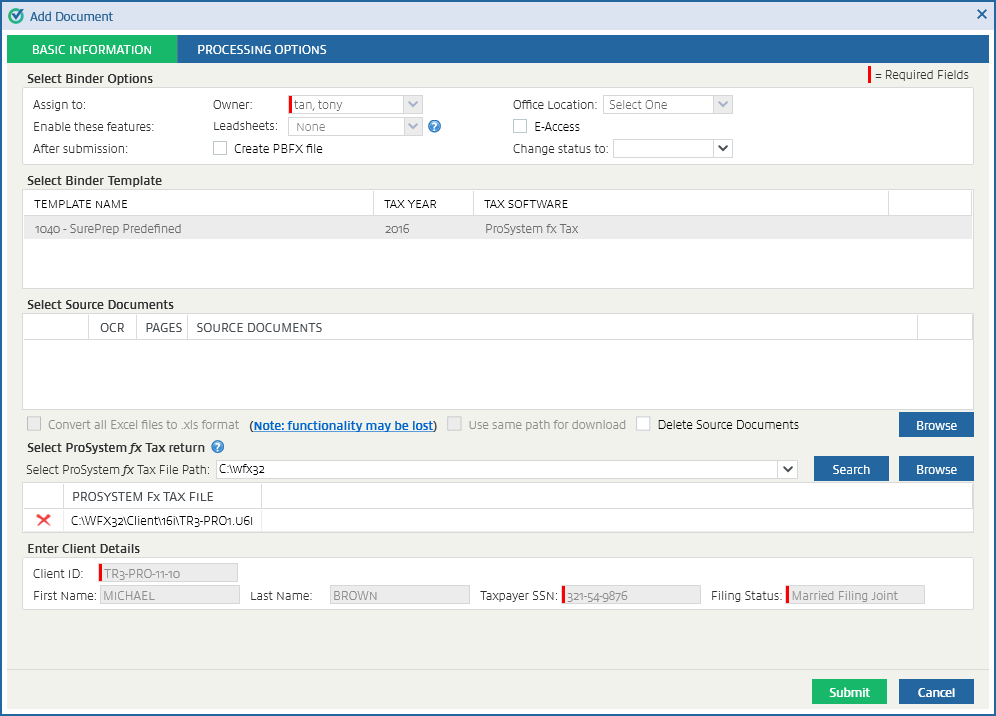
For binders without leadsheets, you may need to provide additional information regarding the tax return depending on your tax software. For binders with leadsheets, skip this step.
GoSystem Tax RS and CCH Axcess Tax
: If you're submitting additional documents to a binder without leadsheets and using GoSystem Tax RS or CCH Axcess Tax, the select tax return section is not available. The Account and the Locator Number will auto-populate.
ProSystem fx, Lacerte, and UltraTax using OCR processing
: If you're submitting additional documents to a binder without leadsheets, using ProSystem fx, Lacerte, or UltraTax, and using OCR processing, then the tax software file automatically attaches from the path previously used.
If for any reason the previously browsed tax software file path is not available, then no tax software file attaches in this section. You'll need to attach the tax software file manually. You can submit additional documents only if the manually browsed tax file name, the version of the tax file, and the Client ID is the same as that of the previously submitted job.
If the manually browsed tax file name is different than the one submitted in the previous job, the following warning message displays:
The Tax Software file attached here does not match the file attached in the original submission. Please visit our Help page for more detail
.
note
For Lacerte, if you've already exported the binder and a more recent tax file is available for this binder, we recommended attaching the most recent tax file when submitting additional documents. If you don't, the tax software file is overridden.
ProSystem fx, Lacerte and UltraTax without OCR processing
: If you don’t want to send the additional documents through OCR, the select tax software section is not available. It is not mandatory that you attach the tax software file in this case.
For binders without leadsheets, you can change settings for
Review Wizard
and
Tax Return
in
Processing Options
. These settings only apply to the additional documents submitted.
note
The
Processing Options
tab isn't available for binders with leadsheets.
While adding documents, if the system identifies that you haven't started the Review Wizard for the 1st submission, then the
Processing Options
tab is not available. However, if you started the Review Wizard, then the
Processing Options
tab is available and you can change options as needed.
Once the additional documents are successfully submitted, the
Jobs in Queue
window will appear.
While adding documents, if the system identifies that you haven't started the Review Wizard for the 1st submission, then the
Processing Options
tab is not available. However, if you started the Review Wizard, then the
Processing Options
tab is available and you can change options as necessary.
If an error occurs when processing the additional documents, those documents will appear under
In Queue
. Select the additional documents, then to edit the details and resubmit the additional documents.
If you want to cancel the submission of additional documents, select .
For binders without leadsheets, the additional documents will appear as a sub-job inside the main binder. Select next to the binder in
FileRoom
to view all the sub-jobs under it.
note
If you added documents after printing a binder, the printed PDF is outdated and you can't download it from the
Download SPbinder PDF/DreamWorkpapers
option on the binder menu. Open the
File
window, go to the
2000 Tax Workpapers
folder, then download the previously printed copy (without the additional documents). To enable the download option, print the SPbinder PDF/DreamWorkpaper again.
Add documents - due date calculations
In
SP Processing
status, if you add documents to a binder that is outsourced to SurePrep, the due date calculation might change based on the number of pages added.
note
You can only add additional documents in any status for GoSystem Tax RS and CCH Axcess Tax binders.
If a binder is submitted to SurePrep, and you add documents to the binder, then the due date calculation may change based on the following scenarios:
Scenario 1: If a SurePrep verifier has already started the verification process, then the additionally submitted documents will be on hold. Once the originally submitted documents are processed and submitted by SurePrep, the subsequent documents are processed. The due date for the subsequent documents will be calculated from the day the original binder is submitted by SurePrep. For example: You submit 150 pages binder to SurePrep and then add 350 pages through add documents. Processing time will take 3 days for the 1st submission, and an additional 4 days for the subsequent submission.
Scenario 2: If a SurePrep verifier hasn’t started the verification process, then the additionally submitted documents will merge and both the original and subsequently submitted documents will appear for verification. The due date for the binder is calculated from the day subsequent documents added. For example, you submit a 150 page binder to SurePrep and then add 350 pages through add documents. The processes will take 5 days.
For 1040SCANverify, 1040SCANverify+, and Outsource binders, you can add additional documents as
In-house
or
at SurePrep
without any limitations.
If the 1st processing type is SurePrep, then all additional documents submitted to SurePrep will merge as a single submission. Similarly, documents submitted as In-house will merge with other In-house documents on hold.
Example
: SurePrep + In-house + SurePrep = 1st and 3rd submission will process first. After that's completed, the 2nd (In-house) submission will begin processing.


 to edit the details and resubmit the additional documents.
 .
.
 next to the binder in