Complete form (Customized fillable forms)

Customized fillable forms can be sent to the client as a requested item when you send a DRL or upload a document request manually from the Client Profile. You or your client can complete fillable forms from TaxCaddy.
Select Complete Form

Send Customized Fillable Forms

Follow these steps to send Customized Fillable Forms:
  1. Go to
    TaxCaddy
    Administrative
    DOCUMENT REQUEST LIST
    . Ensure Customized Fillable Forms are enabled for the categories.
    Configure your fillable form settings
  2. If you selected
    Yes
    and there is proforma data in the tax application, then clients will receive the Customized Fillable Forms after you create and send the DRL.
    Select SEND DRL from the I WANT TO MANAGE menu
    note
    If the DRL was created before this option was enabled then clients won’t receive the Customized Fillable Forms. You'll need to reset DRL and create it again before sending it to the client.
    You can also manually request a document from the Client Profile. However, only categories that allow fillable PDF forms will appear as fillable forms when you create a request.
    Select Upload to send an upload request
  3. Clients can use the
    Complete Form
    feature to fill out the fillable forms (that is, Schedule C, E, and F).
    Select Complete Form

Complete form

You or your client can fulfill a document request by completing the fillable form sent from DRL. Follow these steps to complete the fillable form:
  1. On the
    Overview
    screen, select a client tile to view the client profile. You can also search for a client and select the client tile from the result.
    Select a client profile from the Overview screen
  2. Select
    Documents
    , then select
    Requested Items
    .
    Select Documents, then Requested Items
  3. On the document tile, Customized Fillable Forms sent from the DRL will appear under
    Documents Requested
    with a
    Fillable
    Fillable icon icon.
    Select the
    Menu
    Menu icon 
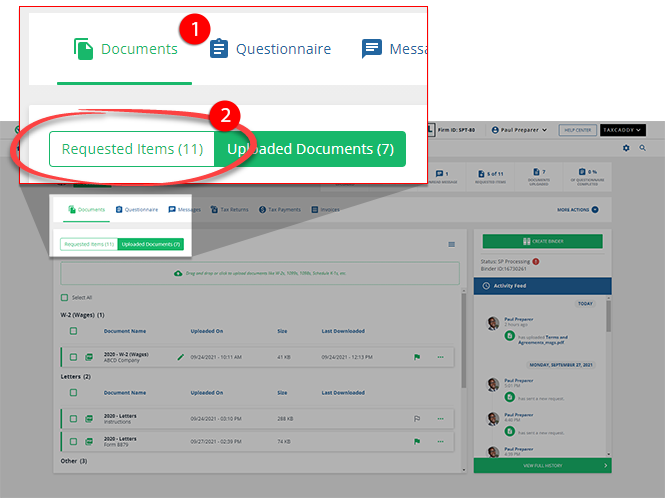
icon to view the document options.
    Select the Menu icon
    Not all documents with the Fillable Fillable icon 
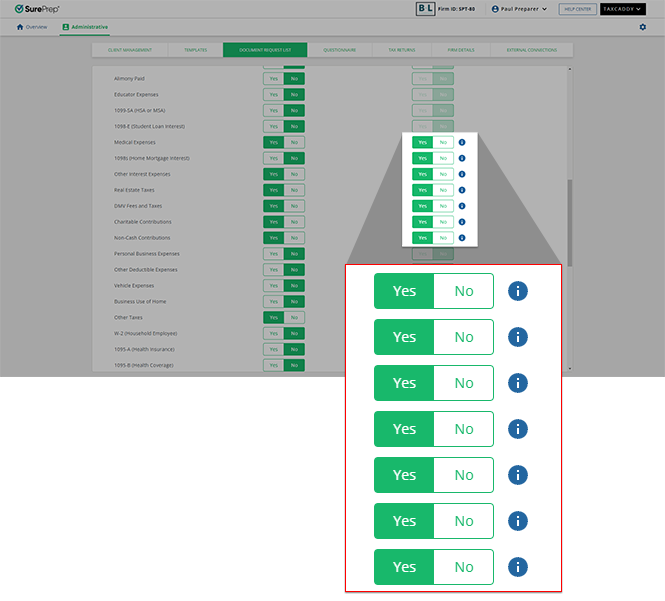
icon are Customized Fillable Forms sent from the DRL. Documents can also have the Fillable icon if an empty form was uploaded and marked as fillable.
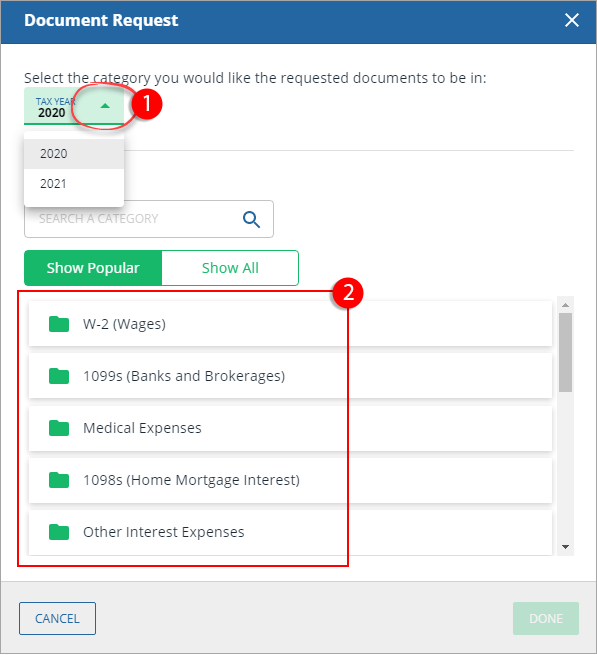
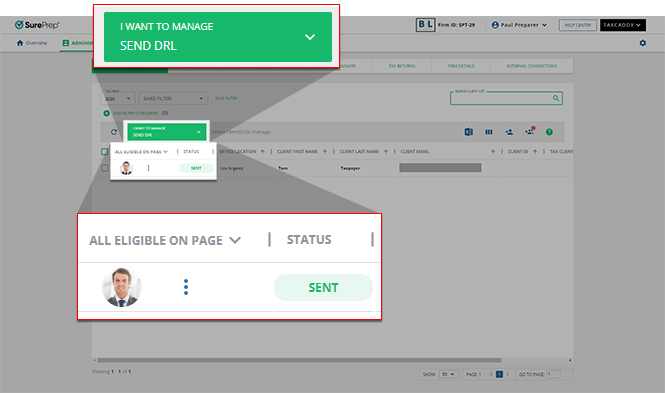
  4. If the document is a Customized Fillable Form, then you will see
    Complete Form
    as an option on the document tile. Select
    Complete Form
    .
    Select Complete Form
    Uploading a document rather than completing the form will alert you that doing so will replace the attached fillable PDF and any data you've provided to it. Select
    CONTINUE
    to upload your document, or select
    COMPLETE FORM
    to fill the PDF in the Document Viewer panel.
    Select a tax year then category
  5. To complete the form, select the highlighted fields then enter the data.
    note
    For GoSystem Tax RS and CCH Axcess Tax, identifier fields (descriptions) from the current year and amounts from the prior year will be auto filled based on the proforma data in the tax application (for example, “Jills Craft Shop” with a prior year amount of $47,500). . Ensure that you and your client only enter current year values; prior year values are only auto-populated as a reference (if available).
    Fillable form document
    note
    Certain Customized Fillable forms will include an extra page in case the taxpayer requires additional space.
  6. Once you have completed the form, select
    SUBMIT
    to upload the fillable form.
    Select SUBMIT
  7. On the
    Submit Document
    window, select the checkbox, then select
    SUBMIT
    . Once the document is submitted, it can no longer be modified.
    Document Request window
  8. Once the Customized Fillable Form form has been submitted, the document status displays
    FORM COMPLETED
    on the
    Requested Items
    tab.
    FORM COMPLETED tag in the Documents Requested category
View uploaded Customized Fillable Forms
To view uploaded Customized Fillable Forms, go to
Documents
, then
Uploaded Documents
.
Select Documents, then Uploaded Documents
Select the submitted form to view it in the Document Viewer panel.
Select a document tile
Selected document in the Document Viewer panel
Delete uploaded Customized Fillable Forms
To redo the fillable form (for requested documents), delete the document from the
Uploaded Documents
tab. After the uploaded form has been deleted, it will be restored to its original state on the
Requested Items
tab. All entered data will be deleted.
note
Only the fillable forms available for uploading requested documents will be restored (for example, documents completed through the
Complete Form
feature). Fillable Forms for review/sign documents won’t be restored if they are deleted.
To delete an uploaded Customized Fillable Forms, go to
Documents
, then
Uploaded Documents
.
Select Documents, then Uploaded Documents
Select the
Menu
Menu icon icon then select
Delete
.
Select Delete
On the
Confirm Delete
window, select
YES
to delete the uploaded document and restore it as a requested item.
Select YES
note
To redo the fillable form (for requested documents), you or your client can delete the document from the
Uploaded Documents
tab. However, after the uploaded form has been deleted, it will be restored to its original state on the
Requested Items
tab. All entered data will be deleted. Only the fillable forms available for uploading requested document will be restored (for example, documents completed through the
Complete Form
feature). Fillable Forms for review/sign documents won’t be restored if they are deleted.

Related Content

error-icon

Triva isn't available right now.

Check out the support page for our phone number and hours

error-close