TaxCaddy can auto-categorize your documents upon upload.
Throughout the tax season, you may receive several document upload requests from your tax professional, each requiring your attention to ensure that your documents are appropriately uploaded and categorized. With TaxCaddy's document Auto-Categorization, you can have a quicker, more dynamic approach to fulfilling your pending upload requests.
Document Auto-Categorization leverages TaxCaddy's AI to analyze each document page and automatically sort them into their appropriate tax categories and forms.
Auto-categorize documents
Sign in to TaxCaddy.
From the
Overview
screen, select
UPLOAD A DOCUMENT
from your Task List.
Select the files to upload from your device.
note
Auto-Categorization will only work with PDFs 200 MB or smaller. PDFs exceeding 200 MB will fail the Auto-Categorization process and must be split before uploading.
When the
Upload Documents
window appears, select the
Auto-Categorize
toggle then select
UPLOAD
.
Once a document is selected, a toast notification will appear to indicate the file's upload percentage.
When the document upload reaches 100% complete, the toast notification will update to indicate that the Auto-Categorization process has begun.
The documents that TaxCaddy's AI has automatically categorized will appear in their respective categories in the
Uploaded Documents
tab.
If the TaxCaddy AI was unable to distinguish a category from the uploaded document, the document will be placed in the
Uncategorized
category.
Restore pages
When using Document Auto-Categorization on larger files containing multiple forms, TaxCaddy AI will split the document as necessary to best categorize the forms within the larger file. If a document is incorrectly split and miscategorized, users can restore the pages to unify under the single original document.
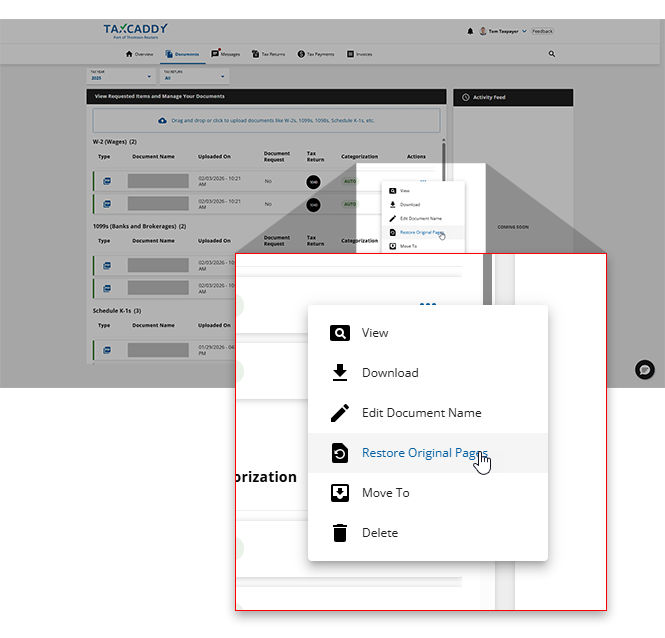
From the Uploaded Documents panel, open the
Menu
of one of the forms that was incorrectly split from the original document then select
Restore Original Pages
.
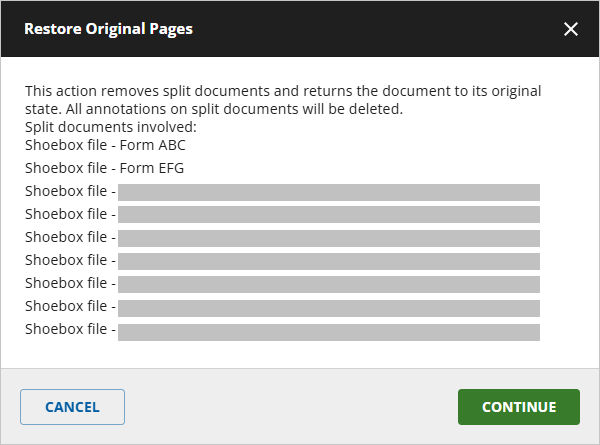
The
Restore Original
Pages window will appear listing all of the forms found in the original document. Review the forms listed and select
CONTINUE
if you wish to proceed with the restoration.
The original larger document will be restored and placed in the
Uncategorized
section where you can begin your manual review.
Supported document types
TaxCaddy's Auto-Categorization feature can categorize documents into one of the following IRS and Non-IRS forms.
Show all hidden content
Select
IRS
or
Non-IRS
forms to view a complete list of supported form types
IRS
TaxCaddy's Auto-Categorization feature can categorize documents into one of the following IRS forms.
Form 1099DIV
Form 1099INT
Form 1099MISC
Form W-2
Form K1
Form 1099R
Form 1099B
Form 1099NEC
Form 1099SSA
Form 1098E
Form 1098T
Form 1098MortgageInterest
Form 2439
Form 5498SA
Form 1099C
Form 1099A
Form 1099RRB
Form W2G
Non-IRS
TaxCaddy's Auto-Categorization feature can categorize documents into one of the following Non-IRS forms.
Bank Statements
Credit Card Statements
Loan Statements
Receipts
Child and Dependent CareCredit
Medical and Dental Expenses
Vehicle Documents
State and Local Real Estate Taxes
Gifts to Charity
Best practices
To optimize your categorization results, we recommend adhering to the following best practices prior to your use of TaxCaddy's Auto-Categorization:
Use clear document scans.
Ensure that all documents are scanned clearly and at a high resolution. Poor‑quality scans can result in document miscategorization or missing/incorrect metadata.
Check file size before upload.
Confirm that each file is under the 200 MB upload limit. Larger files are not supported and may cause processing errors.
Verify multi‑page forms.
For multi‑page forms such as Form 1099‑DIV or Schedule K‑1, verify that all pages are grouped correctly. Continuation pages may require manual review to ensure accurate organization.
Don't combine closing or consolidated documents.
Closing statements, consolidated statements, and other non‑IRS documents should not be combined with standard IRS forms. Combining standard IRS forms with these documents may cause the entire document to be inaccurately categorized. We recommend that these documents be uploaded individually for proper categorization.
Review uncategorized documents.
Always review the documents listed in the
Uncategorized
section to ensure that each tax form is properly sorted in its respective category. Documents like instruction pages, pages with partial or incomplete information, or other non-standard pages can remain in the
Uncategorized
section.
Common questions
Review these common questions regarding the Auto-Categorization feature:
What are some key benefits of using Auto-Categorization?
Some of the key benefits include:
Auto-Categorize
: Automatically scans and recognizes the uploaded tax documents and organizes them into their tax categories. Saving you time from manually organizing each uploaded document.
Automatically splits pages
: You can upload a single PDF file containing various types of tax documents (that is, W-2s, 1099s, 1098s) and Auto-Categorization will separate PDF files for each document.
How will Auto-Categorization know which categories to file each document into?
TaxCaddy's AI-powered Auto-Categorization learns from your actions and improves the results over time.
How can users enable Auto-Categorization for your firm?
If you're interested in having Auto-Categorization enabled within your firm, contact SurePrep Support team to integrate this feature into your daily workflow.
What document types are accepted when using the Auto-Categorize feature?
Auto-categorization works on PDF file formats.
Are there any size limitations to the documents?
Documents can't exceed 200 MB to qualify for Auto-Categorization. Documents exceeding this size will fail the Auto-Categorization process and must be split before uploading.
How long does the categorization process take?
There is no determined amount of time that the categorization process takes, as multiple factors can contribute (file size, for example). We ask that users be patient as the categorization process takes place.
Why are some pages missing after Auto-Categorization?
Pages without recognizable entities (for example, instruction pages, pages with partial or incomplete information, or other non-standard pages that don't clearly match a supported form) may not appear in a specific category. Check the


 Article