
Views in iSheets
iSheet Views determine how data is displayed and filtered
Overview of iSheet Views
Each iSheet can have multiple
Views
, showing different columns and data subsets based on conditional filters and user permissions. Users switch between available views using the View
dropdown menu. 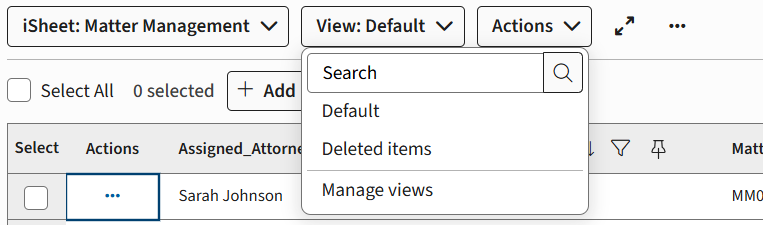
note
A
Default
view is automatically created and includes all new columns, unless otherwise specified in the column configuration.Sorting and Default View
Views appear in a dropdown for end-users, with the default view always at the top. Set a new default by selecting 'Set as default view' for your chosen view. A 'Default' label appears next to the current default, and it is moved to the top of the list.
To change the order of other views, use 'Manage views' in the iSheets section in site admin.

You may set a default sort order for each view. Filters can be added to views to determine which iSheet items should appear.
note
If a user can't access the default, they see the first view available.
If 'Display Search as the default view' is enabled, the Advanced search window opens when the iSheet is accessed.
Adding, Cloning, and Configuring Views
To add or clone a view, open the iSheets admin page and select
Manage Views
from the More actions
menu. New views require a name (up to 80 characters) and a selection of columns. Columns can be reordered and system-generated columns included. note
Custom column permissions are respected for new columns.
Adding a View
In the
Manage Views
screen, select Add View
.
Cloning a View
In the
Manage Views
screen, select More actions
and select Clone view
:
note
If you clone the default view, the new view does not inherit the default view status.
Configuring a View
Multiple configurable options are available in the
Add View
screen, including the View Name and assigned Columns.
note
View names can have a maximum of 80 characters.
note
You may add system-generated
File status
columns to a View, such as approval template status (approved, rejected or awaiting approval), Contract Express status (ready or incomplete), or DocuSign signature status (sent for signature or signed).Editing or deleting a View
To edit or delete a view, open
Manage views
from the iSheet admin page. Click the name of the new view and follow the instructions in Edit Views.
note
See Edit and delete views or Adding and configuring viewsfor more information.
The system created
Draft items
view may also be edited in certain limited ways. See the Modifying the draft items view
section in the Item drafts article for details.note
You cannot delete a default view (first assign another view as the default).
The view menu must contain at least one regular view and the Draft items view.
Setting Permissions
Custom permissions can be set, if enabled, to restrict view access.
See Set permissions for Views and iSheet permissions for more information
note
Views will respect any permissions applied to a column. If a user has access to a view which includes a restricted column, it will not appear in the view for the user.
note
Users with limited permissions only see the 'Print' and 'Export' options.
Mandatory Columns
Ensure all required columns are included in a view, especially if you enable Add/Edit forms to display only columns from the selected view. An alert appears if a mandatory column is missing.

note
To enable mandatory columns, open
Admin
> iSheets
(under Module settings). Click the name of the iSheet and enable Set Add/Edit forms to only display columns from the selected View
:If enabled,
Add record
, Edit record
and shared forms only display and request data for columns defined in the selected View.note


You can check if a view includes all mandatory columns. Open
Admin
, iSheets
, then select Check mandatory columns
.If necessary, select the iSheet to check. A list of views opens.
Select
Show
to see a list of mandatory columns that are missing in the view. Select More actions
then Add mandatory columns
to automatically add all missing mandatory columns to the view.Alternatively, select all views you need to update, then select
Update selected views
in the top-right corner.Inline editing in views
You can enable inline editing in the Columns section. However, you also need to enable inline editing on the View. When viewing the list of iSheets click on
More Actions
and then choose Manage Views
. In the Columns
section set Enable inline editing
to Yes
.