
Due Diligence Workflows
The Due Diligence guided workflow provides two independent paths:
Deal Room Readiness
, which assesses whether the Deal room contains the required documents and supporting agreements, and Document Analysis
, which classifies and analyses documents to identify risks and generate due diligence outputs. Together, these workflows help teams verify data completeness before review and then perform detailed due diligence analysis on the available documents.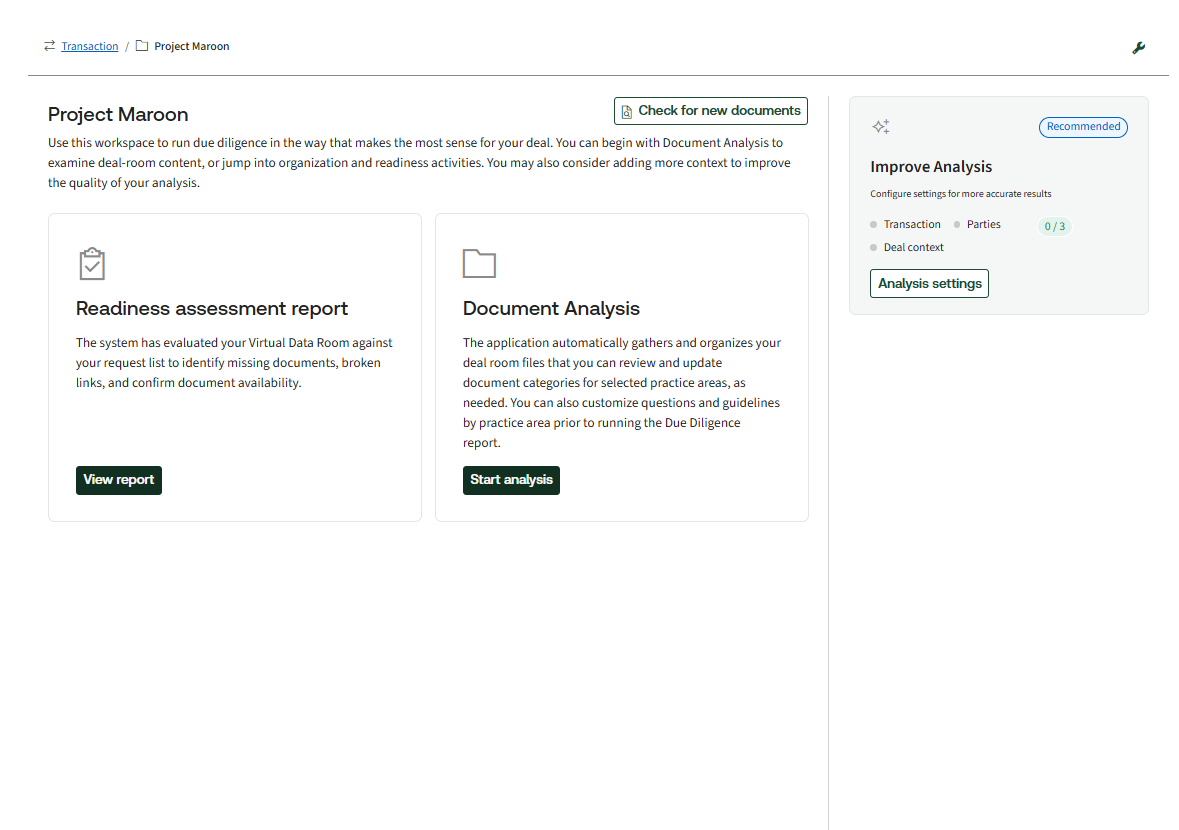
Readiness assessment report
Deal Room Readiness provides an overview of the documents available in the Deal room before analysis begins. It helps identify how ready the Deal room is for review by showing which expected documents are present, which are missing, and where gaps need to be addressed.
Uploading request list
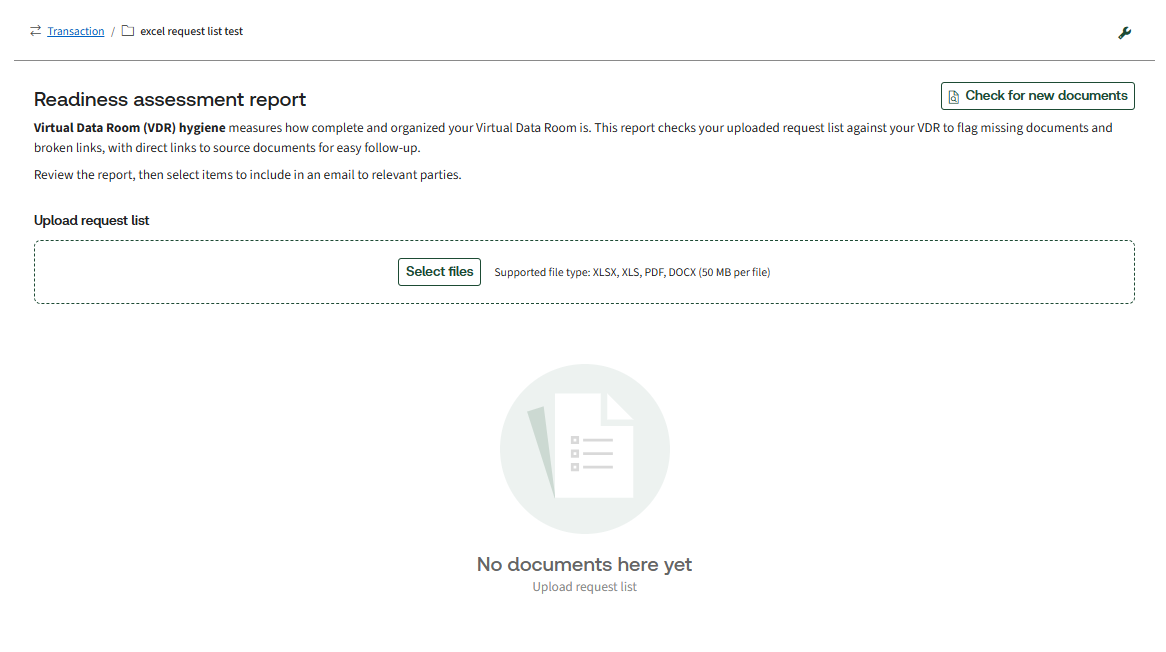
The whole readiness assessment is driven by your firm's own custom checklist. The first time you enter the readiness report for a deal, the system asks you to upload the request list (or checklist) that is relevant to the deal you are working on. You can upload your own request lists, and the system compares the items on that list against the documents in the Deal room.
- From the project workspace, chooseReadiness assessment report.
- When prompted, upload the checklist or request list for this deal. The items on this list will define what the system will check for. Supported file formats are.xlsx,.pdfand.docx.
Reading the readiness report
Once your request list is uploaded, the system produces a report that maps your list against the Deal room. It clearly separates the documents that have been provided from the documents that are still missing. This gives your team an operational picture of how ready the Deal room is before you invest time in analysis.
With this information, your team can go back to the seller's side and request the specific documents that are still needed to review the data set thoroughly.
This communication can be initiated directly from the guided workflow. Once the readiness report is generated, click
Draft email
to draft your message to the seller's party from within the platform.This Readiness report can also be exported to iSheets in HighQ using the
Export
option, creating a dedicated iSheet that capture the missing documents.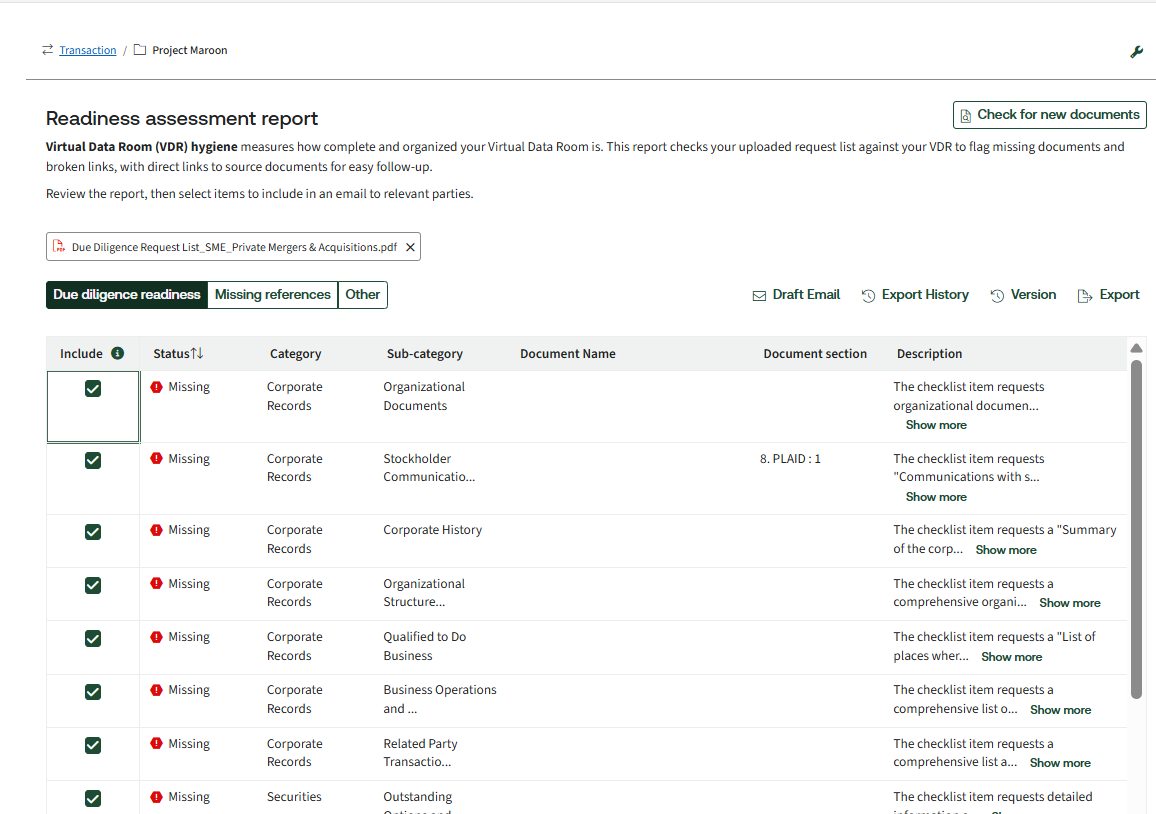
Cross-reference and supporting-agreement checks
Contracts are heavily interlinked, so in addition to listing missing documents, the readiness assessment also examines the references made inside the contracts. Where a contract quotes or relies on a supporting or ancillary agreement, the system checks whether that supporting document is actually present in the Deal room.
This matters because a statement that quotes a supporting agreement is not valid if that agreement is missing. The system calls out these references, so you can see exactly which supporting documents still need to be requested.
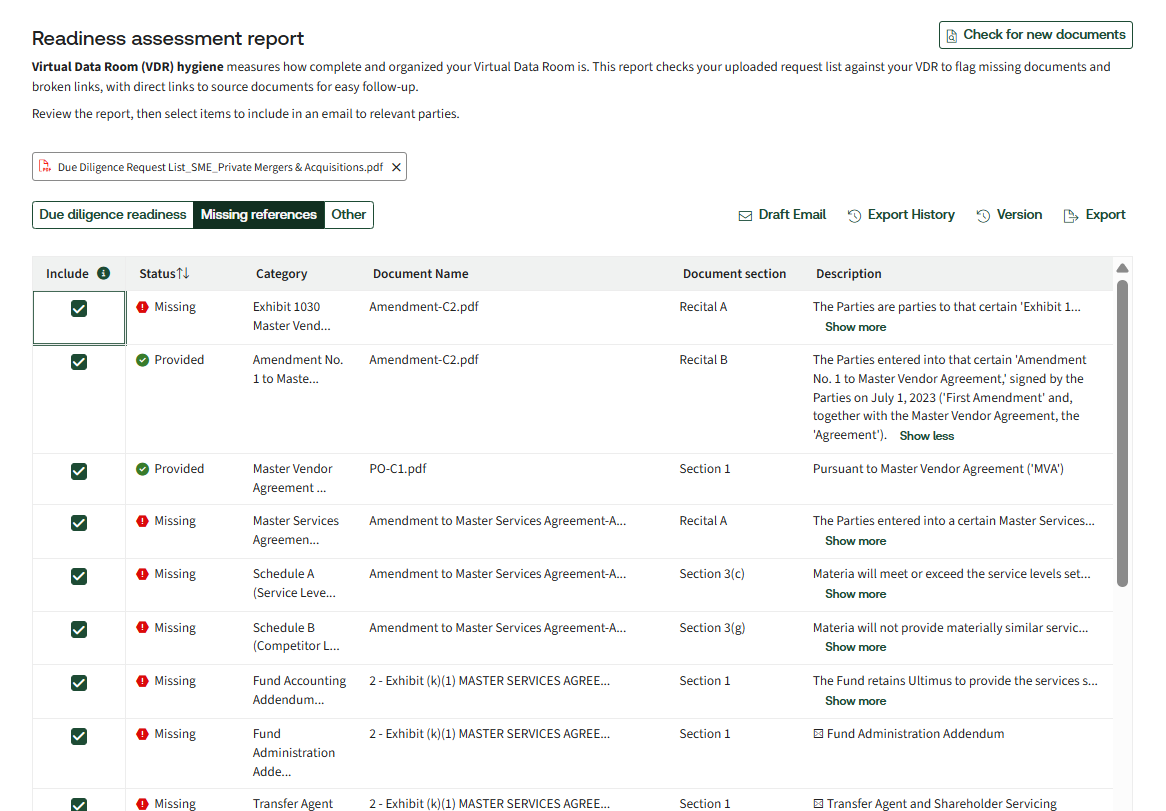
In short, Deal Room Readiness answers two questions before you start: are the documents on my list here, and are the supporting agreements that my contracts depend on here? Everything is driven by your firm's own curated request list.
Document Analysis
After confirming that the Deal room is ready, you can begin the Document Analysis workflow. This workflow includes four steps: classifying documents, configuring questions and risk guidelines, reviewing the results, and generating a due diligence report. Each step is explained below.
Document classification
When you enter Document Analysis, the system goes into the Dealroom, fetches all the files, and presents a clean segregation of every document into its relevant practice area. The documents are listed in a table so you can see what has been found and how it has been grouped.
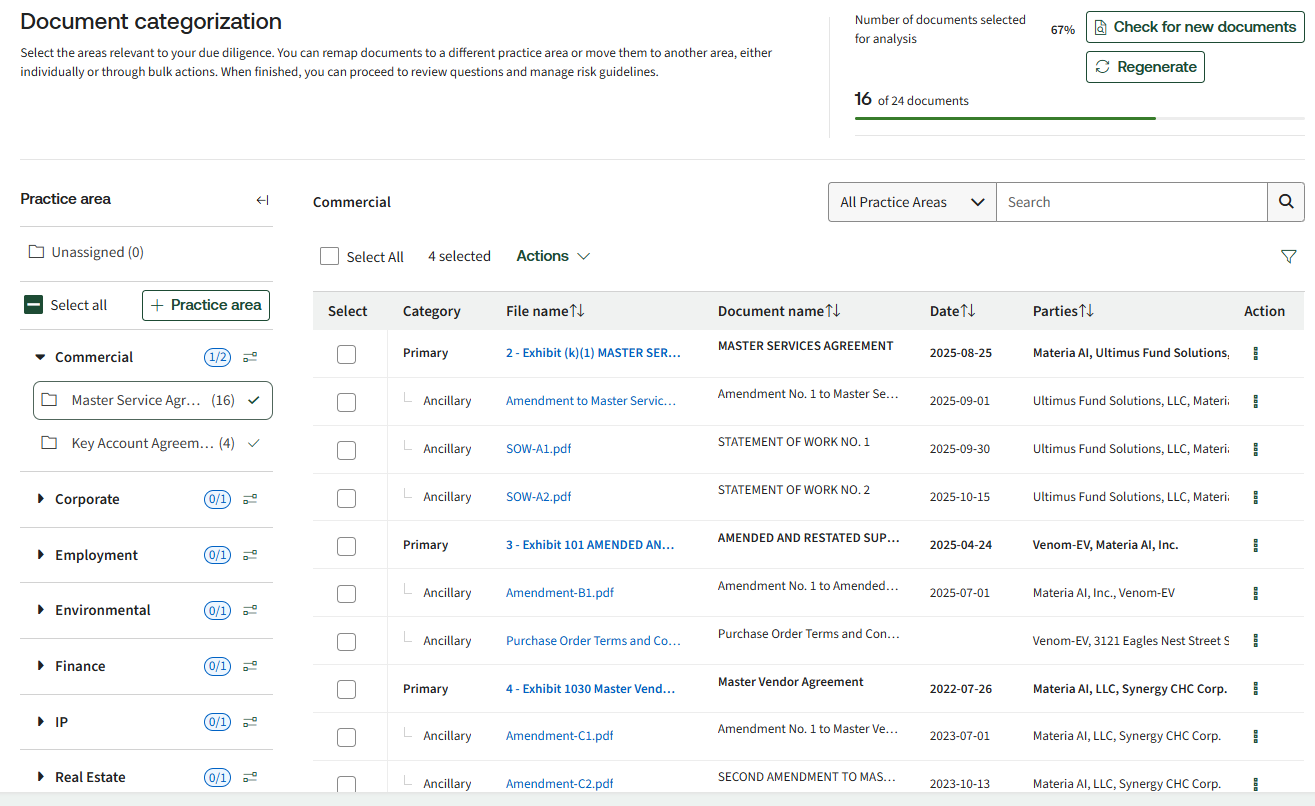
Document families (primary and ancillary)
The system does more than list documents; it recognises how they relate to one another. It identifies the primary document and its supporting or ancillary (a supporting document associated with a primary document) agreements, and labels the ancillary documents accordingly. Related documents are treated as a single document group because the system analyses them together rather than
independently
, following how information flows from one document to another.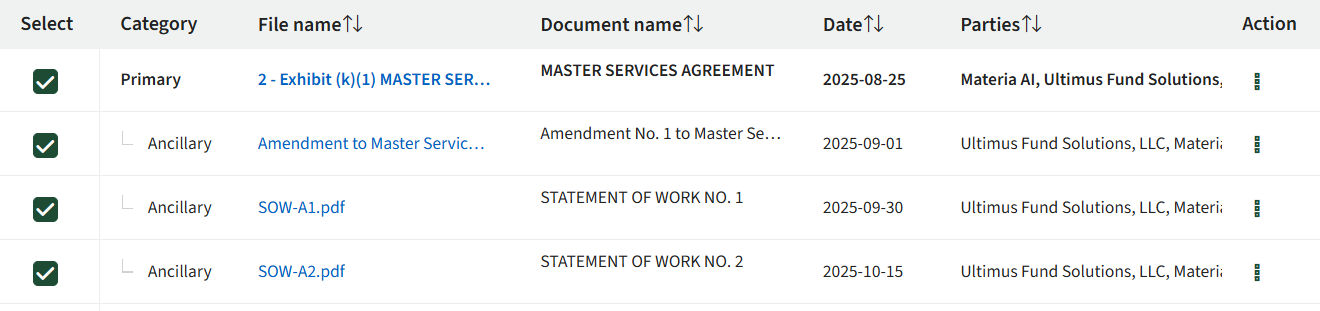
Adjusting the classification (human in the loop)
Classification is a starting point, not a final answer. Because a human is always in the loop, you can intervene wherever you think the system has it wrong. You can move a document into a different practice area, change its document type, or switch it between primary and ancillary. This lets you bring your own knowledge to the deal and keep the scope accurate.
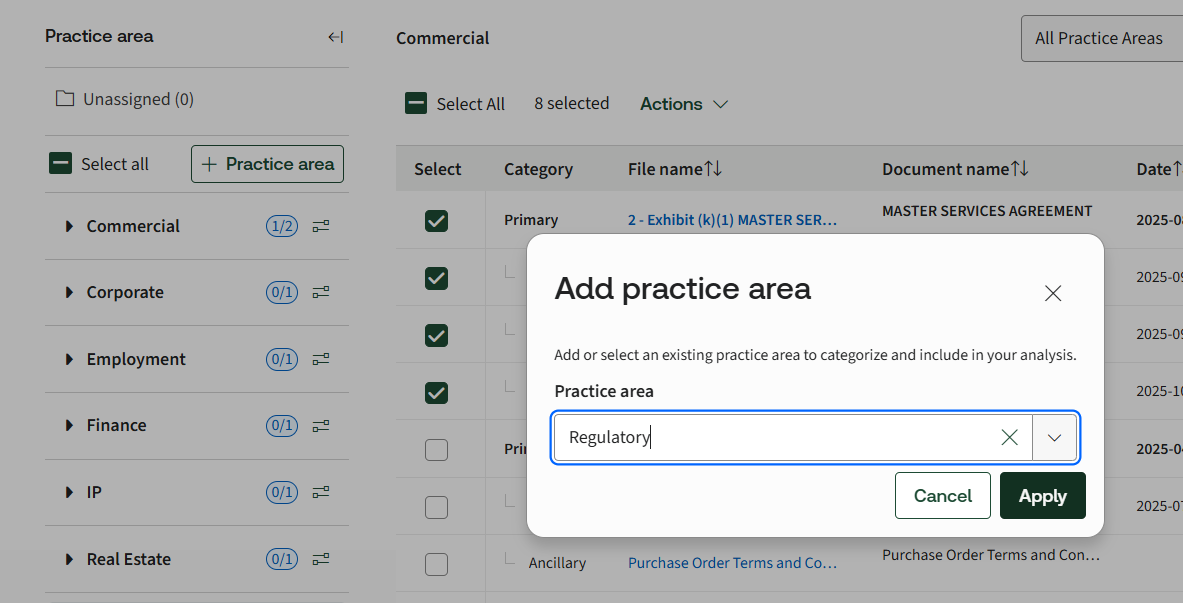
To move a document set to a different practice area, select the primary document. All associated ancillary documents are automatically included in the selection. Select
Actions
> Move to a different practice area
, then choose the target practice area.tip
Review the classification before configuring questions. Assigning documents to the correct practice area and group at this stage ensures that analysis performed in later steps is applied accurately.
Practice areas
Six pre-defined practice areas are available: Commercial, Corporate, Employment, Finance, IP, and Real Estate. Each practice area is configured for the US and UK jurisdictions and includes a predefined set of questions and risk guidelines maintained by Thomson Reuters Practical Law subject-matter experts. These practice areas can be used as provided or further tailored to your firm's requirements. Documents are analysed using the questions and risk guidelines associated with the selected practice area and jurisdiction. For example, a corporate document is analysed using corporate-specific criteria applicable to the relevant jurisdiction.
However, you are not limited to the six above mentioned defaults. You can create your own custom or open practice areas (for example, environmental or tax), build your own question sets, and analyse documents against them. This lets you expand horizontally and add as many practice areas as a deal requires.
note
The pre-defined practice areas contain curated starting-point content from Practical Law. This is embedded default content, not a live Practical Law integration.
The six pre-defined practice areas below each ship with default questions and risk guidelines curated by Thomson Reuters Practical Law subject-matter experts, and are jurisdiction-aware for the US and UK. You can also create custom or open practice areas with your own question sets.
Practice area | Provided as |
|---|---|
Commercial | Pre-defined, Practical Law curated defaults |
Corporate | Pre-defined, Practical Law curated defaults |
Employment | Pre-defined, Practical Law curated defaults |
Finance | Pre-defined, Practical Law curated defaults |
IP | Pre-defined, Practical Law curated defaults |
Real estate | Pre-defined, Practical Law curated defaults |
Custom / open (e.g. tax, environmental) | Created by your firm with its own question sets |
Document types within a practice area
Each practice area can be drilled down into document types. You can create multiple document types under a practice area (for example, corporate), and each document type carries its own questions and its own risk guidelines. This is how your firm achieves granularity, going deeper inside each practice area rather than treating everything in it the same way.
The configuration is structured hierarchically, with practice areas containing document types, document types containing questions and risk guidelines, and results generated at the document-type level.
The Unassigned bucket
Any documents the system cannot match to a practice area are placed in a holding area called
Unassigned
. Nothing is lost, you can create a new practice area and then move documents out of Unassigned into it. Only the documents in the practice areas you have selected are treated as in scope and carried forward into the analysis.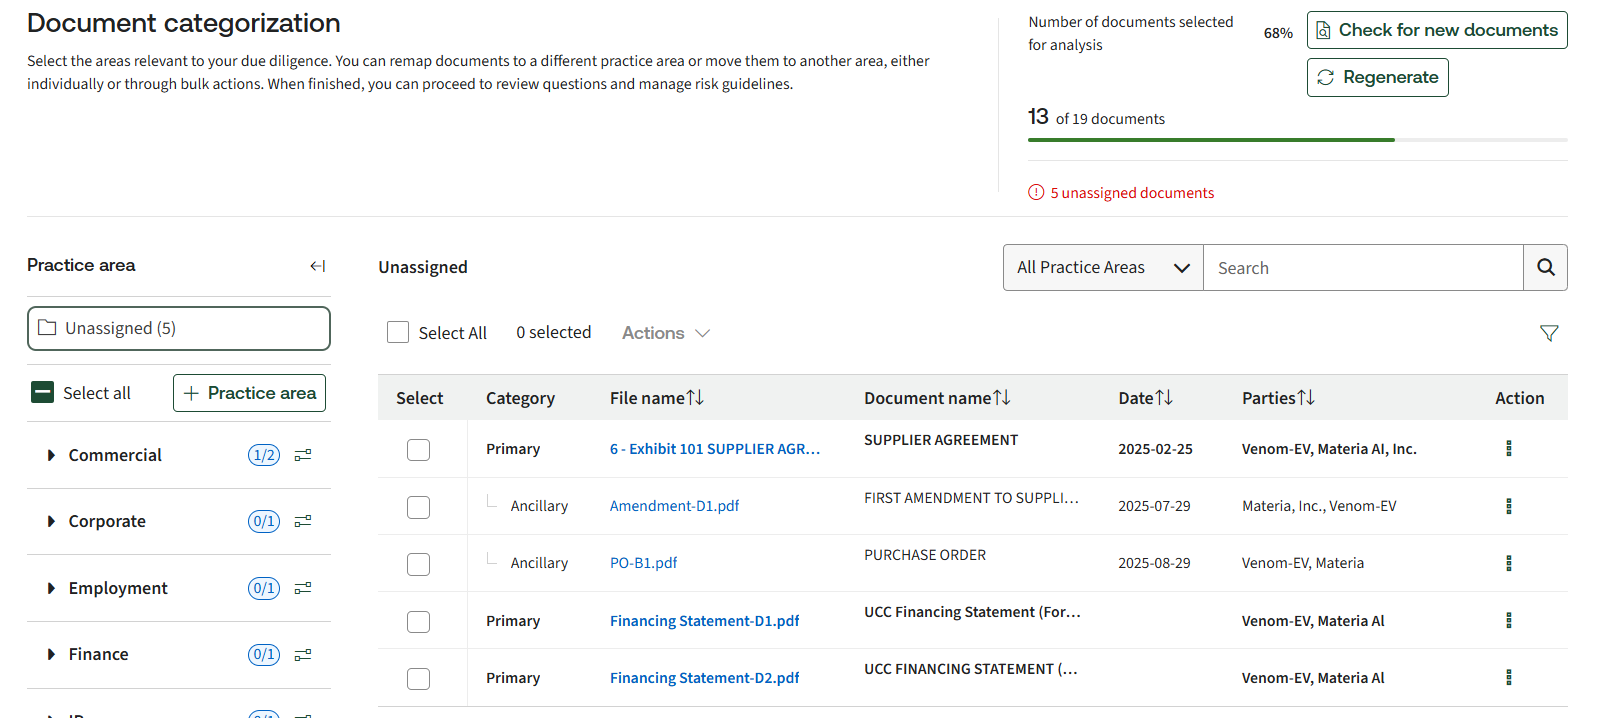
Configure questions and risk guidelines
Once you have confirmed that the system includes the correct set of documents, proceed to the configuration step. Define the questions to be answered and the risk guidelines the AI should apply during analysis. Questions and risk guidelines are configured for each document type within a practice area.
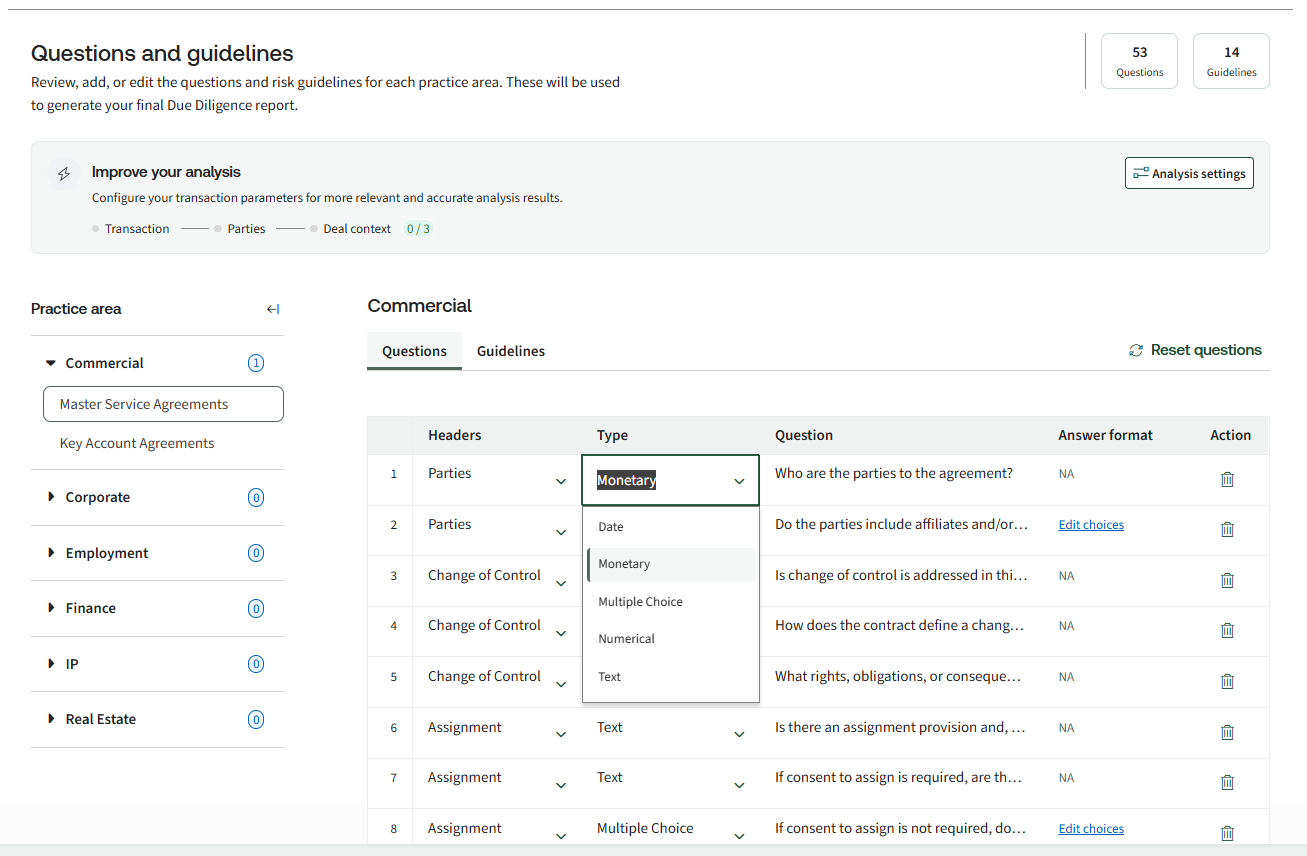
Configuring questions and answer types
For each question you configure, choose the type of answer it should produce. Not every question needs a long written answer, and the answer type you choose drives the output. This also makes the answers usable later for reporting, as structured answers can be filtered or placed into dashboards.
The available answer types are:
- Dateto extract a date.
- Monetaryto extract a monetary amount.
- Multiple Choicefor a simple answer (Example Yes/No).
- Numericalfor a number value.
- Textfor questions that need a comprehensive written explanation.
Adding risk guidelines
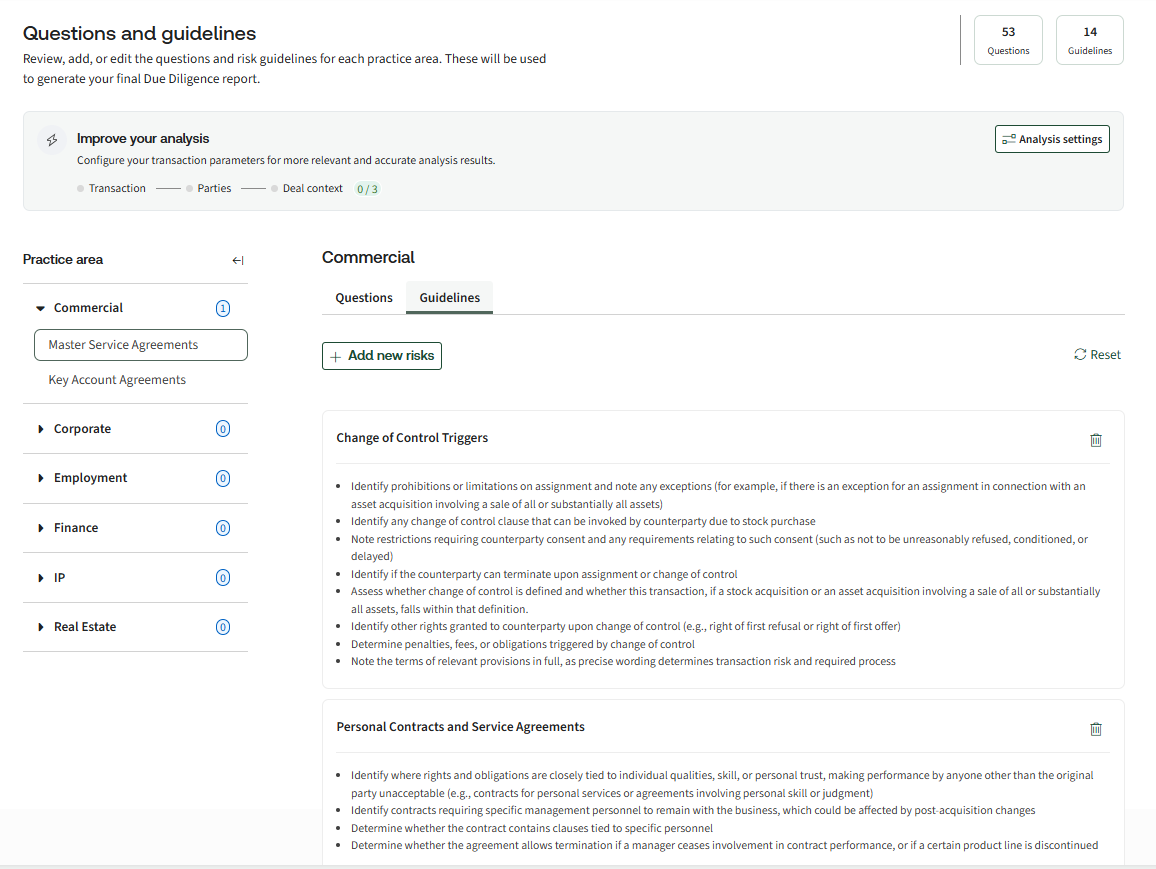
For every document type within a practice area, you can add risk guidelines. These act as further guidance and input to the AI so that it produces more effective results. You can add your own risks, on top of the defaults that ship with the pre-defined practice areas.
As you configure practice areas, document types, questions, and risk guidelines, keep the following limits in mind. These limits accommodate most use cases, but planning your configuration around them can help avoid reaching capacity.
- Custom practice areas: up to 25, in addition to the 6 built-in areas (so up to 31 in total).
- Document types per practice area: up to 25. Document types are the sub-folders within a practice area, each with its own questions and risk guidelines.
- Questions per document type: up to 150.
- Risk guidelines per document type: up to 25.
- Documents per Dealroom: up to 5,000. This is the volume of documents the analysis will cover for a single deal.
View results
Once questions and risk guidelines have been configured for all practice areas, proceed to the results. The results are generated for each analysed file based on the configuration defined in the previous step.
The results grid
Analysis is performed on related documents as a group. Where a primary document has two or three supporting documents, they are analysed together as a whole. Results are shown in a grid, for each document set there is a detailed answer to each of the questions you configured, and the questions are grouped under the column headers you set up.
Click
View more
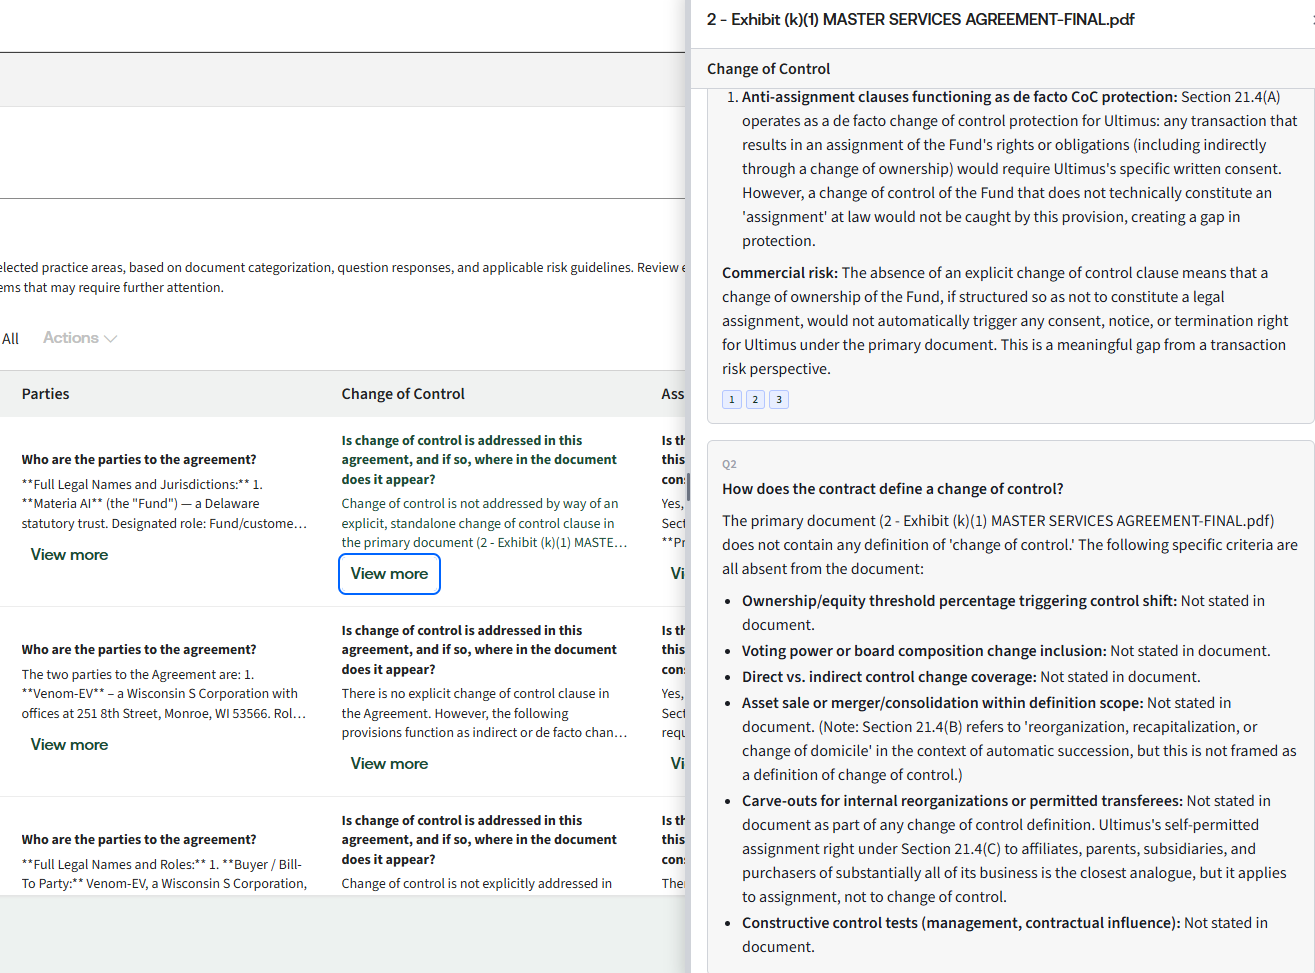
on a column header to open an expanded view, where all the questions grouped under that header are listed vertically with their answers.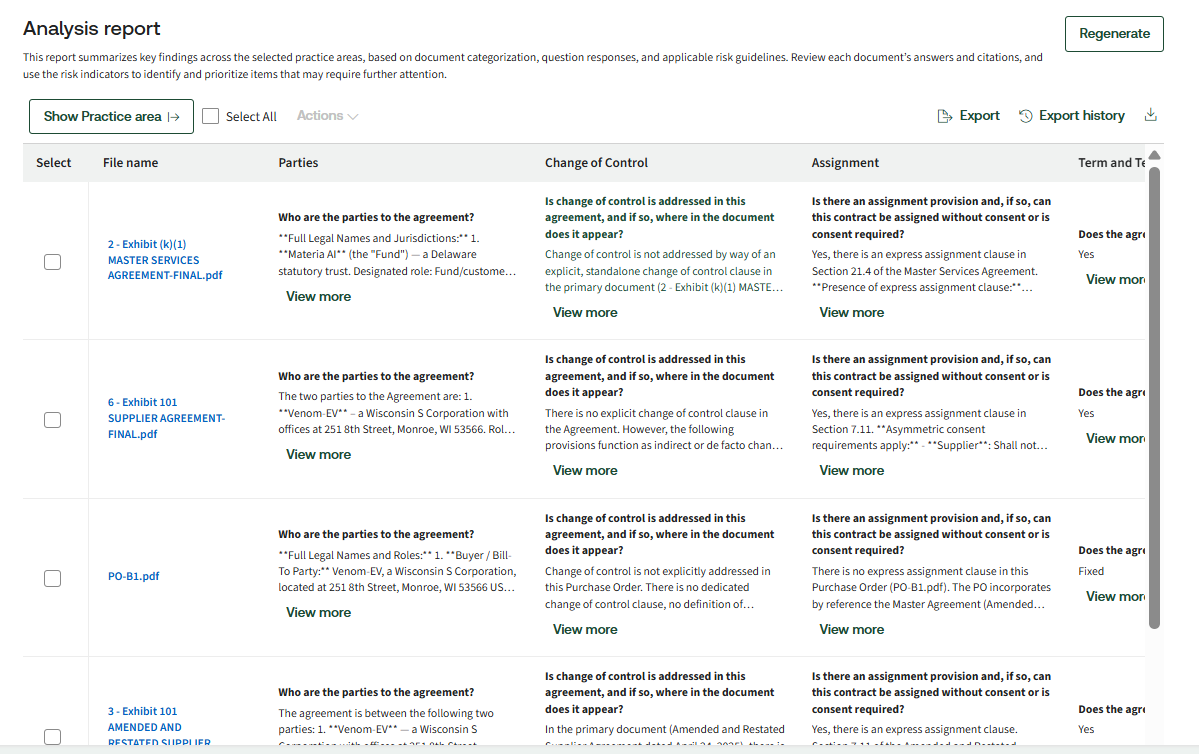
Citations and traceability
Every answer carries a citation. Clicking a citation takes you to the exact source document and anchors you to the passage the answer came from, so you can verify where the system got its information. Transparency and traceability are the foundation of trust in AI output, so every answer and every identified risk is linked back to its source.
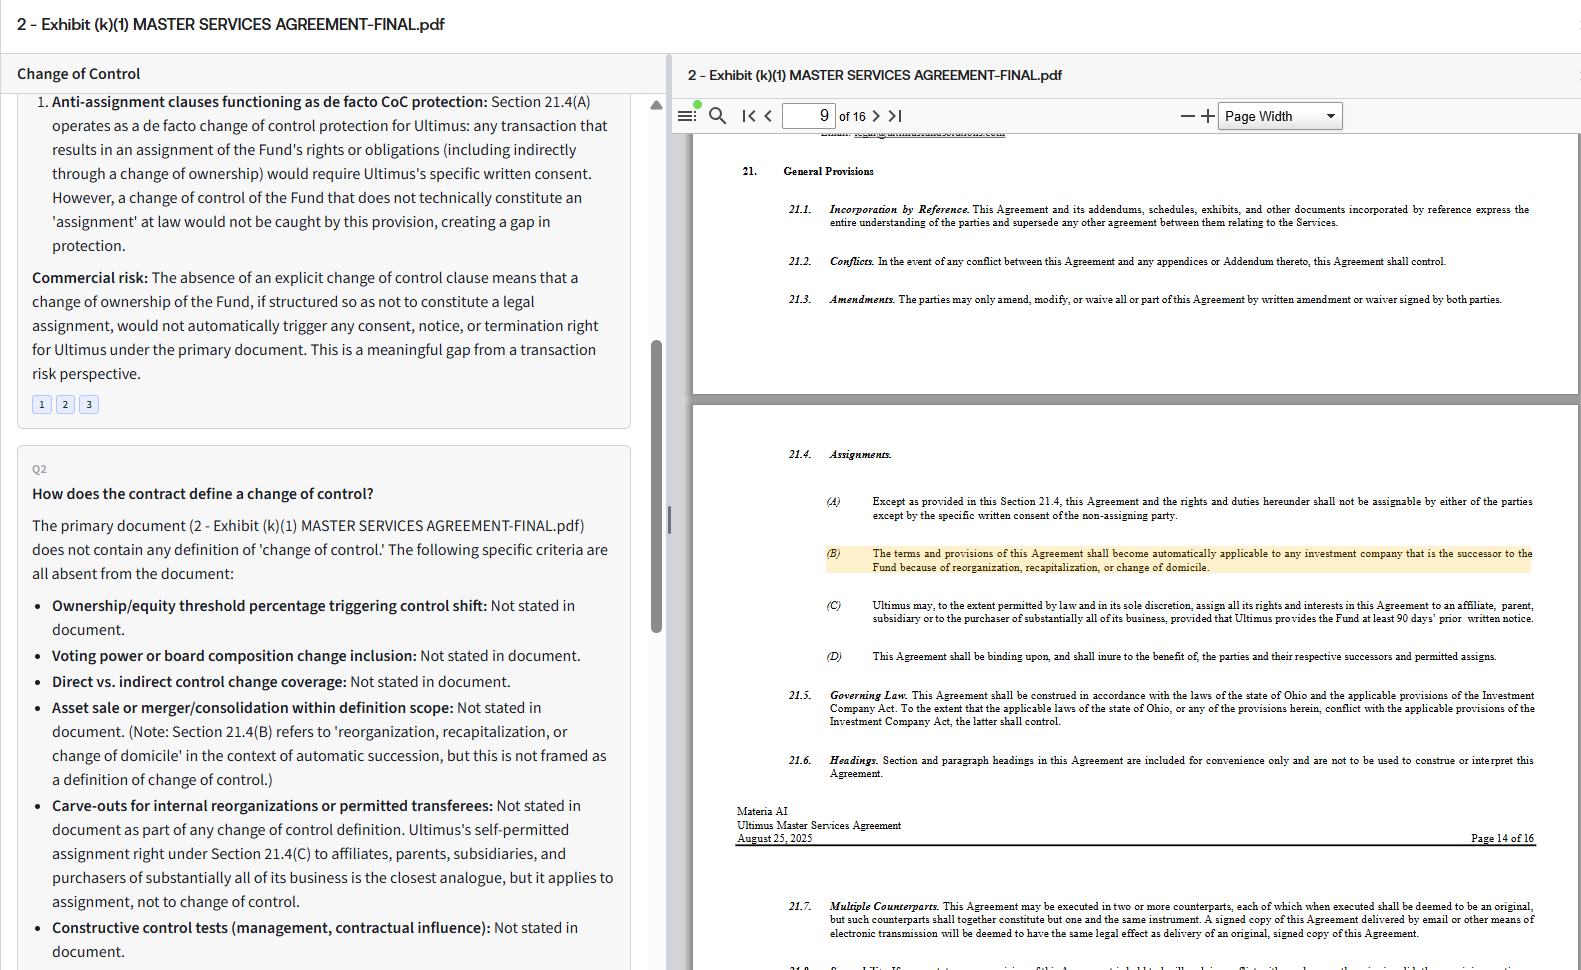
Per-document risk (red flag) view
Alongside the answers, there is a dedicated risk view for each document, based on the guidelines you provide. The system produces a brief risk report, or red flag report, listing the risks identified in that document. As with answers, each risk carries a citation; clicking it takes you to the specific passage inside the document. These document-level summaries help associates understand what is inside a document and prepare it for the next stage of review.
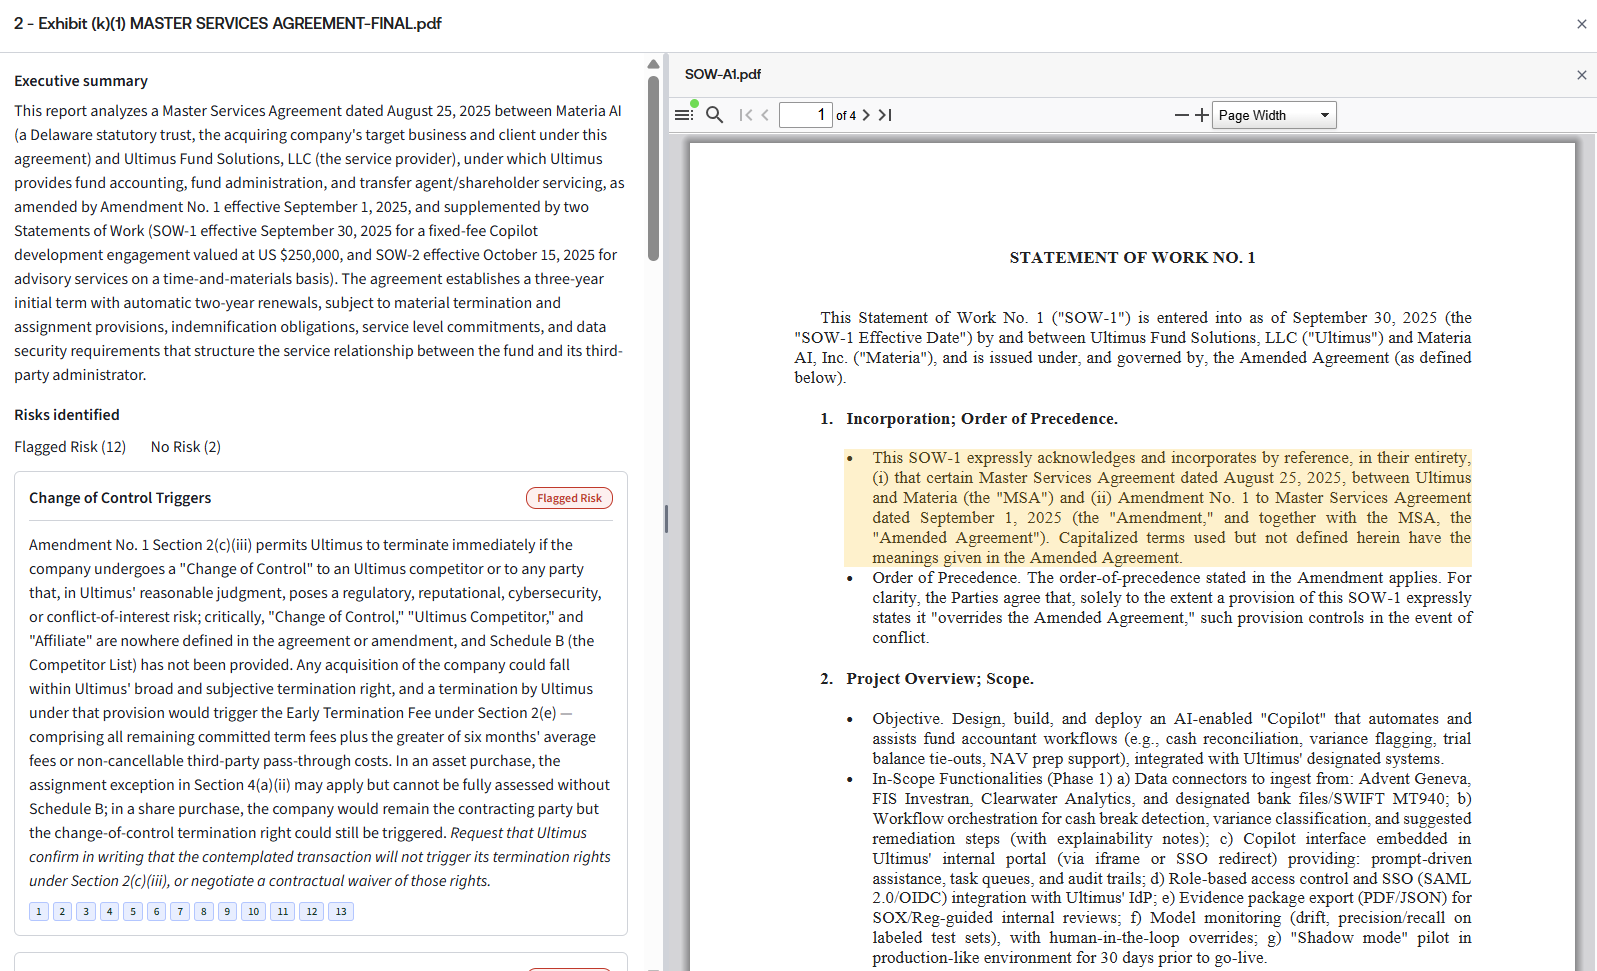
The Due Diligence report
After the document-level summaries are generated, review the Due Diligence report. This report serves as a starting point for drafting and consolidates the risks identified across analysed documents into practice-area-level summaries, such as corporate, employment, and finance.
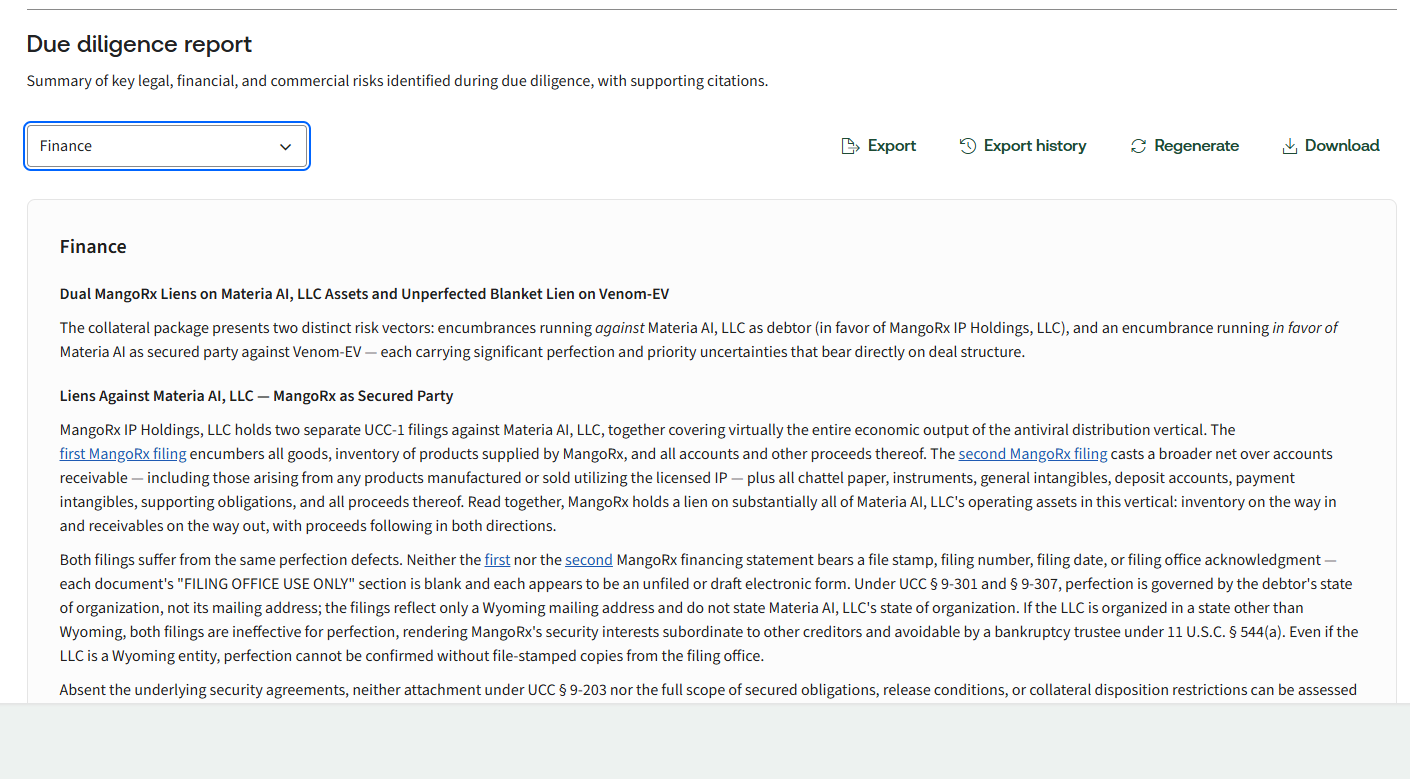
note
The Due Diligence report is a starting point for your drafting. It aggregates and surfaces the key risks per practice area; the legal team refines it from there.