
Create templates for automatic journal entry transactions
You can create automatic journal entry templates in the application. These templates contain information for journal entry transactions. The system creates journal entries from these templates automatically. This happens when you set up or edit templates, change posting periods, preview or print reports, or recalculate entries manually.
- SelectSetup, thenTransaction Templates.
- SelectJournal entryfrom theTypedropdown in the Transaction Detail section.
- Enter the journal entry information for automatic creation.noteInclude subtype, journal, reference, and description. For subtypes, enter a WP reference and selectDifferenceorMisstatement. For Regular or Adjusting subtypes, mark theAuto-reverse next periodcheckbox to reverse the journal entry as you advance to the next posing period.
- Enter the template ID (up to 11 alphanumeric characters) and description (up to 50 alphanumeric characters) on theTemplatetab.
- SelectAutomaticin theTypefield.noteThis field isn't related to theTypefield in the Transaction Detail section.
- In theStarting periodfield, select the posting period to start creating the transactions from this template in.noteFrom this posting period and going forward, the application automatically creates transactions dated for the last day of each posting period.
- Select the balance type in theBasisfield.
- Select the prior period treatment in thePrior periodsfield.noteYou can set up multiple transaction templates with an automatic frequency. SelectPrioritize Automatic Transaction Templatesfrom any saved template to specify the calculation order.
- Select theCalculationtab.
- Select the account numbers to include in the calculation in theCalculate fromgrid.noteThe account selected in the To Account column must be greater than or equal to the account selected in the From Account column. In the Balance Calculation column for each account or range of accounts, select which amounts (year-to-date or single period) to use for the balance calculation.
- Select the method for applying the overall balance. If you chooseDebit, the application will use the overall balance as is. If you chooseCredit, the application will change the sign of the overall balance.
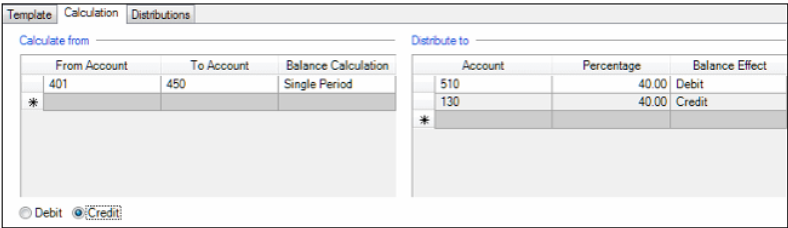
- Select the account, percentage, and balance effect for each distribution in theDistribute togrid. The total percentage for all credit distributions must equal the total percentage for all debit distributions.noteExample 1: Cost of goods sold calculation
- Set up:Average cost of goods sold. 40% of sales. Sales account range: 401-450.
- Transaction:Debit: Account 510 (COGS). Credit: Account 130 (Inventory).
- Calculation:The application calculates 40% of the total sales from accounts 401-450. It debits this amount to account 510 (COGS). It credits the same amount to account 130 (Inventory).
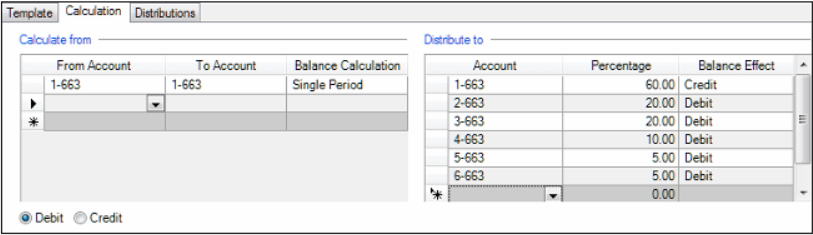
 Example 2: Multi-location expense distribution
- Initial Transaction:Weekly payment: $1,000 to Gary Hanson Lawn Maintenance. Initial debit: Account 1-663 (Location 1).
- Automatic Calculation:Credit 60% of total ($600) from Location 1 (Account 1-663). Distribute credit amount to other locations: 20% ($200) to Account 2-663 (Location 2). 20% ($200) to Account 3-663 (Location 3); 10% ($100) to Account 4-663 (Location 4). 5% ($50) to Account 5-663 (Location 5). 5% ($50) to Account 6-663 (Location 6).
- Final Distribution:Location 1 (1-663): 40% ($400); Location 2 (2-663): 20% ($200). Location 3 (3-663) 20% ($200): Location 4 (4-663): 10% ($100): Location 5 (5-663): 5% ($50): Location 6 (6-663): 5% ($50).
- SelectEnterto save the template.
- SelectPrioritize Automatic Transaction Templatesto specify the order the application should create transactions. This option is only available for transaction templates set up with anAutomaticfrequency.

