Advisory plan example walkthrough
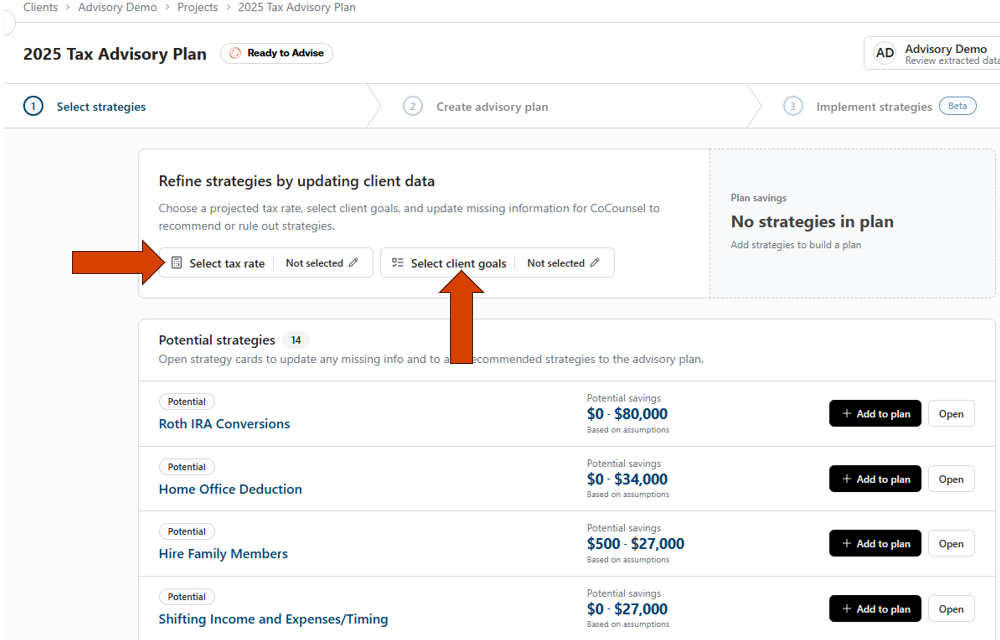
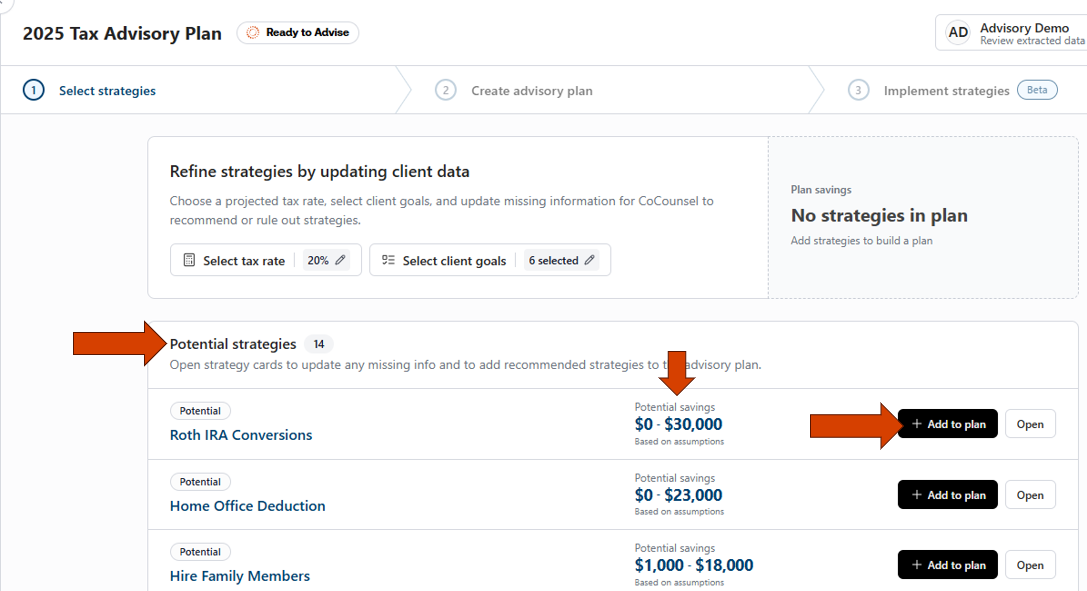
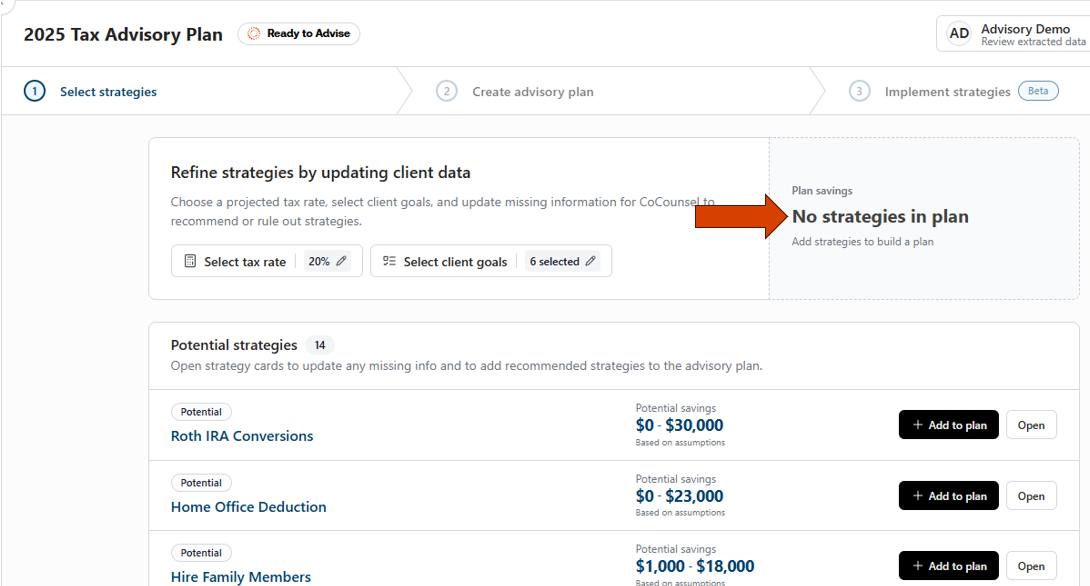
In this example, strategies were not added to the plan and there's a view of potential strategies, some that already have potential savings calculated while others may show up as N/A.
Strategies listed as N/A may not provide tax savings for your client but may still be critical to them and provide other financial benefits.
Additionally, you can also find which strategies are currently not relevant.
While these strategies are not relevant today, it doesn't mean that they’ll always be irrelevant for our client. As a client's situation changes, so can the relevancy of strategies.
Select the
Open
button on the Maximize Hire Family members strategy. From here, you can:
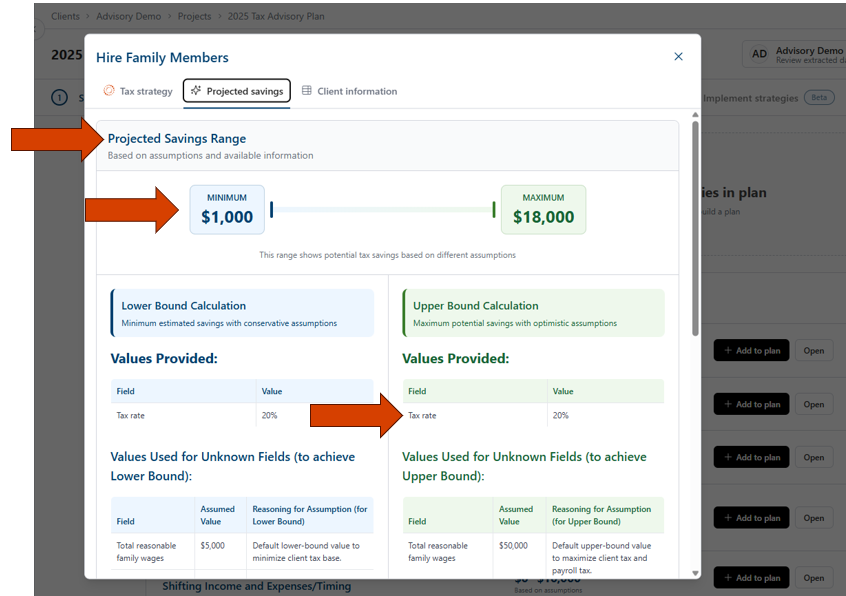
View the Projected savings or
Savings calculations
if the AI has enough information
Review the client information that AI used to determine if the client was eligible for this strategy. Additionally, you can select
Show reasoning
for an AI-generated overview on why this client is eligible.
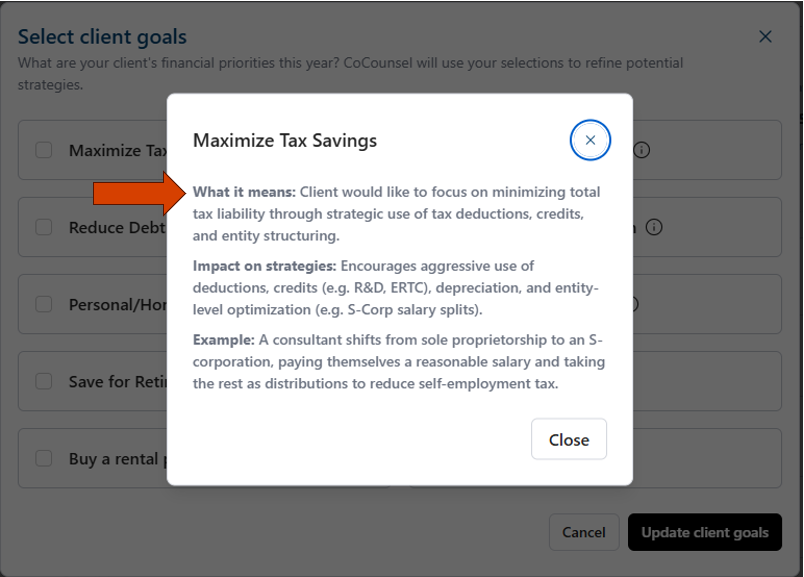
Review a description of each strategy. This is a great overview for those advisors that may be slightly unfamiliar with a topic or strategy to review. Additionally, there may be other items for you, the advisor to consider as well.
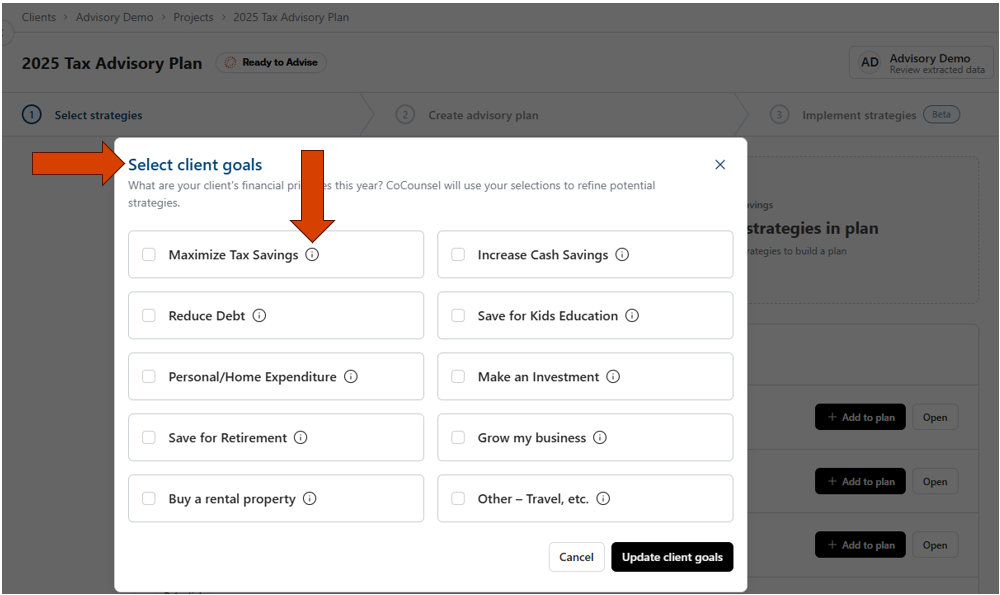
See what client goals this strategy aligns with.
Review the potential savings and
Add to plan
.
Selecting
Projected savings
calculations will provide you with an AI-generated range of potential savings. The AI will generate upper and lower bound ranges by reviewing the information that it knows and then entering several other assumptions. As you add more unknown details, the AI will continue to refine these projections.
The AI is using the 20% that was added earlier and then creating some assumptions.
The AI will also provide reasoning steps that the user can follow.
Update a few fields in the client information and see how the AI then leverages those additional details. Any areas shaded in yellow are areas that we can populate to help determine the eligibility of a strategy and to provide more accurate calculations. Update a few fields and then select
Update client data
.
If you don’t know the answers to all these questions, you may also need to have a follow-up conversation with your client.
After you update a few fields, return to Projected Savings; the AI incorporates your changes and narrows the savings range.
Updating all the missing information will give us more of an exact calculation. The
Projected savings
tab will now change to a
Savings calculation
tab and will show the details behind the calculations performed.
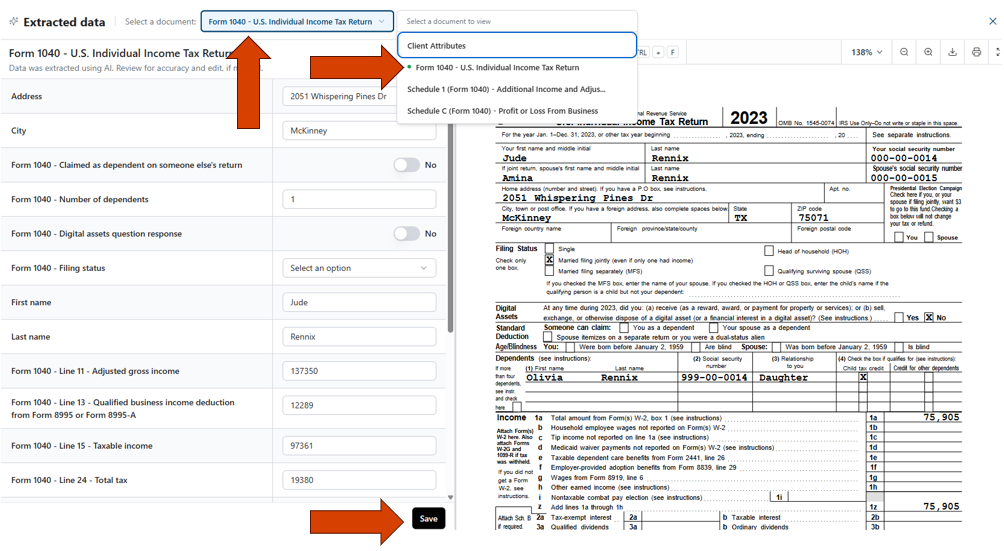
When selecting
Client information
you can also view where information was pulled directly from the tax return.
Lastly, selecting
Add to plan
will now populate the strategies in the plan. Once all strategies that you'd like to discuss with your client have been added to plan, you can now
Create the plan
.
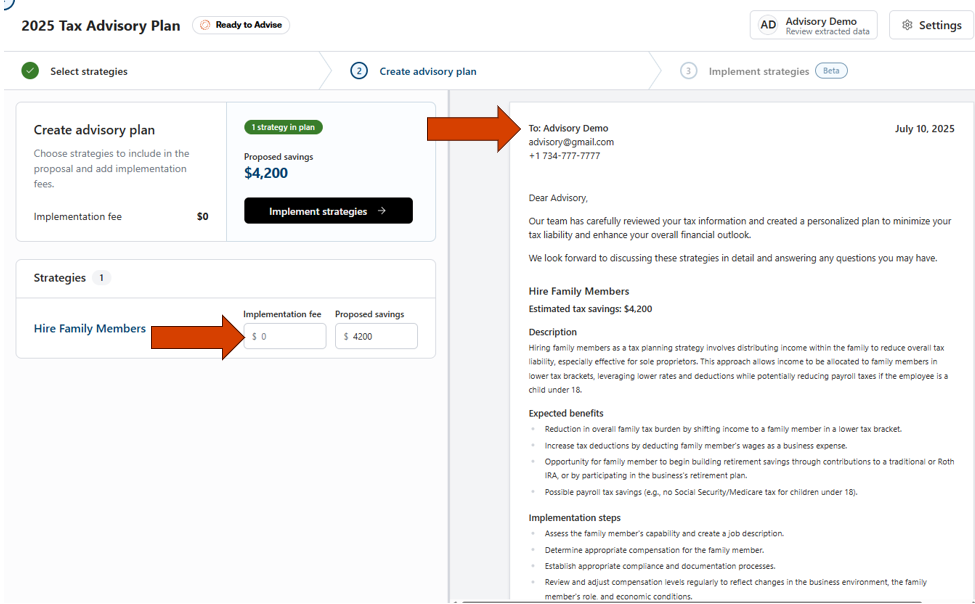
On the
Create advisory plan
step, build your client's plan summary. Use it as a proposal, a discussion aid for recommended strategies, or a summary to support an official proposal.
In the left pane you can enter in an implementation cost (discussed in the following sections) and update the potential savings estimate to your liking.
In the center pane, your client's name will be listed at the top along with a brief introduction to your client (in our example, of client's name is 'Advisory Demo').
If we scroll further down the proposal to see a larger view of the center pane, you will notice that each strategy will include the following information:
Strategy name
Brief description of the strategy
Expected benefits of moving forward with the strategy
High-level view into what steps would need to be taken to implement the strategy
Estimated tax savings
At this time, these areas are not editable, but users will be able to download to Word for manual modifications.
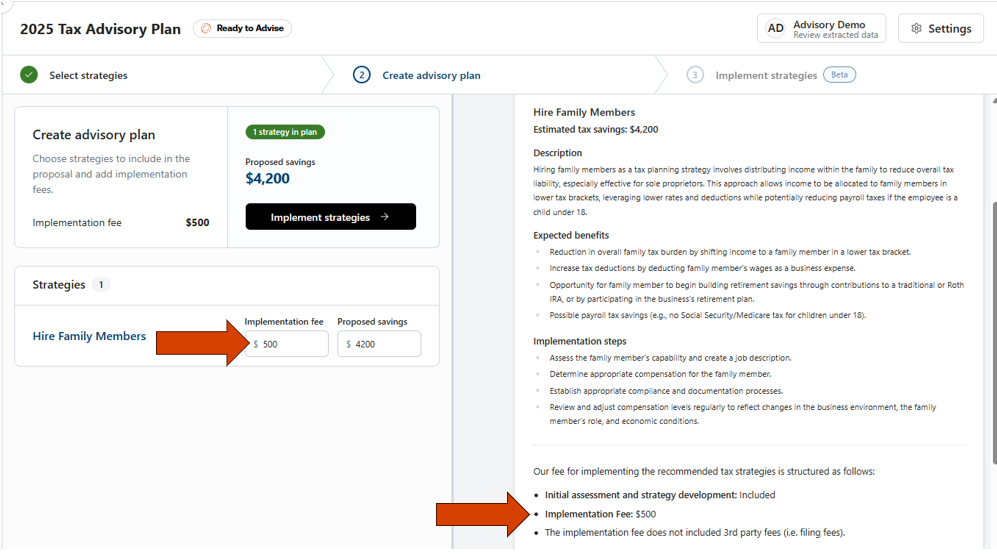
You will have the ability to enter in an Implementation fee that will transfer to the plan Summary that you can print, download, and send to your client. We define implementation fee as the cost that the client would pay to implement the strategy. To reiterate, this would be your firm's fee and other associated costs with setting up and implementing a specific strategy or set of strategies.
In this walkthrough, an implementation fee of $500 was included for the Hire Family Members strategy.
To round out this walk through, we'll now review one of our newest features called AI Guided Workflows. Here we’ll have an AI expert help walk you through implementing a specific strategy.
This assumes that you've had a conversation with your client and they are ready to move forward with implementing a strategy or set of strategies. We'll begin by selecting the
Implement strategies
button.
Because this feature is continually evolving, we've added the beta tag to let you know that we're still adding additional capabilities to this tool. Additionally, you'll also see a board indicating the status of each strategy. In the following example, we have added this strategy to the board and have not started on it yet. As you progress through the different implementation steps, the strategy will move to different phases and indicate progress.
Selecting the strategy card will open up the AI Guided Workflow. The center pane will be where your interactions with the AI expert take place and you'll work with the expert through the chat box at the bottom of the page. The right pane will be an area where you can view the steps needed to be completed, review any client deliverables that the expert will help create and also give you access to an audit log so that you can track and review your work or the work of another staff member.
Let's walk through a couple steps. Select
Get started
in the center pane and the expert will get us kicked off.
You can further interact by asking the Agent additional questions before moving on to the next step.
The expert will provide a response, using the underlying Checkpoint content as the source of truth.
When you're ready to move forward, you can let the expert know and select
Go to next step
.
This will auto-mark step 1 as being complete and then we can move to step 2.
In step 2 you will create your first deliverable after providing the expert with some additional details.
We can now access out first client deliverable.
You can edit the deliverable in the right pane or ask the expert to make real time edits, which will change what you see in the deliverable.
You can continue going through each of the steps to implement a strategy. We hope that this will be a valuable tool to help standardize implementation processes, empower staff members that may not be as familiar with implementing strategies, and provide you more confidence in implementing strategies that you might not be familiar with today.
Remember, you can always leave and come back to a project at any time. When you come back to a project, you'll be able to get started exactly where you left off.
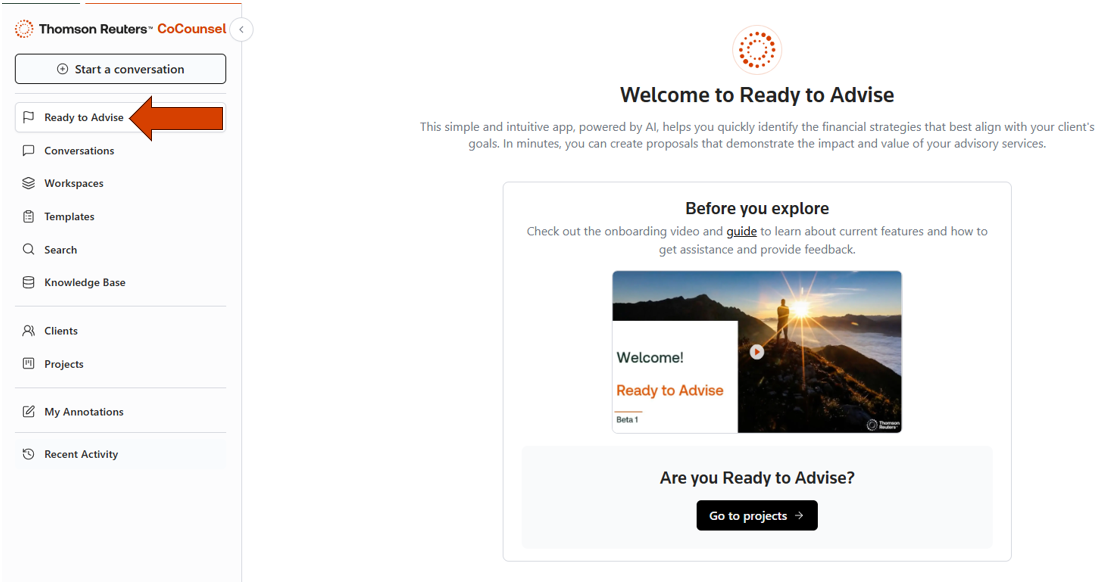
Lastly, each time you log in, you will always be taken to the Welcome page. If you have already created at least 1 advisory project, then you will notice that you can now be taken directly to your projects page.
On the
Projects
page, you will be able to create a new project or jump back into a project that you've already started. Here, you can also view the status of each project and have several options available to filter or search for specific projects.
This concludes our high-level walkthrough of Ready to Advise.