
Multi-line text Variable
A Multi-line text allows you to enter text across multiple lines and is best suited for inputs like addresses.
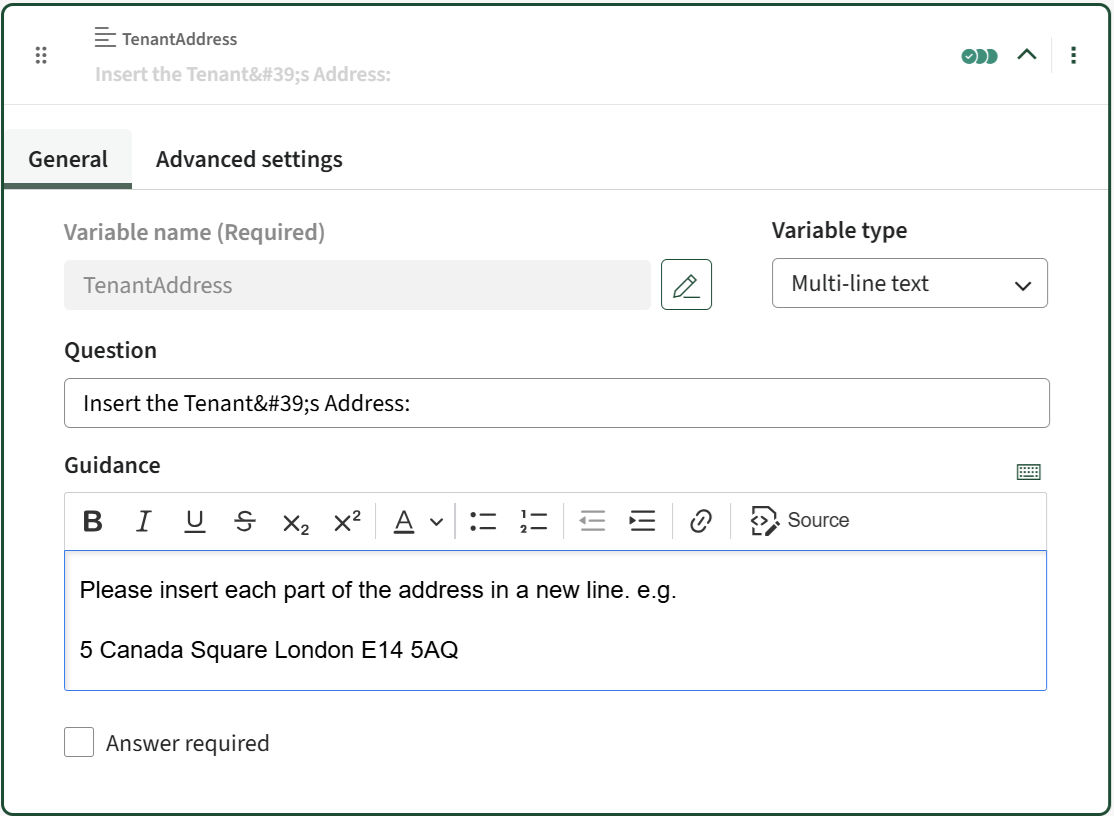
- Question: This is the question we want to ask the user. It typically specifies the question text displayed on the questionnaire shown to end users.
- Guidance: This specifies the guidance text that appears below the question in the questionnaire. It also supports rich text formatting using the controls above the text box.noteIf you want to make a specific question compulsory for the user, check theAnswer requiredbox. Required questions display a red asterisk and prevent submission until they are answered.
Advanced settings
This section is divided into three different settings. On the Questionnaire, lists questions and input fields shown to end users in Author Online to collect structured feedback or data, which may vary by content type. The document outlines the values that will be included in the final document generated after the questionnaire is completed and the template is assembled. Repeated groups help authors organise content that could be repeated.
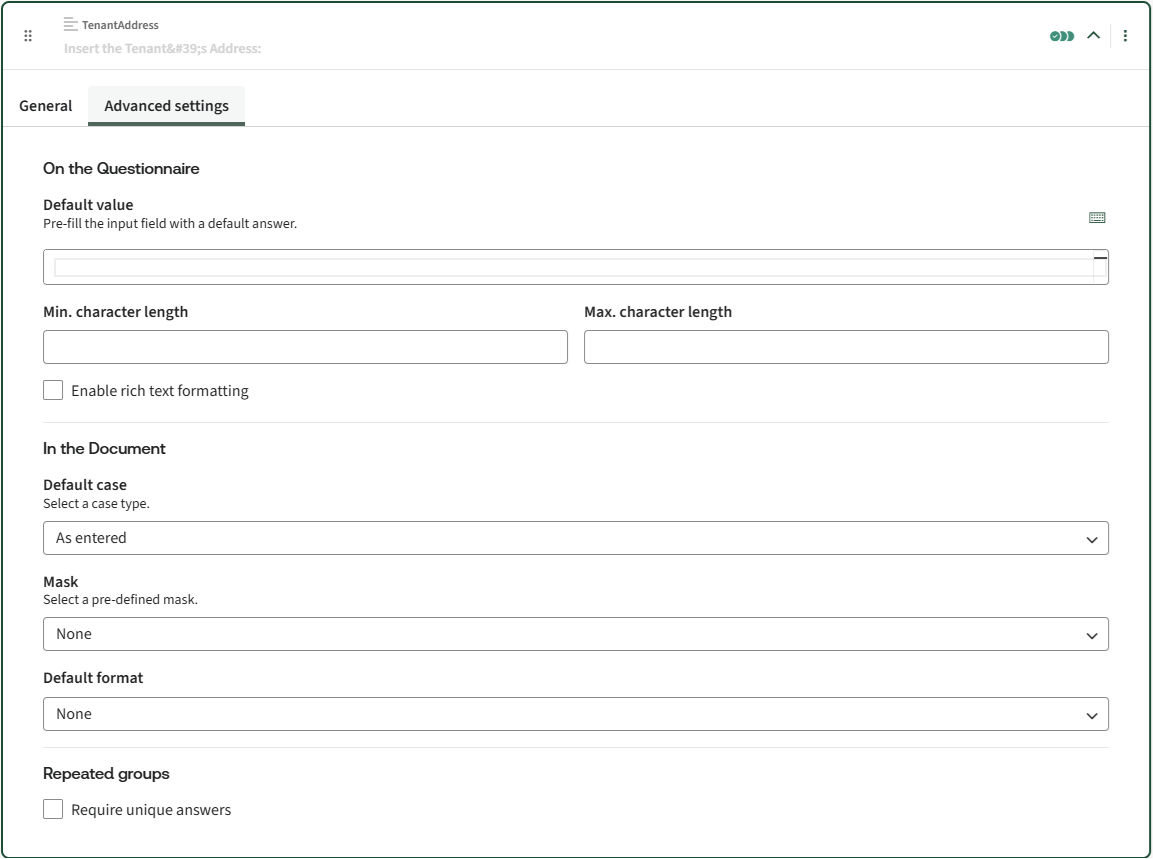
On the Questionnaire
- Default value: Default values are pre-filled entries that appear in questionnaire fields when accessed for the first time. You can later type these values manually in the edit boxes or derive them using expressions in the questionnaires. When setting a default value for a text variable, it must be enclosed in double quotes.If a variable remains unanswered, because the user removed the default or skipped the relevant questionnaire page, the default value will not appear in the final document. This ensures only confirmed user inputs are included.
- Min. character length: Must be a positive whole number representing the minimum number of characters allowed in the questionnaire.
- Max. character length: Must be a positive whole number representing the maximum number of characters allowed in the questionnaire. The text box will prevent the user from entering more characters than the specified value for this attribute.
- Enable rich text formatting: When this option is selected, an edit box with rich text formatting options is displayed in the questionnaire, allowing the user to apply formatting such as changing text colour, background colour, and font and insert content such as tables and images.noteAn "Include HTML" statement must be included in the template for the formatted text to render correctly in the generated document.
In the Document
Default case
The default case specifies the casing of variable values in a generated document when no local case is defined. The available options are:
Format Option | Description |
|---|---|
Capitalize Each Word (capitals) | The first letter of all words will appear capitalised in the generated document. |
Uppercase (upper) | All letters will appear in uppercase in the generated document. |
Lowercase (lower) | All letters will appear in lowercase in the generated document. |
As entered | All letters will appear as they are entered on the questionnaire in the generated document. |
Title case (proper) | The first letter of all major words will be capitalised in the generated document. |
First letter capitalize (firstletter) | The first letter of each word will be capitalised in the generated document. |
If no default case is selected, the value will be generated as entered in the questionnaire, by default.
For detailed instructions, see Field format and case overview.
Mask
A
Mask
is a pattern applied to a variable that enforces a specific input format in the questionnaire. It ensures that users enter information in the required structure before they can continue, helping maintain data accuracy and consistency.Masks can be either be:
- a pre-defined mask
- Custom mask
They control both the
type
and format
of characters a user can enter, such as letters, numbers, or special characters. If the user's input does not match the mask, the questionnaire will not proceed. For example, if you need to capture an ISIN number
, which consists of two uppercase letters followed by eight digits, you can apply the following mask: AA########
In this mask, each symbol represents an allowed character type:
- Arepresents an uppercase letter (A–Z)
- #represents a digit (0–9)
With this mask applied, the user must enter exactly two uppercase letters followed by eight digits. Any other format will be rejected.
The available pre-defined mask options are:
Pre-defined masks | Description |
|---|---|
Telephone number (telephone) | The user must enter a valid telephone number consisting of digits (0–9), spaces, or hyphens, with an optional leading plus (+) and optional matching parentheses. |
Email address (emailaddress) | The user must enter a valid email address. Any sequence of characters that contains at least one at (@) character and at least one dot (.) character. |
Web address (webaddress) | The user must enter a valid email address. Any sequence of characters that contains at least one dot (.) character. |
UK postcode search (searchaddress) | Enables the UK postcode search in the questionnaire by displaying a Search for address button below the text field.
note This feature works only when en‑GB is set as the template's base locale. |
Company search (searchcompany) | Enables the Companies House search feature by displaying a Search Companies House button next to the text field in the questionnaire.
note This works only when the base locale is en‑GB (UK companies), nl‑NL (Netherlands companies), or when /en‑GB or /nl‑NL is manually added to the mask for templates using a different base locale. |
Password field (password) | The edit box contains bullet characters for every character typed by the user.
note The password is only masked in the questionnaire, but in the Document History, it is recorded in plain text. |
Alternatively, you can create a custom mask by selecting the
Create new
option from the dropdown list. The newly created mask will be automatically selected by default, without the need to select it manually and will be updated as the most recent. If any mask is modified, it will be re-ordered to appear with the most recently modified status in the dropdown.Prevent line breaks
When the option is checked, the information appears on a single line, separated by commas (if multiple), instead of being displayed as a list.
Default format
The default format attribute determines how variable values appear in a generated document when no local formatting is applied. The default format is interpreted based on the variable type. You can choose from popular formats using the dropdown menu or create your own by selecting the
Create new
option. Clicking the Edit format
button will open the Format dialog, and the newly created format will be selected as the default.If you choose
None
as the default format, the generated document will undo the previous selection and remove the selected format.You can manage both newly created and existing formats by selecting the format and clicking
Edit format
. This will open the Edit Format dialog box, which provides options to Delete, Save, or Cancel.- Delete– Removes the selected format.
- Save– saves the custom formats in the Format table according to applicable conditions.
- Cancel– Discards the custom formats, and they will not be stored in the format table.
note
When custom formats are created for a data type, they will be displayed as options in the 'format' dropdown, ordered by the most recently added and appearing immediately after the default format list. If any format is modified, it will be re-ordered to appear by the most recently modified status in the dropdown.
For , the available default formats are below:
multi-line text
Pre-defined formats | Result |
|---|---|
Punctuation with "and" (, | and ) | John, Mary and David |
Punctuation with Oxford comma (, |, and |.| and ) | Anna, John, and Lisa. |
Line breaks (^L) | Anna John |
Line breaks with punctuation (;^L|; and^L|.) | Anna; John; and Lisa. |
See list format and multiline text format for details on how to apply different formatting options.
Related Content
-
Variables in Author Online
Format: Article