
Set up a SharePoint Online connection in Contract Express
With Contract Express, you can connect to SharePoint Online to use list data as an External Table or export documents to libraries.
This guide outlines the steps to configure a connection to SharePoint Online. This must be done by an Administrator in Contract Express.
Set up connection in SharePoint Online
To configure a connection to Contract Express in SharePoint Online:
Set up connection
- Go toAzure Active Directory.
- In App Registration, add a new application and complete the following parameters:
- Name
- Redirect URI: select Web and enter {ContractExpressURL}/dms/callback
noteDon't forget to add the bit after the trailing slash in your Contract Express URL. For example: https://eu1.contractexpress.com/app/dms/callback - Click Register.
- In theCertificates and Secretssection, add a new client secret.
- Add a description, e.g. Contract Express.
- Make a note of the Client Secret Value (not the Secret ID). You'll need this to set up the connection in Contract Express.
- Return to the main Overview page and copy the Application (client) ID. This is what Contract Express refers to as the Client ID in the next section.
- Make a note of the Directory (tenant) ID. This will be used to build your SharePoint Online OAUTH API URL in Contract Express.
Set permissions
- InAPI permissions, add a permission.
- SelectMicrosoft Graphfrom the options.
- When prompted for the type of permission, selectDelegated permissions.
- For connections that are to be used for Export only, select the Sites dropdown and tick Sites.Manage.All.
- For connections that are to be used for an External Table, select the Sites dropdown and tick Sites.Manage.All.
- Click theAdd permissionsbutton.
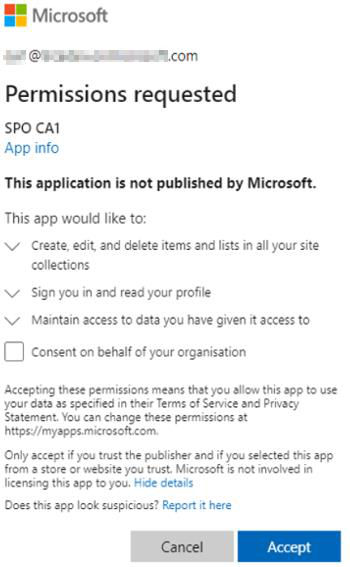
This access will require admin consent. To grant consent, perform export of a document or click Test connection on the external table entry in the Admin tab. Log in with SPO admin account when prompted. After authentication, you will see a permissions request where you can check "Consent on behalf of your organisation" and click Accept.
Index your SharePoint Online list
If you want to use SharePoint Online list as External Table, ensure that your SharePoint Online list has been indexed. This allows the columns in SharePoint to "speak to each other", so that when a choice is made in the Text Selection variable, the relevant data from other columns is pulled through into the computations that need this information.
To index a SharePoint Online list:
- Navigate to the relevant list in SharePoint Online.
- Click the cogwheel at the top right.
- Click on List Settings.
- Scroll down and click onIndexed Columns.
- ClickCreate new index.
- Choose the column that will be used as the index.
Use display names or internal column names
SharePoint columns have a display name and an internal name and the two are not always the same. When you set up SharePoint Online list as an External Table, you can specify that you want to use internal names for the columns. This option reduces the number of API calls made per request and can improve performance. If the checkbox is left blank, data will be searched both by the internal column names and display names.

There are several ways to check the internal column names. One of the quickest ways is to sort your list by the column you are interested in and check the value of the sortField parameter in the browser URL.

Searchable List limitation
Note that SharePoint only supports searchable lists using “begins with” filter. Currently they do not support list queries using “contains” filter.
Set up connection in Contract Express
To configure a connection to SharePoint Online in Contract Express:
- Go toAdmin>Connection settingsand click the +Add connectionbutton.
- Choose SharePoint Online as the Integration type.
- Give the connection a name to differentiate it from any other connections that are set up.
- Enter your SharePoint Online OAUTH API URL, followed by your Directory (tenant) ID. For example: https://login.microsoft.com/{DirectoryTenantID}
- Enter the SharePoint Online API URL. This will be https://graph.microsoft.com/v1.0
- Enter your Client ID and Client Secret copied from your Azure Active Directory page.
- Click theSavebutton at the top of the page.
note
You can create multiple connections to one or more applications. Adding a connection will enable it for the entire license space.
When exporting, all users will be offered the ability to connect to each enabled connection, however they can only successfully connect to the connections for which they have valid credentials.