
Build a Table of Authorities
The Table of Authorities (TOA) Builder inserts a properly formatted list of references in your legal document.
Use the following steps to build a Table of Authorities.
- Select theTOA Buildertool on the left side of your document.
- If you are a new user, it is recommended that you define presets for common use cases using theProfileoptions. Profiles let you select, save, and reuse options you use frequently.
- Under Cite Identification Range, select one of the following:
- Search entire document for cite identificationto search the entire document for cite identification.
- Mark beginning and end range for cite identificationto restrict the search to only part of the document. Place the cursor in the document at the beginning of the desired range and select theSet start positionbutton. Place the cursor at the end of the desired range and select theSet end positionbutton. You can also change the range by selecting either theUpdate start positionorUpdate end position buttons.
- SelectRun TOA Builder. All authorities found in the document will display in the left pane.
- Optionally, select theHide/Show All Instancesbutton (
 ) to display or hide additional instances of citations.
 - To locate a citation in your document, select it from the citations list in the left pane. The document view scrolls to the location of the citation and the citation is highlighted in your document.
- Select individual checkboxes, content category checkboxes, or theSelect Allcheckbox to select the citations you want to include in the TOA. All citations are selected by default.
- Select thePlus(
 ) button to manually add a citation. Then, complete the following:
- Choose a category: Select the citation category and jurisdiction for the citation. SelectNext.
- Input citation text: Enter theTitleandReporter Stringin the fields. Confirm the citation is correct in the Preview window and then selectNext.
- Add citation: Select the full citation in the document and then selectAdd. The citation will be added to the list.noteYou can also select the citation in your document before you select thePlusicon. Fields will be autopopulated based on your select and you can edit.After you add a manual citation to the list, the list will re-alphabetize itself. If you plan to relocate a citation out of alphabetical order, be sure to add all necessary manual citations before you manually move citations to the locations.
- When selecting a citation in the list, you have the following options:
- Select theEdit Text(
 ) button to edit the citation. Edit the title or reporter string, confirm the citation is correct in the Preview, and select Save.
 - Select theMove Up(
 ) or Move Down(
 ) button to move it up or down in the list. You can also drag and drop citations to any other part of the list.
 - Select theMake Primary(
 ) button to change a secondary citation into a primary one in the list. Select the Make SecondaryorMake Instance(
 ) button to change the citation to a secondary citation of the citation immediately above it in the list.
 - Select theEdit Range(
 ) button to change the range of the cite in the document. Select to change the TitleorReporter, select the complete title or reporter string in the document, confirm its correctness in the Preview, select theUpdatebutton, and then selectSave.
- SelectInsert TOA.
- Select in the document to select a position in the document to insert your TOA, then selectSubmit.
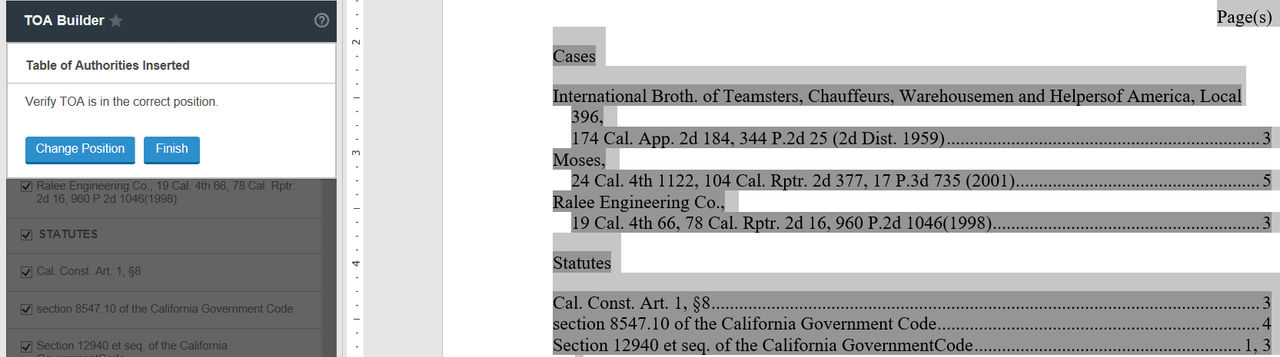
- Verify the TOA is in the correct position. SelectChange Position, if needed. SelectFinish.
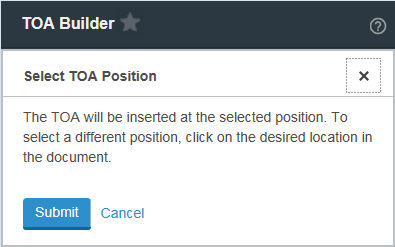
- A message verifying the TOA has been inserted displays. SelectXto close.
The table of authorities is inserted in your document at the cursor location. The table of authorities includes the following headings, dependent on the selected Profile settings: Cases, Federal Cases, State Cases, Statutes, Federal Statutes, State Statutes, Rules, Federal Rules, State Rules, Regulations, Federal Regulations, State Regulations, and Other Authorities.
Edit citations and add additional citations after the TOA has been created
After you insert the Table or Authorities into your document, you can add additional citations or edit additional citations within both the text of the document and the Table of Authorities without undoing your previous work. Before you begin, add or edit any citations.
- Select theTOA Buildertool on the left side of your document.
- Under Cite Identification Range, select one of the following:
- Search the entire document for cite identificationto search the entire document for cite identification.
- Mark the beginning and end range for cite identificationto restrict the search to only part of the document. Place the cursor in the document at the beginning of the range and select theSet start positionbutton. Place the cursor at the end of the desired range and select theSet end positionbutton. You can also change the range by selecting either theUpdate start positionorUpdate end position buttons.
- SelectRun TOA Builder.
- Select one of the following:
- Continue editing the existing TOAto maintain all edits that have been previously made.
- Remove existing TOA Tags and start againto start from scratch with the Table of Authorities.
- SelectContinue. The citation list will appear in the left pane.
- If you selected to keep the previous TOA, new or edited citations will appear with a New icon next to them in the list. Drafting Assistant classifies new citations as:
- Citations that you added to the text after the first TOA was completed.
- Citations that were removed from the TOA the first time. If you deselected a citation previously, it will reappear in the list and be selected by default.
- Manipulate the list of citations as described previous as necessary and selectInsert TOAto begin the process of inserting the TOA into your document once more.noteAfter you run the TOA Builder again or insert a manual citation, the citation list will re-alphabetize itself. If you plan to relocate a citation out of alphabetical order, be sure to add all necessary manual citations before you manually move citations to the locations.
Related Content
-
About TOA Builder
Format: Article