
Setup
Use the following instructions to configure workstations prior to launching Engagement Manager. Completing these steps ensures optimal performance for your application.
If you experience issues in Engagement Manager, complete this setup to ensure that all settings are configured correctly. In some instances, Microsoft Office updates, internet browser updates, and a reset of your internet browser can cause settings to be removed.
If you're still experiencing issues after completing these steps, the Troubleshoot common workstation issues article provides answers to common issues that you may encounter in Engagement Manager.
Configure your internet options
You'll need to set up the following internet options for
Engagement Manager
to work properly.- Select the search icon next to the Windows Start button and enterInternet Options.
- SelectInternet optionsfrom the menu.
- Go to theGeneraltab:
- SelectSettingsfrom theBrowsing historysection.
- On theTemporary Internet Filestab:
- SelectEvery time I visit the webpage, thenOK.
- SelectDeletefrom the Browsing history section.
- Mark theTemporary Internet Files and website filesandCookies and website datacheckboxes and clear every other option.
- SelectDelete.
- Go to theSecuritytab:
- SelectTrusted sites, then selectSites.
- Clear theRequire server verification (https:) for all sites in this zonecheckbox.
- In theAdd this web site to the zonefield, enter*.thomsonreuters.com,, then select*.engagementmanager.thomsonreuters.com,*.onvio.usand*.gofileroom.comAdd.
- Re-mark theRequire server verification (https:) for all sites in this zone, then selectClose.
- SelectCustom level.
- In theReset custom settingsdrop-down list, selectLow, thenReset.
- In theSettingslist, enableDisplay mixed content, then selectOK.
- Go to theAdvancedtab:
- Mark theUse TLS 1.2checkbox.
- SelectApply, thenOK.
Set up Google Chrome
To access GoFileRoom, Engagement Manager and Guided Assurance, each user's workstation must first be configured prior to their first sign in. Engagement Manager is not supported on Microsoft Edge. We recommend that you use Google Chrome.
Before you open Engagement Manager with Google Chrome, you need to configure the browser. Engagement Manager uses notifications, pop-ups, and redirects that Chrome can block automatically.
- Open Google Chrome.
- Select
 to open the Chrome menu, then select Settings.
 - OpenPrivacy and security, then selectSite Settings.
- You can allow:
- Notifications from [*.]engagementmanager.thomsonreuters.com [*.]onvio.us [*.]gofileroom.com [*.]thomsonreuters.com. This enables notifications to pop up when the user’s sign-in session is about to time out.
- Additional permissions: Automatic downloads from [*.]engagementmanager.thomsonreuters.com [*.]onvio.us [*.]gofileroom.com [*.]thomsonreuters.com. This helps when viewing and editing documents.
- Pop-ups and redirects from [*.]engagementmanager.thomsonreuters.com [*.]onvio.us [*.]gofileroom.com [*.]thomsonreuters.com. This allows files to be opened from Engagement Manager.
Engagement Manager with Microsoft Edge
Use these steps to set up Microsoft Edge for Engagement Manager.
important
We don’t support using Microsoft Edge with Engagement Manager. At this time, there is
no
internal testing in the Microsoft Edge browser or any guarantee that all functionalities will work in the Edge browser. We recommend that you use Chrome as the default internet browser on your workstation.- Open Microsoft Edge.
- Select
 to open the browser menu and select Settings.
 - SelectCookies and site permissions, thenManage and delete cookies and site data.
- In theAllowsection, selectAdd.
- Enter each site and useAddto save:
- [*.]engagementmanager.thomsonreuters.com
- [*.]onvio.us
- [*.]gofileroom.com
- SelectCookies and data storedto go back to the previous screen, thenNotifications.
- In theAllowsection, selectAdd.
- Enter [*.]engagementmanager.thomsonreuters.com and selectAdd.
- SelectSite permissionsto go back to the previous screen, thenPop-ups and redirects.
- In theAllowsection, selectAdd.
- Enter each site and useAddto save:
- [*.]engagementmanager.thomsonreuters.com
- [*.]onvio.us
- [*.]gofileroom.com
Install GoFileRoom Add-In
If you have administrative privileges, you can follow these steps to install the GoFileRoom Add-In.
important
- Prior to installing the latest GoFileRoom Add-In, verify that the prior version has been uninstalled. GoFileRoom functionality may be hindered if multiple versions of the Add-In are installed on the same machine.
- Microsoft .NET 4.0 Framework (or higher) must be installed on your machine to use the GoFileRoom Add-In.
To install the GoFileRoom Add-In:
- If .NET 4.0 Framework (or higher) is not installed, download and install Microsoft .NET 4.0 from the Microsoft website.
- Hover over your username, then selectPreferences. Go to theDownloadstab, then selectGoFileRoom Add-Infrom the dropdown list.
- After it downloads, right-click theGoFileRoom-Add-In.exefile, then selectRun as administrator.
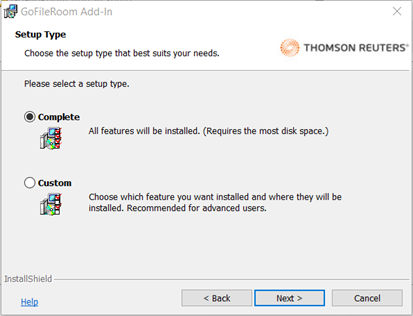
- The InstallShield Wizard will guide you through the remainder of the installation process. SelectFinishto complete the installation. SelectYesto restart your computer.
- (Optional) The GoFileRoom Add-In lets you make a customized installation and control what components are going to be installed. While it’s recommended to perform a Complete installation, the Custom install is available for certain situations.
note
- The InstallShield Wizard provides you with the option to install all the components of the GoFileRoom Add-In at once, or to choose which components to install.
- Terminal Server Add-In installations are required to be run at the console as an Administrator.
These are the commonly used features of the GoFileRoom Add-In:
- Adobe Acrobat integrates GoFileRoom and Adobe functionality.
- ControlPanel simplifies uploading and managing your files in GoFileRoom.
- Microsoft Office integrates GoFileRoom and Microsoft Word and Excel functionality.
- QuickLaunch lets you quickly launch and use GoFileRoom without having to sign in each time.
- If licensed, ScanFlow fully integrates with GoFileRoom. ScanFlow leverages 100% accurate barcode and indexing features to scan large batches of documents quickly and accurately.
note
- GoFileRoom supports the current and one prior version of the Add-In. If your firm experiences any issues, make sure your users have the latest version of the Add-In installed.
- There are 2 alternatives to perform the installation in silent mode:
Install Engagement Manager Add-ins
A new Engagement Manager web add-in is now available, and we recommend installing it, as all future enhancements and maintenance will be delivered exclusively to the web version. You may use either the web add-in or the legacy desktop add-in. Follow these instructions for the installation process.
important
Only one add-in should be installed and active at a time. Avoid using both add-ins simultaneously. You can uninstall the desktop add-in from in Windows.
Key differences between Engagement Manager add-ins
Web add-in
- Available from Microsoft Marketplace
- Works across Office platforms (Windows, Mac, Web)
- Modern web-based technology
- Automatic updates
- Cross-platform compatibility
- Enhanced security
- Better performance
- Future-proof technology
Desktop add-in (legacy)
- Older COM-based technology
- Windows desktop only
- Manual installation required
- Being phased out
Features available in the Engagement Manager web add-in
- Updated UI and modern technology, with installation directly from the Microsoft Add-ins store for Excel and Word.
- Updates no longer require local downloads or reinstalls due to the web-based technology.
- Notes:View, add, edit, assign, reply to, and delete notes linked to the active workpaper (Excel and Word). Changes made in the add-in are reflected on the engagementsNoteslist tab.
- Tickmarks:A permission allows designated users customize tickmark labels or reset them to defaults for both workpapers and Trial Balance. Firm-level administrators assign this permission in theSetupgroup and customize in theFirm Setupmenu.
- Recalculate:Automatically sync your workpaper with the latest engagement data when opening Excel and Word workpapers. To turn this on, go to .
- Journal Entries link:A link in the initial drawer opens and redirects to theJournal Entriesscreen for efficient navigation.
- User notifications:The web add-in confirms successful actions (for example, Recalculate and Clear during rollforward) and displays alert messages when errors occur.
- Engagement Link formulas, Workpaper Reference, Procedure Completed, Check Mark, Custom Excel (formerly Options), and Tickmarks continue to be available with an enhanced UI and modernized codebase.
Install Engagement Manager web add-in
Install the Engagement Manager web add-in to use features that integrate with Microsoft 365 apps and to access the latest functionality in Excel or Word.
note
This add-in supports Microsoft 365 for Windows (Office 2016 or later) and Office Online. You can install it directly from the Microsoft Marketplace or follow the instructions below.
- Open either Microsoft Excel or Word.
- In theHometab, selectAdd-ins.

- You can directly install add-ins from the page or selectMore Add-insto explore.
- In theOffice Add-inswindow, select theStoretab, search for the Engagement Manager add-in, and selectAdd.
- Review the license terms, then selectContinue.
- Enter a valid Engagement Manager email.
- Choose your region U.S. or U.K., then selectSign in.
- After sign in, the Engagement Manager Add-in side pane appears.
Install Engagement Manager desktop add-in
Install the Engagement Manager desktop add-in to use the functions that integrate with Microsoft Office applications.
note
We support the current and one prior version of the client add-in. If your firm experiences any issues, make sure you have the latest version of the client add-in installed.
- Find which version of Word or Excel you have installed:
- Open either Microsoft Excel or Word.
- SelectFileand chooseAccount.
- SelectAbout ExcelorAbout Word.
- Note if the version is 32-bit or 64-bit.
- Open Engagement Manager.
- SelectSetup
 , then Downloads.
 - In the Add-Ins section of the Downloads screen, choose the Office Client Add-In with the version that matches your installed version.
- For 32-bit, select and downloadOffice Client Add-In XX.X (32-bit)
- For 64-bit, select and downloadOffice Client Add-In XX.X (64-bit).
- Run the installation file.troubleIf you receive an error that the Visual Studio 2010 Tools for Office Runtime is not installed, download and install it component from the Microsoft Download Center for Visual Studio Tools 2010.
- Choose your region in the End-User License Agreement:
- SelectAmericasfor the U.S.
- SelectEMEAfor the U.K.
By choosing the wrong region, then you can't sign in with your username and password properly from the add-in. There is also a server.config file atC:\program files\thomsonreuters\engagementmanager\officethat will either say UKPROD or PROD.
Install the Engagement Manager Link
The purpose of the Engagement Manager Link is to interact with other applications installed on your local computer. This includes:
- Launching the SMART Practice Aids application to set up a new engagement, edit an existing engagement, or edit a smart document.
- Opening a new Outlook message if you are right-clicking on a document and choosing to email via Outlook.
- ChoosingAdd Workpaperfrom Guided Assurance, when you subscribe to the desktop version of Checkpoint Tools, or rolling forward Checkpoint Tools documents using the desktop version.
To install the Engagement Manager Link:
- Open Engagement Manager.
- SelectSetup and select Downloads.
- SelectEngagement Manager Linkand download the installation file.
- Select the installation file to run it and follow the steps in the wizard to install the Engagement Manager Link.noteWhen signing into Engagement Manager, or performing any of the actions in the application, you may receive a security prompt from your web browser asking permission toOpen Engagement ManagerLink. Mark theAlways allow demo.engagementmanager.thomsonreuters.com to open links of this type in the associated appcheckbox, which will prevent you from seeing this window regularly. None of the functionalities will work if you ignore or cancel the window.
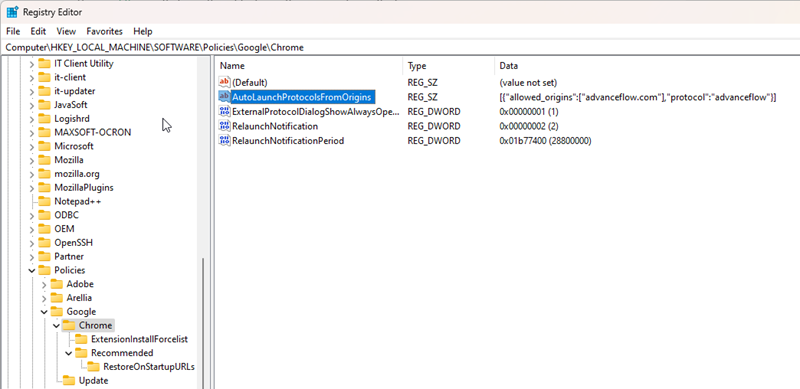
Internal use only
A computer tech can add a registry entry to prevent these prompts from appearing. We don’t want to give this to the average user because it may overwrite other similar existing registry entries with a similar purpose. For example, preventing this message from appearing when launching Citrix from VO, or preventing this message when editing a GoFileRoom document for GoFileRoom Link.
The registry entry should look something like this:
Windows Registry Editor Version 5.00
[HKEY_LOCAL_MACHINE\SOFTWARE\Policies\Google\Chrome]
"AutoLaunchProtocolsFromOrigins"="[{\"allowed_origins\":[\"engagementmanager.thomsonreuters.com\"],\"protocol\":\"engagementmanager\"}]"
Install the Dynamic Web TWAIN scanner
install the Dynamic Web TWAIN to scan workpapers into an engagement binder.
- Open Engagement Manager.
- SelectSetup
 and select Downloads.
 - SelectDynamic Web TWAINand download the installation fileDynamsoftServicesSetup.msi.
- Select theDynamsoftServicesSetup.msifile to run it and follow the steps in the wizard to install the tool.
- On the Optional add-on features for Web TWAIN SDK screen, leave the fields blank and selectSkip.