Set up the GoFileRoom ControlPanel
Enable the GoFileRoom ControlPanel (Part of the GoFileRoom Add-in)
Use the following procedure to enable Microsoft Outlook integration with GoFileRoom so that you can easily upload documents.
- Verify that you have installed the latest version of the GoFileRoom Add-In.
- Close Microsoft Outlook.
- Select the Start button and chooseAll Programs,GoFileRoom,Enable Control Panel Outlook Integration.
- Select theInstallbutton.
- SelectClosewhen the installation is complete.
Set up the GoFileRoom ControlPanel
Follow these steps to set up the ControlPanel.
- Open the GoFileRoom ControlPanel GoFileRoom icon from the Start menu in Windows.
- If required, enter your login ID and password.
- Select the following options in theConfigurationstab of theGoFileRoom ControlPanelwindow.
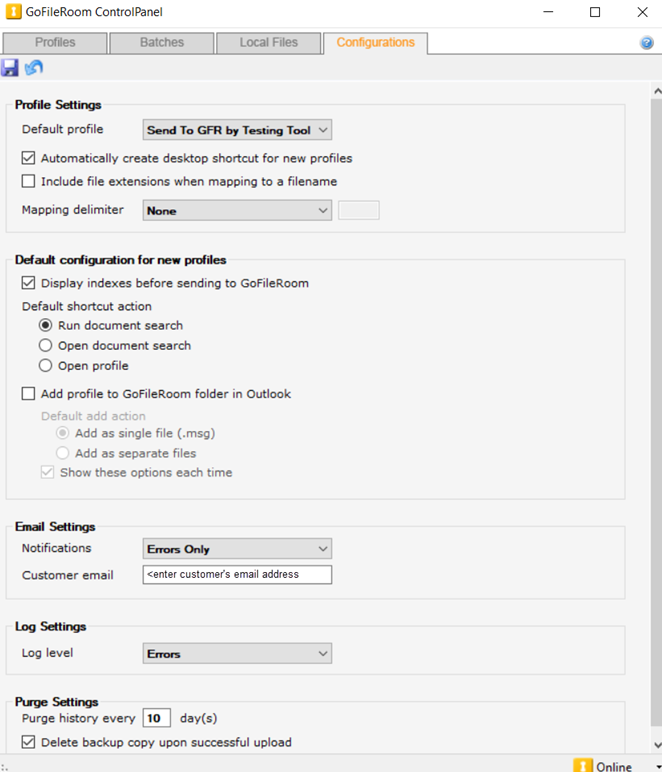
- Default Profile:
- ChooseSend to GoFileRoom.
- Mark theAutomatically create desktop shortcut for new profilescheckbox.
- Mapping delimiter:
- ChooseOtherand enter a single period without spaces in the empty field next to Other.
- Mark theDisplay indexes before sending to GoFileRoomcheckbox.
- Default shortcut action:
- ChooseOpen profile.
- Mark theAdd profile to GoFileRoom folder in Outlookcheckbox.
- Default add action:
- ChooseAdd as separate files.
- Mark theShow these options each timecheckbox.
- SelectErrors Onlyfrom theNotificationsdropdown.
- Enter the customer's email address in theCustomer emailfield.
- SelectErrorsfrom theLog leveldropdown.
- Mark theDelete backup copy upon successful uploadcheckbox.
- Select theSavebutton before you close theConfigurationstab.
The new add-ins are listed in Outlook in the
File
, Options
, Add-Ins
pane as GFRCPOutlookIntegration
and Thomson Reuters WorkFlow Tools
.Send documents to GoFileRoom
The GoFileRoom ControlPanel feature lets you send a single file, multiple files, or an entire folder to GoFileRoom by dragging and dropping it onto a desktop shortcut.
You can change your default email preferences so that emails are saved based on your needs. You can use GoFileRoom profiles when you move documents from your desktop, network location, C:\ drive, and so forth.
Right-click the folder or document and choose
Send to
, GoFileRoom
, then select the profile that you want to use. For more information, see Send documents to GoFileRoom.You can also drag profiles to a GoFileRoom ControlPanel desktop shortcut. Alternatively, you can drag-and-drop files from Windows to GoFileRoom using the cabinet icon on your Windows desktop.
- Create a folder on yourC:\drive, called GoFileRoom Profiles.
- Drag the profiles that you have created into the GoFileRoom Profiles folder on theC:\drive.
- Right-click your Windows taskbar and chooseToolbars,New toolbar.
- Go to the GoFileRoom Profiles folder, then choose theSelect Folderbutton to create a new GoFileRoom Profiles taskbar.
Change profile settings
Because the default profile is set to Send to GoFileRoom when the GoFileRoom ControlPanel is installed with the GoFileRoom Add-In, you'll need to make the following changes in the Profile Settings dialog as follows.
- From the Start menu in Windows, open the GoFileRoom ControlPanel.
- Select theSettingsbutton in theProfilestab of theGoFileRoom ControlPanelscreen.
- Set up your profiles as follows.
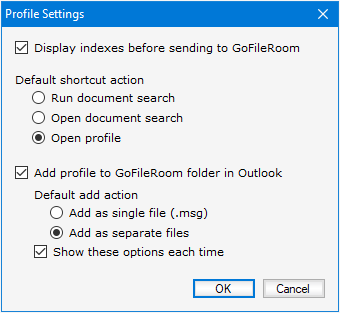
- Mark theDisplay indexes before sending to GoFileRoomcheckbox.
- Default shortcut action:
- ChooseOpen profile.
- Mark theAdd profile to GoFileRoom folder in Outlookcheckbox.
- Default add action:
- ChooseAdd as separate files.
- Mark theShow these options each timecheckbox.
- SelectOK.
note
- Users can set up additional profiles by selecting theNew Profilebutton on theProfilestab. When documents are uploaded in this manner, they can be viewed immediately on theBatchestab of the GoFileRoom ControlPanel.
- Documents other than Microsoft Word, Microsoft Excel, or Adobe documents that get stuck as "Checked out" can be checked back in via theLocal filestab in the GoFileRoom ControlPanel.
- When you are already signed into the GoFileRoom ControlPanel, you can select theGoFileRoom Quick Launchin the Windows taskbar to quickly sign into www.gofileroom.com.
- When you mark theAdd profile to GoFileRoom folder in Outlookcheckbox, the Folder Tick boxes won't be enabled and will appear greyed out. This is intentional because you can configure the new profile by default to add a folder to Outlook, as explained in the Change Profile Settings section.
Profile set up per entity type
The following is an example profile saved as client ID 8879 for a PDF of the same name. This illustrates how you can set up a profile for each type of entity, scan each signed 8879 separately into a folder on you desktop and the save it with their client IDs. There is a setting in UltraTax CS that allows you to print the client ID at the top of the page.
At the end of the day, perform the following actions.
- Drag the specified folder to the profile, or right-click the folder, and chooseSend to,GoFileRoom.
- Select the profile, then selectOKto upload it to GoFileRoom.
- Verify that the upload was successful by selecting theBatchestab in the GoFileRoom ControlPanel.
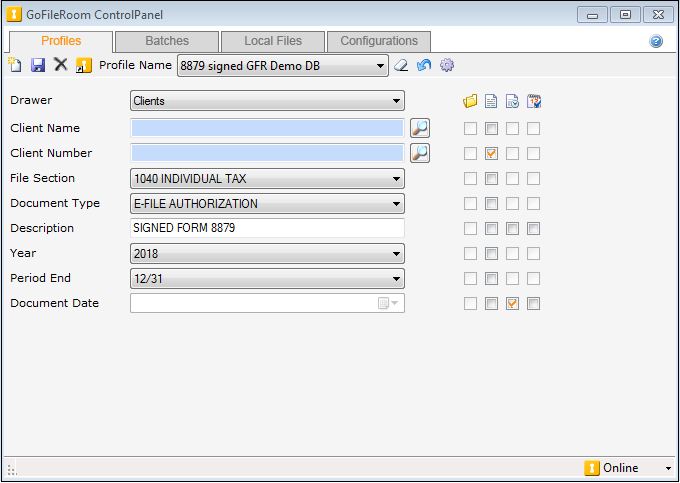
Profile for a client that sends numerous emails to the firm
In this example, the client (Construction Designs) sends numerous emails, as a client to the firm. The following profile would be setup by a member of the firm that works with that client.
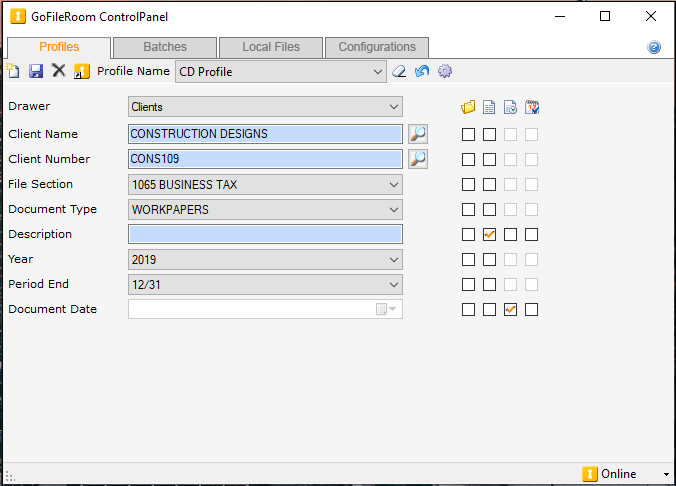
Profile for a staff member that works with 1120S clients
In this example, a staff member of the firm works on numerous 1120S returns in their role at the firm. In the following example profile, the staff needs only to add the client name/ID as they index, without the need to index all fields in the profile.