
Set up GoFileRoom
Before you can launch GoFileRoom, you'll need to do some initial setup on each computer that will access it. Administrators should complete the following on each workstation.
System requirements
Browser requirements
- Google Chrome is the only supported internet browser for GoFileRoom.
- You'll need to configure your Google Chrome notification, pop-up settings and your internet options.
Software requirements
- The following operating systems are supported in both 32-bit and 64-bit:
- Windows 11
- Windows Server 2019
- Windows Server 2016
- Windows Server 2022
- Windows Server 2025
noteGoFileRoom is also supported in terminal server, remote desktop, and Citrix server (published applications or desktop) environments. - A high-speed internet connection. We recommend a dedicated, high-speed business class connection.
- The following versions of Microsoft Office are supported in both 32-bit and 64-bit:
- Microsoft 365 Apps (formerly Office 365), only when the Office desktop applications are fully installed on the local computer
- Office 2024
- We recommend using classic Outlook with the GoFileRoom Add-In. The new Outlook doesn't currently support this integration. We're working to implement this functionality in the new Outlook as part of our future product roadmap.noteOffice 2021 - Microsoft ends support for this version on October 13, 2026. Upgrading to Microsoft 365 Apps or Office 2024 is recommended.
- Adobe Acrobat (subscription-based version only)note
- Must be run inClassic View. To turn it on, selectDisable new Acrobat.
- Perpetual-license versions are not supported because they don’t include theDisable new Acrobatoption.
- Install Adobe Acrobat (Don't install Acrobat Reader).
- Set Acrobat as the default PDF viewer.
- We recommend using classic Outlook with the GoFileRoom Add-In. The new Outlook doesn't currently support this integration. We're working to implement this functionality in the new Outlook soon.
Hardware requirements
- Intel or AMD 2Ghz 64-bit processor
- 4 GB RAM (minimum) or 8 GB RAM (recommended)
- At least 1 15-inch monitor with 1024x768 resolution or higher
- A Microsoft Windows-supported printer capable of data compression and a minimum 2 MB of memory; while we recommend 16 MB of memory
- A TWAIN or WIA-compliant scanner
Configure your internet options
You'll need to set up the following internet options for to work properly.
- Select the search icon next to the Windows Start button and enterInternet Options.
- SelectInternet optionsfrom the menu.
- Go to theGeneraltab:
- SelectSettingsfrom theBrowsing historysection.
- On theTemporary Internet Filestab:
- SelectEvery time I visit the webpage, thenOK.
- SelectDeletefrom the Browsing history section.
- Mark theTemporary Internet Files and website filesandCookies and website datacheckboxes and clear every other option.
- SelectDelete.
- Go to theSecuritytab:
- SelectTrusted sites, then selectSites.
- Clear theRequire server verification (https:) for all sites in this zonecheckbox.
- In theAdd this web site to the zonefield, enter*.thomsonreuters.com, , then selectAdd.
- Re-mark theRequire server verification (https:) for all sites in this zone, then selectClose.
- SelectCustom level.
- In theReset custom settingsdrop-down list, selectLow, thenReset.
- In theSettingslist, enableDisplay mixed content, then selectOK.
- Go to theAdvancedtab:
- Mark theUse TLS 1.2checkbox.
- SelectApply, thenOK.
Configure Google Chrome
Google Chrome is the only supported internet browser for GoFileRoom. You'll want to add these settings to Google Chrome to make sure GoFileRoom works properly.
- Open Google Chrome and select
 to customize and control Google Chrome.
 - SelectSettings.
- SelectPrivacy and security, thenSite Settings.
- SelectNotifications.
- In theAllowed to send notificationssection, selectAdd.
- Enter[*.]gofileroom.com, then selectAdd.
- SelectAddagain and enter[*.]onvio.us.
- SelectAddagain and enter[*.]thomsonreuters.com.
- Go back toSite Settingsand selectPop-ups and redirects.
- In theAllowed to send pop-ups and use redirectssection, selectAdd.
- Enter[*.]gofileroom.com, then selectAdd.
- SelectAddagain and enter[*.]onvio.us.
- SelectAddagain and enter[*.]thomsonreuters.com.
Install GoFileRoom Add-In
If you have administrative privileges, you can follow these steps to install the GoFileRoom Add-In.
important
- Prior to installing the latest GoFileRoom Add-In, verify that the prior version has been uninstalled. GoFileRoom functionality may be hindered if multiple versions of the Add-In are installed on the same machine.
- Microsoft .NET 4.0 Framework (or higher) must be installed on your machine to use the GoFileRoom Add-In.
To install the GoFileRoom Add-In:
- If .NET 4.0 Framework (or higher) is not installed, download and install Microsoft .NET 4.0 from the Microsoft website.
- Hover over your username, then selectPreferences. Go to theDownloadstab, then selectGoFileRoom Add-Infrom the dropdown list.
- After it downloads, right-click theGoFileRoom-Add-In.exefile, then selectRun as administrator.
- The InstallShield Wizard will guide you through the remainder of the installation process. SelectFinishto complete the installation. SelectYesto restart your computer.
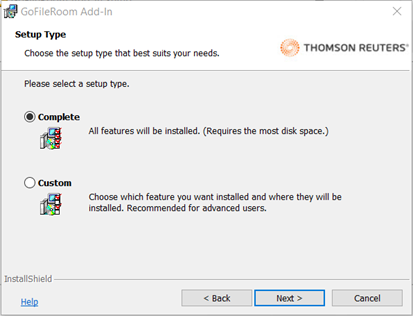
- (Optional) The GoFileRoom Add-In lets you make a customized installation and control what components are going to be installed. While it’s recommended to perform a Complete installation, the Custom install is available for certain situations.
note
- The InstallShield Wizard provides you with the option to install all the components of the GoFileRoom Add-In at once, or to choose which components to install.
- Terminal Server Add-In installations are required to be run at the console as an Administrator.
These are the commonly used features of the GoFileRoom Add-In:
- Adobe Acrobat integrates GoFileRoom and Adobe functionality.
- ControlPanel simplifies uploading and managing your files in GoFileRoom.
- Microsoft Office integrates GoFileRoom and Microsoft Word and Excel functionality.
- QuickLaunch lets you quickly launch and use GoFileRoom without having to sign in each time.
- If licensed, ScanFlow fully integrates with GoFileRoom. ScanFlow leverages 100% accurate barcode and indexing features to scan large batches of documents quickly and accurately.
note
- GoFileRoom supports the current and one prior version of the Add-In. If your firm experiences any issues, make sure your users have the latest version of the Add-In installed.
- There are 2 alternatives to perform the installation in silent mode:

