
Setting Up Invoice Formats
Because companies may have multiple AP centers with different requirements, company system administrators can set up multiple formats for the invoice spreadsheet and the invoice summary pages. These files are included in the AP batch.
You can customize the invoice summary format by removing, adding, or changing financial and matter fields that appear at the end of the default format. The invoice spreadsheet should be formatted so that it contains all the information needed for your AP department to pay the invoices.
Two spreadsheet formats are supported:
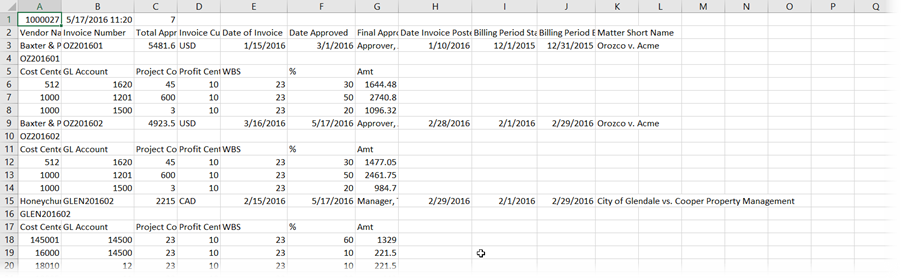
- Single-row format: Each invoice is represented by a single line. All invoice accounting code allocation rows are listed in the same line in the AP batch invoice spreadsheet. The standard row is the only source for the accounting code allocation rows content from the invoices. There is 1 standard row for each invoice included in the invoice spreadsheet.

- Multi-row format: Each invoice is represented by multiple lines. Each invoice accounting code allocation row is listed on a separate line.
Tip | We recommend that you show the sample default single-row invoice spreadsheet, a sample default multi-row invoice spreadsheet, and the invoice spreadsheet specifications to your AP department so that they can determine which columns to include.
To set up new invoice formats, open the AP Routes page:
- SelectSettingsin the left navigation.
- In theAccounting and A/P Settingssections, selectAP Route Configuration.
To create a new invoice spreadsheet format
- In collapsible sectionStep 2: Formatting, selectCreate new invoice spreadsheet format. You can find this option following your list of currently defined formats. It may be necessary to scroll down.
- Define the fields as they correspond to your invoice.Field referenceFieldDescriptionNameThe name of your invoice spreadsheet format. When you assign the format to a particular AP Route, you select the format by name. Therefore, it is best to use an intuitive name that relates to the route to which the format will be assigned (for example, "European SAP").File formatComma Separated Value (.csv): If the invoice spreadsheet is in the Comma-Separated Value format, the text is surrounded by double quotation marks. Numbers don’t have quotes. For example, a line in a Comma-Separated Value file would appear as: "CompanyName," 100.00, "MatterName."Pipe Delimited: In a pipe-delimited file, all fields are separated by a vertical pipe character. For example, a line in a pipe-delimited file would appear as: CompanyName | 100.00 | MatterName.Multiple item field formatComma Separated Value (.csv): If the invoice spreadsheet is in the Comma-Separated Value format, the text is surrounded by double quotation marks. Numbers don’t have quotes. For example, a line in a Comma-Separated Value file would appear as: "CompanyName," 100.00, "MatterName."Pipe Delimited: In a pipe-delimited file, all fields are separated by a vertical pipe character. For example, a line in a pipe-delimited file would appear as: CompanyName | 100.00 | MatterName.File ExtensionThe file extension is made up of the last 3 letters of the file name. For example: invoicespreadsheet.csv. Enter the file extension you would like on the invoice spreadsheet file when the AP Batch is run. For a comma-separated values file, typecsv. For a pipe-delimited file, typetxt.Date FormatUse the dropdown to select the date format to use for the invoice format.noteSelecting the format in Tracker ensures that the file is created accordingly. However, you should double check your Excel settings, as it will transform the date format to its default date format.DelimitersA delimiter is a character, or a combination of characters used to separate items of data. Most delimiters are characters that won’t be used in the data, such as "|" or "[]".
- Beginning-of-File Delimiter: If selected, select a dlimiter and decide if it is on a separate line.
- End-of-File Delimiter: If selected, select a delimiter and decide if it is on a separate line.
- Beginning-of-Row Delimiter: If selected, select a delimiter.
- End-of-Row Delimiter: If selected, select a delimiter.
Invoice inclusion rules- Include reversed invoices: If this checkbox is checked, reversed invoices are allowed. Clear this checkbox to exclude reversed invoices.
- Include reversal invoices: If this checkbox is checked, reversal invoices are allowed. Clear this checkbox to exclude reversal invoices.
- Include credit invoices: If this checkbox is checked, credit invoices are allowed. Clear this checkbox to exclude credit invoices.
- Include zero amount invoices: If this checkbox is checked, zero amount invoices are allowed. Clear this checkbox to exclude zero amount invoices.
File header and trailerTheFile header and trailersection includes options for including a row of summary information at the beginning and/or end of every file (the date the batch was run and the total number of invoices, for example). You might also select to specify a constant value to appear at the beginning or end of the file, such as "Acme Company Legal Invoices."- Include a unique header row at the beginning of the file: Select or clear the checkbox to indicate if you want to include a header tow. If you select the checkbox, a section appears that lets you select the column order and column value from the fields.
- Include a unique trailer row at the end of the file: Select or clear the checkbox. If you select the checkbox, a section appears that lets you select the column order and column value from the fields.
Invoice header and trailerThe Invoice header and Invoice trailer sections include options for including a row of summary information at the beginning and/or end of every invoice. You might also select to specify one or more constant values to appear at the beginning or end of each invoice.- Include unique header row at the beginning of each invoice: Select or keep the checkbox clear. If you select the checkbox, then select the column order and column value from the fields. See the Invoice Spreadsheet Specification for a complete list of the fields.
- Include unique trailer row at the end of each invoice: Select or keep the checkbox clear. If you select the checkbox, then select the column order and column value from the fields. See the Invoice Spreadsheet Specification for a complete list of the fields.
Allocations- Allocation format: Use the dropdown to select a single-row or multi-row format.
- Include Column Header Row: (Single-row format only) If this option is selected, there will be 1 allocations header row output for each invoice (displayed before that invoice's allocation rows).
- Include allocations header: (Multi-row format only)
- Include allocations trailer: (Multi-row format only)
- Include empty allocation rows: (Multi-row format only) Because some AP systems require that there are always the same number of allocation rows, there is the option to include empty allocation rows. If there are fewer than the maximum number of allocation rows (100), empty allocation rows are included until the maximum number of allocation rows (100) has been created. When this option is selected, the invoice always contains the maximum number of allocation rows, but some may be empty.
noteIf you inspect an invoice spreadsheet and it appears that not all expected invoices are included, you may have selected the Include empty allocation rows option. If there are several empty rows in the invoice spreadsheet it may be necessary to scroll down past the empty rows to see the next invoice.Allocation rows formatInclude Column Header Row: If you select this option, there will be a header row before the section of the invoice spreadsheet that contains the standard rows. There will be 1 standard row header for each invoice spreadsheet.For single-row format, the standard rows follow the standard row header, and the standard rows are contiguous in the invoice spreadsheet. There is 1 standard row for each invoice included in the invoice spreadsheet.When using enhanced (mode) accounting code allocations, the allocation row information from invoices is only output in the allocation rows. Unlike simple (mode) accounting code allocations, the standard row doesn’t include any invoice accounting code allocation content.The column choices don’t reference specific allocation rows. Instead, you select columns for: accounting code types, allocation percentage, allocation amount, and comment. The spreadsheet that is produced will contain an allocation row for every allocation row for all the included invoices.Columncorresponds to the columns in your spreadsheet.Column Name/Datacorresponds to the information that will appear in that column. When you specify an option, a list appears. Scroll through the list to locate the value that corresponds to your column.When you select an option, a new column option appears.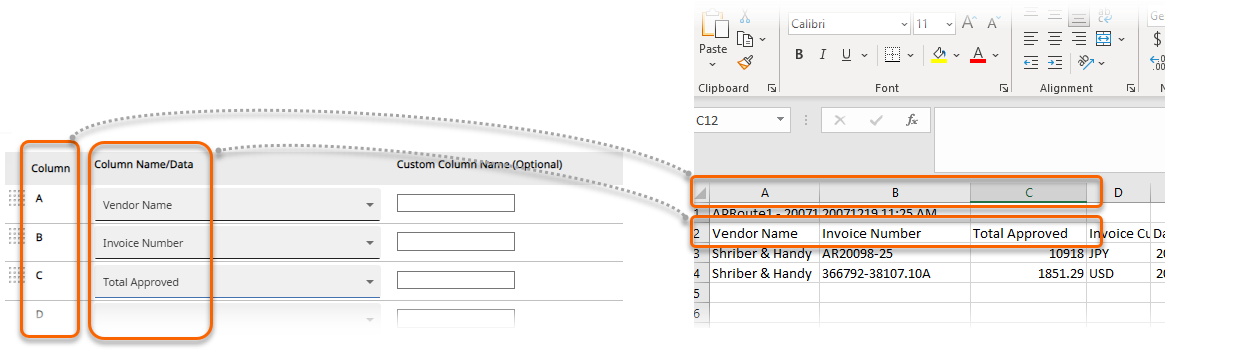 Standard rowsFor single-row format, the Standard row is the only source for the accounting code allocation rows content from the invoices. There is 1 Standard row for each invoice included in the invoice spreadsheet.Columncorresponds to the columns in your spreadsheet.Column Name/Datacorresponds to the information that will appear in that column. When you specify an option, a list appears. Scroll through the list to locate the value that corresponds to your column.When you select an option, a new column option appears.
 - On the toolbar, selectSave & close.
Invoice Fields from the Accounting tab on the Invoice
Some of the spreadsheet information corresponds to fields on the invoice's
Accounting
tab. For example, the
Comments
field on the Invoice tax configuration and cost allocations
section of the invoice can be added to the spreadsheet. Select Allocation Comments To AP
from the dropdown.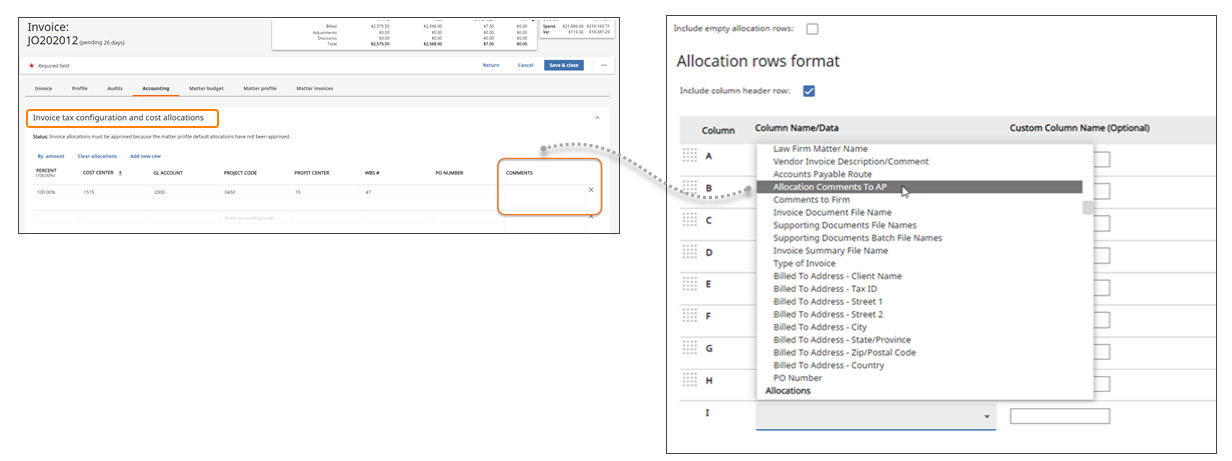
You can also include the
Comments to AP
field that appears on the Accounting
tab in the Other Invoice Accounting Details
section. Select Allocation Comments To AP
from the dropdown list. You can find this option in the Invoice Data
section in the dropdown.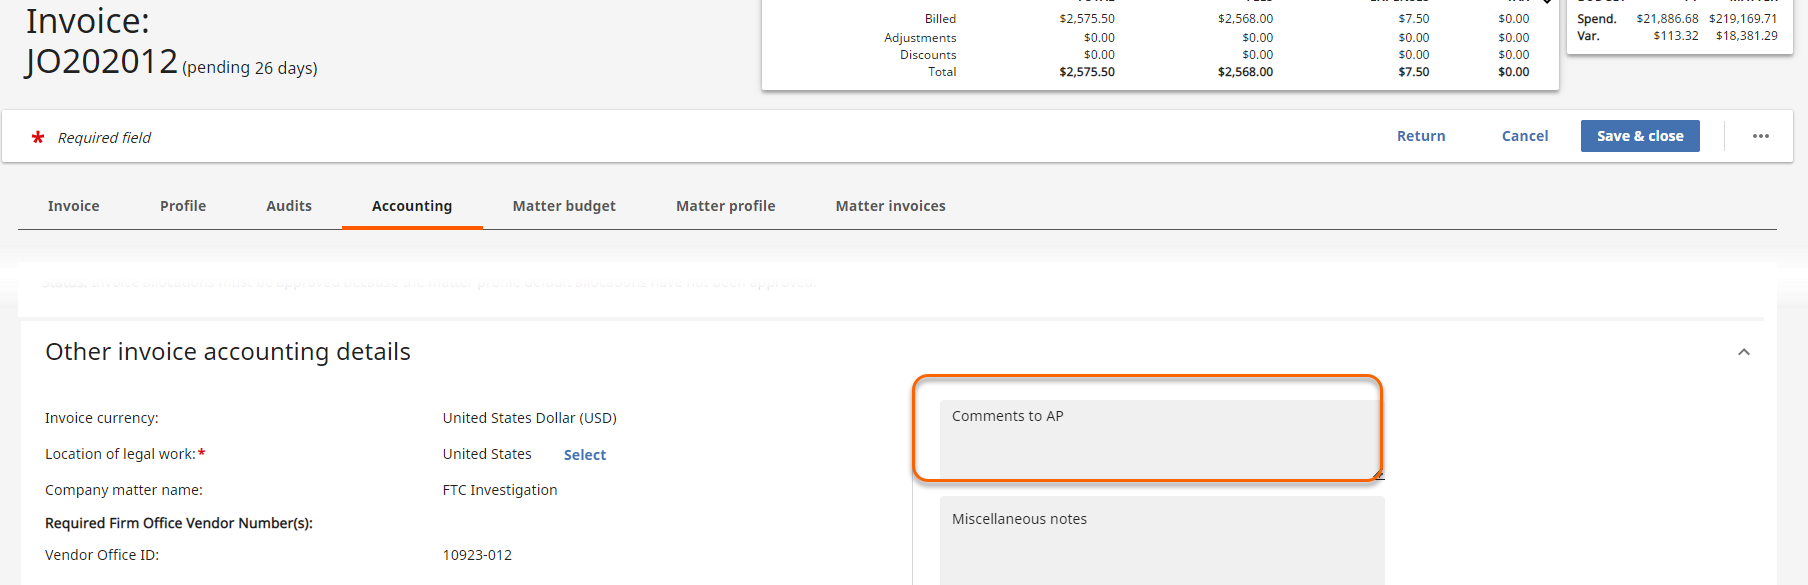
note
The
Miscellaneous notes
field in the Other Invoice Accounting Details
section is not available to be included in the spreadsheet format sent to AP.To copy an existing invoice spreadsheet format
- In collapsible sectionStep 2: Formatting, selectCopy to new formatnext to the format you want to copy. Tip | You can select the hyperlinked name of a defined format to open it and view the settings.
- Give the new format a unique name, and then configure it as appropriate.
- On the toolbar, selectSave & close.
To create a custom Invoice Summary format:
- In collapsible sectionStep 2: Formatting, selectCreate new invoice summary format.
- In theInvoice Summary Format Namefield, enter a name for the format. This name will be used to identify the format when you are selecting formats for your AP routes.
- You can have multiple formats for the invoice spreadsheet and the invoice summary pages that are included in the AP batch. The following are the default fields:
- Invoice Information
- Firm/Vendor. You can change the default short firm/vendor name to instead include the long firm/vendor name in the Firm Name Format dropdown in the General Information Section.
- Office
- Invoice Number
- Date of Invoice
- Billing Period
- Date Posted
- Invoice Description/Comment
- Amount Approved
- Approved Total
- Invoice Currency
- Date Approved
- Final Approver
- Approved Fees
- Approved Expenses
- Comments to AP
- Accounting Code Allocations
- Vendor Address & Tax Information in Tracker
- Amount Billed
- Billed Total
- Invoice Currency
- Billed Fees
- Billed Expenses
- Approval History
The Office Vendor Number field appears by default in the invoice summary under Additional Financial Information when it's required for a given AP route. - In theAdditional Financial InformationandMatter Informationcollapsible sections, selectRemovenext to any row you want to remove from the format.
- To add a row, selectAdd additional row. Use the dropdown to select the value for the rows you want to add.
- On the toolbar, selectSave & close.
To configure the invoice spreadsheet:
- UnderStep 2: Formatting, select the name of a spreadsheet to edit.
- On the new window that opens, scroll down to the Standard Rows section.
- Select the required columns from the dropdowns. You can find the following under Invoice Data on the dropdown:
- Billed to Entity
- Billed to Address
- Client Name
- Billed to Address
- Tax ID
- Street
- If you want to assign a custom name to the column, enter it in theCustom Column Name(Optional) field.
- On the toolbar, selectSave & close.
Converting from Single-Row Format to Multi-Row Format
If you have never used the enhanced accounting codes mode, all of your AP batch invoice spreadsheet formats will be single-row format. If and when you turn on the enhanced accounting codes mode, you should strongly consider converting your invoice spreadsheet formats from single-row format to multi-row format.
- SelectSettingsin the left navigation.
- UnderAccounting and A/P Settings, selectAP Route Configuration.
- UnderStep 2: Formatting, open the single-row invoice spreadsheet format that you want to convert and print out (or otherwise note) the Standard rows column selections for Allocations.
- On the toolbar, selectCancelto close from the single-row format.
- SelectCopy to new formatnext to the existing single row format you want to convert to multi-row format.
- Give the new format a unique name and save.
- Open the new invoice spreadsheet format.
- Scroll down toAllocations - Allocations format:and selectMulti-Row (enhanced mode).Tracker displays a warning about changing to a multi-row format. The directions will advise you about what to do to avoid problems.
- TheAllocation formatwill change to multi-row format and allocation-specific columns will be deleted from the Standard Rows columns selections. TheAllocation row formatsection is now available.
- Select allocation columns in theAllocation rowsformat section that are equivalent to the allocation columns that were deleted from theStandard rowssection (after you converted from single-row to multi-row in Step 2 preceding). Note that the multi-row format simplifies this process. You select 1 column for each accounting code allocation row element. Your selection represents all allocation rows. The invoices spreadsheet will contain 1 row for every allocation row from each invoice.
- You can reorder your column selections by drag and drop using the grip tape icons to the left of the column letters.
- To delete a column, select the blank column name at the top of the column names menu and move the blank column to the bottom of the list. The blank column will be omitted from the results when you save.
- If you select the Include empty allocation rows option, then the invoice spreadsheet will contain 100 allocation rows for each invoice. Blank rows will be included for rows that don’t contain allocation row data. If your invoice spreadsheet appears to be missing data, check to see if this option has been selected. If you have included empty allocation rows, you may need to scroll down past the empty rows before you can see the next invoice.
- On the toolbar, selectSave & close.
Including the Billed To Entity in AP Batch Documents
If a Billed to entity is included in an invoice and you would like it to appear in the AP batch files sent to your AP department, you'll need to configure the invoice spreadsheet and invoice summary to include the Billed to entity.
Scroll down to the
Standard Rows
section and select the required columns from the dropdowns. You can find the following under
Invoice Data
on the dropdown:- Billed to Entity
- Billed to Address
- Client Name
- Billed to Address
- Tax ID
- Street
In the
ADDITIONAL FINANCIAL INFORMATION
section, select Billed to
from the drop-down .