
Creating a Freeform Notice
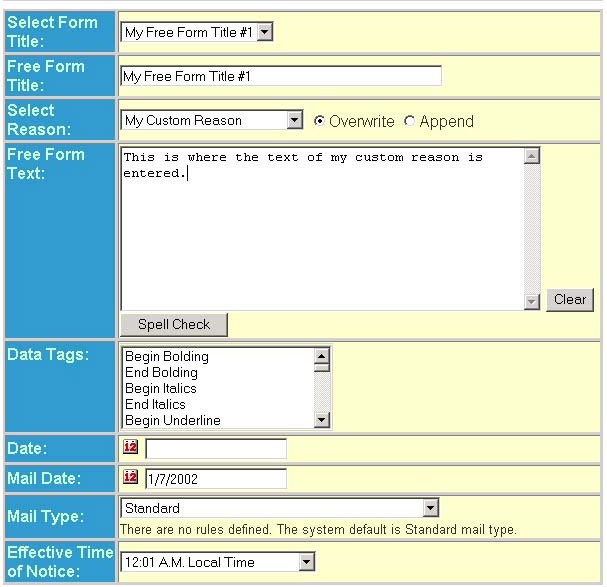
- Select theForm Titlefrom the drop-down list or scroll down to the desired entry and press theTabkey. This will display freeform titles which are defined inUtilities.noteThe System Administrator or any user with Data Setup-Free Form rights can add to the list ofFree Form Titlesor edit them. Go toUtilities > Free Form Titlemaintenance page to add or edit the list.
- Manualy enter theFree Form Titleif you did not select a previously defined title from the list. This is the title that is printed on the notice.
- Select aReasonfrom the drop-down list. The list contains previously defined custom reasons. You can also scroll down to the desired entry and press theTabkey. You will only see this field if custom reasons have been added to your system.
- Overwriteis the default selection.Overwritemeans that the selected custom reason will 'overwrite' the blank reason description box. UseOverwriteto replace a previously selected custom reason. If a custom reason has been placed in theReasondescription box that is not applicable, selecting another custom reason with the overwrite option erases the first custom reason and places the text of the newly selected custom reason in theReasondescription box.
- You can use more than one custom reason on a notice. To include multiple custom reasons in theReasondescription box, select the first custom reason and selectOverwrite. Then change the selection toAppendand select an additional custom reason.
- TheFree Form Textdisplays the body text of the freeform notice. This field has unlimited text. Enter the description manually or with a custom reason to display on the freeform notice.
- SelectData Tagsfor formatting instructions such as bolding, italics, or text such as the producer name or phone number from the policy information page to the notice text. You can also dynamically insert pieces of data from the policy record into the notice text. While editing the notice text, Data Tags appear in braces ({}). At generation time they are translated into associated data or formatting changes on the notice. You can enter Data Tags directly into the text box or alternatively select them from theData Tagslist. Selection from the list adds the appropriate Data Tag to the end of the text.
- Select theDatefor this free form. It can be a current, past, or future date.
- Select theMail Datewhich is the date the notice will be mailed.
- Select theMail Typefrom the drop-down list. The default mail type is Standard Mail for a freeform notice.
- Select theEffective Time of Notice. This displays the time the notice takes effect. It is your company default and you can modify it if needed.