
Creating a Notice - Reason Details
The second screen in the notice process is the
Reason Details
screen.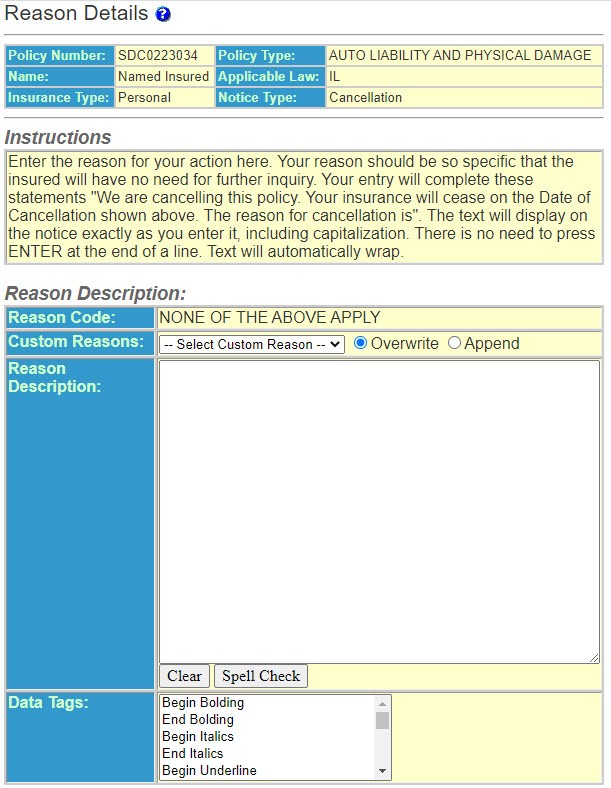
- Instructions – Information regarding how to complete the reason description.
- Reason Code – The Reason Code you selected previously.
- Custom Reasons – A list of previously defined custom reasons you can load inUtilities. To select a custom reason select it from the drop-down list or scroll down to the desired entry and press theTabkey. If you have not defined custom reason information inUtilities, this field will not display.
- Overwrite - Overwrite means that the selected custom reason will 'overwrite' the blank reason description box. Overwrite may also be used to replace a previously selected custom reason. If a custom reason has been placed in the reason description box that is not applicable, selecting another custom reason with the overwrite option will 'erase' the first custom reason and place the text of the newly selected custom reason in the reason description box.
- Append - More than one custom reason may be used on a notice. Select a custom reason with the overwrite option selected. Then change the selection to append and select an additional custom reason to include multiple custom reasons in the reason description box.noteCustom Reasonscan be added or edited by the System Administrator or any user with Data Setup - Custom Reason rights. You can access the Custom Reasons maintenance page inUtilities.
- Reason Description – The specific reason you are taking this action. You can add this test to the notice by manually entering the specific reason, selecting any number of Custom Reasons, or a combination of both.
- Clear – Clears the field.
- Spell Check – Checks the spelling.
- Data Tags – Formatting the reason details.The Data Tags feature allows you to add some basic text formatting to notice text. This also allows you to dynamically insert pieces of data from the policy record into the notice text at generation time. While editing the notice text, Data Tags appear in braces ({}). At generation time they are translated into associated data or formatting changes on the notice. Data Tags can be typed directly into the text box or alternatively may be selected from the Data Tags list. Selection from the list adds the appropriate Data Tag to the end of the text.
- On the side menu, selectContinue.