
China Export Declaration
The
China Export Declaration
screens have a common layout and core functionality. The functionality for China Export Declaration
is covered in this section. Any variances specific to a screen will be noted.Invoice data can be entered manually on the screen or be pre-populated through an interface. Regardless of how data is entered, the steps to use the screens are the same. All active invoices in the system will appear in the
Find Declaration
drop-down list.LINK TO DECLARATION PAGE THROUGH SYSTEM MESSAGE
Under the
System Messages
tab, the following message will appear: Please visit the CN Export Declaration Screen to complete the declaration filing. Clicking on the hyperlink will redirect the user to the China Export Declaration screen.
Once an invoice is selected, ten different standard tabs can appear on the
China Export Declaration
screen. Each standard tab is explained in more detail below.
Command Buttons
These buttons (under the navigation bar) invoke specific actions as described below:
Buttons | Descriptions |
|---|---|
Go Back To Shipment | Clicking this button will redirect the user to the Export Invoice Management screen. |
Pull Invoice Data | Clicking this button will populate the fields in the China Export Declaration screen with the data from the Export Invoice. This option will appear if a shipment has not yet been processed. |
Save and Validate | Clicking this button will cross-check the current declaration to determine the accuracy of data; and then save all changes and updates made to the declaration. This option will appear if a shipment has not yet been processed. |
Declaration Verified | Clicking this button will change the declaration/clearance status as ‘Verified’. The option will appear only after the declaration/clearance status becomes ‘Unprinted’, and declaration/clearance data needs to be verified manually. |
Undo Verification | Clicking this button will revert the declaration/clearance status as ‘Unprinted’. The option will appear only after the declaration/clearance status becomes ‘Verified’. |
Generate Export Document Form | Clicking this button will generate an Export Declaration Form when the declaration type is “Export”. This option will appear only after all validation hold messages have been resolved. |
Generate Exit Document Form | Clicking this button will generate a China Customs Exit Form when the declaration type is Exit . This option will appear only after all validation hold messages have been resolved. |
Declaration Data Extract | Clicking this button will generate standard declaration data in the standard Single Window upload Excel template. This option will appear only after the export invoice has been reviewed, approved and processed. |
Exit | Clicking this button will close the China Export Declaration screen. |
CCSHEADER
The
CCSHeader
tab contains the top-level declaration data specific to the China Export Declaration as a whole. This information can be both viewed and edited in the CCSHeader
tab. Fields that display on the CCSHeader
tab are configured to meet China AEO needs.
The content of the
Header
tab is in a form view. When the declaration status is Final
, the fields in the invoice page will turn gray and you will not be able to make any further changes.CCSDETAILS
The
CCSDetails
tab stores all part level details (e.g. GoodsItemNum, CommodityItemNum, ProductName, and TxnQty). These tab fields have been configured for China AEO Clients, ensuring that recorded details apply to client business requirements. Data corresponding to these fields is autopopulated from the corresponding export invoice.To view more information, choose a record from the tab and click its corresponding expansion arrow on the far left.

CCSCONTAINER
The
CCSContainer
tab contains instruments of international traffic (e.g. ContainerID, ContainerModel, GoodsNo, and LCLFlag) information associated to a shipment on an invoice.Add Container Record
To add a new Container.
Click
New
to open the CCS Container
pop-up and enter package-related details into the fields of the pop-up.
To save the record, click
Save
.To drop all changes without saving, click
Cancel
.
Edit Container Record
To edit an existing package detail record, choose a record to edit and move the cursor to the corresponding downward arrow. Once the options menu appears, click
Edit
to open the pop-up. 
Make all necessary changes.
To save the record and close the pop-up, click
Save
.To drop all changes without saving, click
Cancel
.
Delete Container
To delete an existing Container record, choose a record to delete and click on the
Delete
button.
The
Confirm Deletion
pop-up will appear on the screen.To remove the record, click
OK
in the confirmation pop-up.To cancel the deletion and close the pop-up, click
X
or Cancel
.
CCSOTHERPACKAGE
The
CCSOtherPackage
tab contains additional values (e.g. PackQty, and PackType) related to a Package.
Add CCSOtherPackage
To add a CCSOtherPackage, click
Add New
to open the CCSOtherPackage
pop-up.
Choose a
Pack Type
from the drop-down menu and enter information in the other required fields.Click
Save
to store the record and return to the CCSOtherPackage
tab.Click
Cancel
to close all changes and return to the CCSOtherPackage
tab.
Edit CCSOtherPackage
To edit an existing
CCSOtherPackage
, choose a record to edit and click the Edit
button to open the pop-up with the CCSOtherPackage
record’s current information prepopulated into the fields.
Make all necessary changes.
To save and close the pop-up, click
Save
.To drop all changes without saving, click
Cancel
.Delete CCSOtherPackage
To delete an existing
CCSOtherPackage
, choose a record to delete and click the Delete
button.
To remove the fee, click
OK
in the confirmation pop-up.To cancel the deletion and close the pop-up, click
X
or Cancel
.CCSCOOINFORMATION
The
CCSCOOInformation
tab contains values (e.g. CertType, EcoCertNo, DecGNo, and EcoGNo) related to a COO.
Add CCSCOOInformation
To add a new CCSCOOInformation, click
Add New
to open the CCSCOOInformation
pop-up.
Enter information in the other required fields.
To save and close the pop-up, click
Save
.To drop all changes without saving, click
Cancel
.
Edit CCSCOOInformation
To edit an existing CCSCOOInformation, choose a record to edit and click the
Edit
button to open the CCSCOOInformation
pop-up with the record’s current information prepopulated into the fields.
Make all necessary changes.
To save and close the pop-up, click
Save
.To drop all changes without saving, click
Cancel
.Delete CCSCOOInformation
To delete an existing CCSCOOInformation record, choose a record to delete and click the
Delete
.
To remove the CCSCOOInformation record, click
OK
in the confirmation pop-up.To cancel the deletion and close the pop-up, click
X
or Cancel
.CCSATTACHMENT
The
CCSAttachment
tab is used to store attachment documentation values (e.g. DocuCode and CertCode) related to the declaration.
Add CCSAttachment
To add a new CCSAttachment record, click
Add New
to open the CCSAttachment
pop-up.
Enter the record’s information in the required fields.
To save and close the pop-up, click
Save
.To drop all changes without saving, click
Cancel
.
Edit CCSAttachment
To edit an existing CCSAttachment record, choose a record to edit and click the
Edit
button to open the CCSAttachment
pop-up with the selected record’s current information prepopulated into the fields. 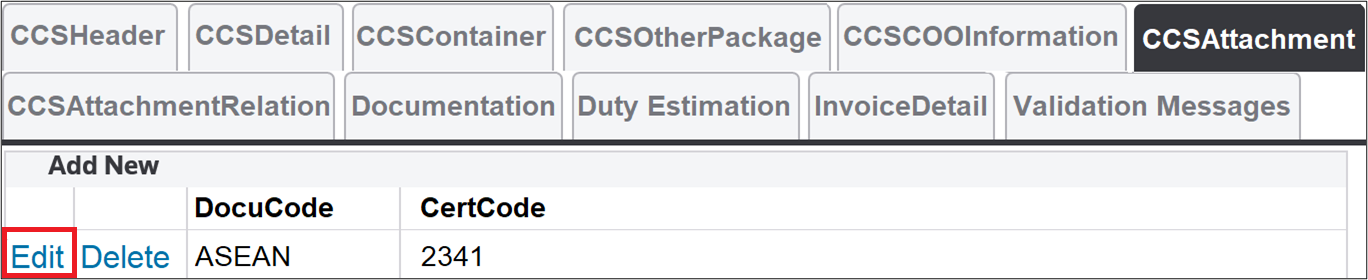
Make all necessary changes.
To save and close the pop-up, click
Save
.To drop all changes without saving, click
Cancel
.Delete CCSAttachment
To delete an existing CCSAttachment record, choose a record to delete and click the
Delete
button.
To remove the CCSAttachment, click
OK
in the confirmation pop-up.To cancel the deletion and close the pop-up, click
X
or Cancel
.CCSATTACHMENTRELATION
The
CCSAttachmentRelation
tab contains values (e.g. EDocCode, EdocID, EdocOwnerCode, and EdotOwnerName) related to any attachment on the declaration.
Add CCSAttachmentRelation
To add a new CCSAttachmentRelation record, click
Add New
to open the CCSAttachmentRelation
pop-up. 
Enter the record’s information in the required fields.
To save and close the pop-up, click
Save
.To drop all changes without saving, click
Cancel
.
Edit CCSAttachmentRelation
To edit an existing CCSAttachmentRelation record, choose a record to edit and click its corresponding
Edit
button to open the CCSAttachmentRelation
pop-up with the record’s current information prepopulated into the fields. 
Make all necessary changes.
To save and close the pop-up, click
Save
.To drop all changes without saving, click
Cancel
.Delete CCSAttachmentRelation
To delete an existing CCSAttachmentRelation record, choose a record to delete and click its corresponding
Delete
button.
To remove the CCSAttachmentRelation, click
OK
in the confirmation pop-up.To cancel the deletion and close the pop-up, click
X
or Cancel
.DOCUMENTATION
The
Documentation
tab shows all documentation the system will and/or has generated and any documents uploaded to the system by a specified user. This tab also contains features enabling you to send e-mail(s) to outside parties with export documents attached. This is accomplished by clicking Send E-mail
in the upper right corner of the pop-up.Outside documents can be uploaded by clicking the downward arrow next to
Attachments
.
Prior to processing the shipment, select the appropriate document format (PDF, DOC, XLS). Once generated, the documentation can be viewed by clicking the document name.

To view these documents, click the document name.
Some documents contain custom logos that appear on the document when generated. If you reprint the documentation after the intial print, the logo associated to the document will print on the new version of the document.
Uploading External Documents
To upload documents from outside of the ONESOURCE system.
- ClickUpload and Add.

- ClickNew.
- Enter a title into theTitlefield. If needed, supply notes in theNotetextbox.
- To save a title for future use and easy re-entry, check theSave title for later usebox.
- ClickBrowseto search for a file to upload from the local computer.
- Once a file is chosen, clickUpload and Addto attach the document to the declaration.

Sending E-mails
To send an e-mail directly from the system, click
Send E-mail
.important
When a message is sent from the system, it will come from the user’s e-mail address as it is entered in the system.

Clicking
Send E-mail
will open the E-mail Shipment
pop-up. The To, CC, Subject and body fields of the e-mail will appear. Enter the recipient e-mail address(es) in the To and CC fields. Write a subject and e-mail body.
To add a document(s) to the e-mail, click
Attachments
. This shows the document name along with the file format. Select the document(s) to attach, then click Send
.Once an e-mail is sent, the recipient’s e-mail address will be stored in the system and become an available option when the type-ahead feature is used.
To choose an e-mail address, hover over the e-mail address and click
Enter
.Load Template
and Insert Code Snippets
are notable features within the e-mail function. Within the Load Template
list are available e-mail templates that can be used to store the e-mail body along with the To, CC, and Subject.
Code Snippets
Selecting a code snippet from the
Insert Code Snippet
drop-down will populate the snippet into the e-mail body.When the e-mail is sent, the related/queried information (e.g. the product list per that shipment) will appear in place of
@PRODUCTLIST@
.After filling in all information on the various fields, confirm the template is complete and click
Save
. Any value or list of values (e.g. products shipped) can be configured and added to the drop-down.
DUTYESTIMATION
In Import (for import only) Invoice Management page, user can estimate duty by clicking the
Estimate Import Duty
button in the top right of the page.
And the estimated results (except for ActualLineDuty and ActualyLineVAT) will be displayed in the
DutyEstimation
tab. All currency will be converted into CNY according to latest conversion rate.
Spreadsheet Download
You can mass update the ActualLineDuty and ActualyLineVAT by spreadsheet uploading, before uploading the spreadsheet, you need to download a template by clicking the
Spreadsheet Download
link in DutyEstimation
tab.
Spreadsheet Upload
After the template is downloaded, you need to input the ActualLineDuty and ActualyLineVAT into ‘PaidDuty’ and ‘PaidVAT’ columns in the template.

By clicking
Spreadsheet Upload
button, there will be a ‘Spreadsheet Upload’ pop-up, and you can choose the updated template by clicking Choose File
button, and then click Upload and Import Data
button, and the ActualLineDuty and ActualyLineVAT will be updated for the corresponded products and displayed in the tab grid.
INVOICEDETAIL
The
InvoiceDetail
tab displays source information of export invoice values (e.g. ProductNum and TxnQty).
VALIDATION MESSAGES
The
Validation Messages
tab contains values (e.g. Date, Type, and Message) and displays any hold messages in conjunction with the declaration. Validation messages are grouped by message type: HoldValidation Message | Meaning |
|---|---|
Hold | This message type indicates a validation error that needs to be cleared before an invoice can move to the next processing step. |

The
Validation Messages
tab displays validation message summaries.
Related Content
-
Export Management
Format: Article