
Customs Declaration System (CDS) Export
When exporting goods out of the UK, Exporters or their representatives must submit an export declaration and get clearance from customs before the goods are allowed to leave the UK. This screen allows you to create export declarations and submit the same to customs. You can access this screen under the
Daily Processing – OUTBOUND
menu option, as UK CDS Declaration (Export)
.
The search bar
Find Declaration
is used for locating specific invoices or declarations within the ONESOURCE CDS Export system.Search Filters | |
|---|---|
Current | When you select Current and search for a declaration, theFind Declaration drop-down menu will show all declarations up to theCLEARED status. |
Completed | If you choose Completed and search for a declaration, theFind Declaration drop-down menu will display only those declarations that were canceled or received anEOG orEXT status from Customs. |

CREATING A NEW DECLARATION
To create a new declaration.
1. Click
New
to open a pop-up.
2. Use the
Procedure Group
dropdown to select the corresponding group and click Proceed
to confirm.The procedure group dropdown contains a combination of the Declaration Category, Type of Declaration, Additional Declaration type code and procedure codes. Choose the correct option as per your authorization and requirement.
Refer to the Appendix for the description of declaration categories and type codes.

3. Enter required data. If a field has an asterisk (*), it is a required field and cannot be blank.

4. Click
Save and validate
to run a validation process to ensure the declaration adheres to Customs rules and regulations. Errors will be displayed in the Validation Warnings
tab.
The “Location” column will define which tab and field contained the error.
The “Warning” column will provide a definition for the error.
The “Severity” column will provide whether it is an error or warning.
To resolve an error, go to the location listed in the “Validations” tab and make the change to fix what appeared in the “Warning” column. Click “Save and validate” to revalidate.
After all validation errors have been resolved and the declaration is complete, the “Transmit” button becomes available.
5. Click Transmit to send the complete declaration to Customs.
ACTION BUTTONS VISIBILITY
This section helps you to better understand which actions you can take against a declaration based on its status.
Action | Description |
|---|---|
New | On click of this button new declaration will be create |
Save and Validate | On click of this button the declaration is validate and saved in draft state and all the details which are invalidate for those warning are visible under validation warning tabs |
Transmit | On click of this the declaration is transmitted to custom if all provide details are correct and compliance as per custom transmit will be successful else Transmit fail |
Transmit GPR | Allows you to transmit a Good Presentation message (GPR) to customs. |
INV | Allows you to create an invalidation request for the declaration. |
Amendment | Allows you to amend the declaration. |
Supplement | Allow you to supplement or provide additional info to the declaration |
Create GPR (With Amendment) | Allows you to create a Good Presentation message with amendments to the declaration. |
Transmit GPR (With Amendment | Allow yoy to transit the Goods Presentation message with amendments to the custom |
CDS Report | Allows you to generate a PDF document containing the declaration details. |
ADDING AN INVOICE
Invoices can be added to a declaration by clicking
SELECT INVOICE
or by manually creating an invoice in the declaration.Notes about the
SELECT INVOICE
button:- After transmitting the declaration, the button will not be visible to add or remove invoices.
- After rejection from custom, the button will be visible, and you can add or remove invoices.
Adding an Existing Invoice to a Declaration
To add an invoice to the declaration.
1. Click
SELECT INVOICE
to open a pop-up which lists all processed invoices that have not already been attached to a declaration.2. Review the list of invoices to determine which one to add to the declaration.
important
To better view and analyze these columns, you can perform sorting and filtering options described in the section
Sorting and Filtering Grids
in the User Setup user guide. 3. Once the invoice to be added is found, check the box of the invoice you want to add.
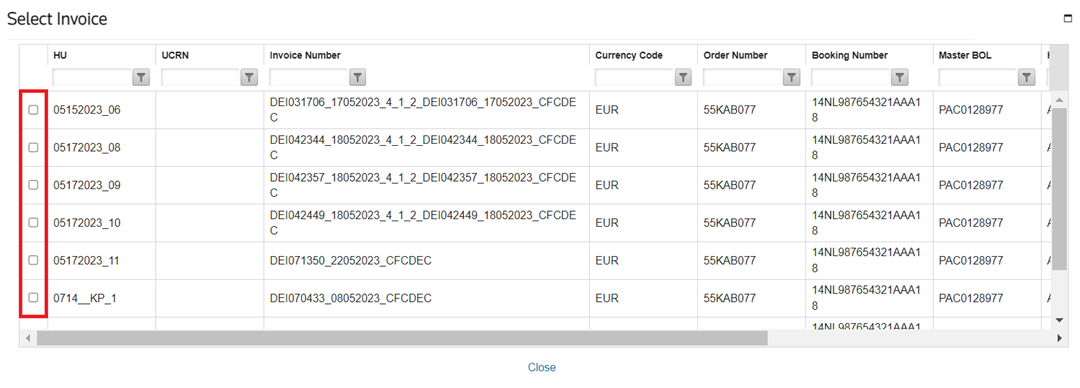
After selecting an invoice, the list automatically refreshes and is sorted based upon grouping criteria.
4. Click
Close
.The header, parties and goods items information will be added to the declaration and the record for the
Goods Items
tab.
Removing Invoices of a Declaration
To remove an invoice you selected, simply click “SELECT INVOICE” to open the pop-up and uncheck the box of the invoices you want to remove.

Manually Adding an Items to a Declaration
To manually add an invoice.
1. Open the
DE Export Declaration
screen.2. Use the
Find Declaration
field to locate the desired declaration.3. Click on the
Goods Items
tab.4. Click
New
.
5. The
GoodsItem
pop-up opens which contains a list of relevant data fields to be entered for an invoice. Enter all fields to create the invoice.
6. Click
Save
at the bottom of the pop-up when you are finished or Cancel
to drop all changes and close the pop-up.7. After saving it, the system will create a new line for the goods item under the
Goods Item
tab. This tab contains multiple sub-tabs, which (when opened) will access additional information under each goods item (e.g. Packages, Containers, Documents, etc.).8. Complete the fields in these tabs with their respective required data. If a field has an asterisk (*), it is a required field and cannot be omitted.

9. Click
Save and validate
to run a validation process to ensure the declaration adheres to Customs rules and regulations. Errors will be displayed in the Validations
tab.If any errors occur, do the following:
- Go to the location listed in the Validations tab and make the change to fix what appeared in theWarningcolumn.
- TheWarningcolumn will provide a definition for the error. The Location column will define which tab and field contained the error.
- ClickSave and validateto revalidate.
10. After all validation errors have been resolved and the declaration is complete, the
Transmit
button becomes available.11. Click
Transmit
to send the complete declaration to Customs.This section highlights the process to follow when creating and submitting a full declaration to Customs. However, the ONESOURCE Export Declaration System accounts for various message types.
The section below will explain the process you will follow for different message types.

Related Content
-
UK Customs Declaration System (CDS)
Format: Article