
FTA: Supplier Portal Plus (SPP) - SPP Analysis (Upload & Analyze)
To upload and analyze a BOM:
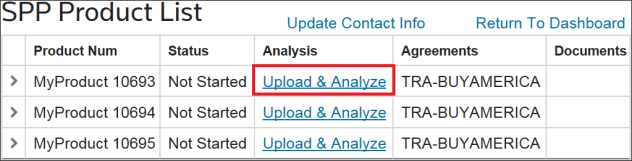
- Choose a record from the grid.
- Click its correspondingUpload & Analyzelink to open theUpload & Analyzescreen.
The page opens in a new tab, so you still have access to the original product list on your first tab.
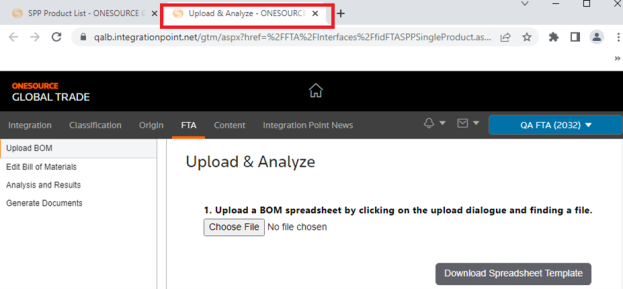
This screen has four steps, each of which has a sub-section listed below:
- Upload BOM
- Edit Bill of Materials
- Analysis and Results
- Generate Documents
Upload BOM
In the
Upload BOM
stage of the process, you can provide a BOM spreadsheet in the provided template. To get a blank copy of the template, select the
Download Spreadsheet Template
button.
- With the template open, selectEnable editing.
- Enter BOM information into the fields provided. Ensure you review the “escriptioncolumn, as it contains instructions on how to correctly fill in the template.

- After you enter all the necessary information, save the template to the local drive.
- Return to theSPP Analysisscreen.
- SelectChoose File.
- Locate and select the file from your local database.
- SelectOpen.
After uploading, a confirmation message will appear on your screen.
If there is an issue with the upload, the
Validation Errors
tab will appear. This tab is only visible when there are errors.To view a detailed grid that explains where errors occurred and the reasons for them, go to the
Validation Errors
tab. Refer to the following grid for more information on what appears in the Validation Errors
tab.Column | Description |
|---|---|
User Name | Shows the username of the user who uploaded the spreadsheet. |
File Name | Shows the name of the spreadsheet containing the error. |
Line Number | Indicates the Excel© line where the error can be found in the spreadsheet. |
Field Name | Indicates the specific field in the spreadsheet where the error occurred. |
Validation Error Message | Provides the reason for the error, making it the most crucial part of the grid. |
important
While some error messages are standard, others can be customized for specific scenarios.
Edit Bill of Materials
After a BOM has been uploaded, the supplier can proceed to the
Edit Bill of Materials
portion of the process. The BOM information will appear in the Finished Good
and Purchased Components
grids.- Review all data.
- Make any necessary changes.
- If any changes need to be made to a Finished Good or a Purchased component, select the item to be modified.
- Click its correspondingEditbutton.

- The selected line will become read-write. Make any necessary changes.
- ClickUpdate.
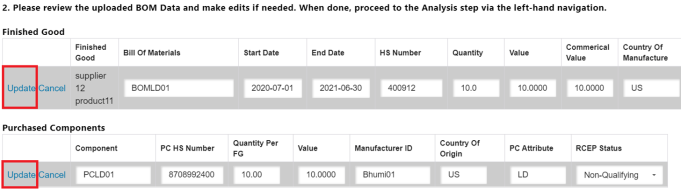
- After all necessary changes have been made, click theAnalysis and Resultstab to proceed to the next step.

Analysis and Results
- Select one or more agreements via checkbox.
- Click theStart Analysisbutton to start the BOM analysis process.

- After the analysis is complete, the system message below will appear on the screen and the Result value will change toAnalyzed.

- After analysis is complete, click on theGenerate Documentstab to proceed to the next process step.

Generate Documents
Generating a New Declaration Document
To generate a new declaration document,
- Select one or more agreements to include from the grid by clicking their corresponding checkboxes.

- Select a blanket period.

- Enter the signature and company information for the document.

- Enter Other Party Information (Receiver Name and Receiver Address) and BOM Information (Factory Name and Factory Address) if necessary. This is not mandatory for the upload process. Click the save button after including the information.

- To submit an existing declaration document, select theChoose Filebutton and select a file from the local drive. Once that file has been selected, click on theSubmit Documentbutton.

- When you are done providing the declaration information, selectGenerate Document.
Extra Information
In the “
Extra Information
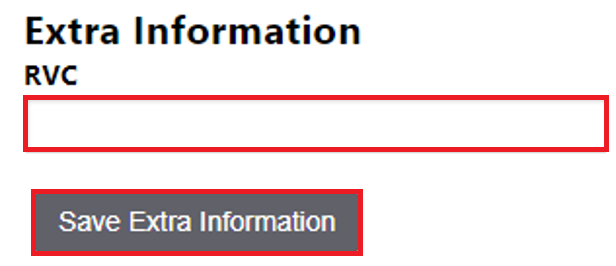
” section, each agreement associated with the solicitation is displayed as a separate tab, allowing you to save agreement-specific details. The data you enter in this section will be displayed on the screen for your reference. However, it will not be included in reports or synced with solicitation admin and other external systems.In the “RVC” field, you can enter the RVC percentage your BOM scored via SPP analysis. When you’re done, select
Save Extra information
.
Related Content
-
FTA: Supplier Portal Plus (SPP)
Format: Article