
FTZ Management: Tools - Post Summary Corrections
The
Post Summary Correction
screen is used for making corrections to entry summaries that have already been accepted and paid. This screen is accessible to self-filers only.If the client is not a self-filer, the client will want to handle any Post Summary Corrections with their broker.
note
Charges and refunds will be handled outside ONESOURCE Global Trade.
PSC: Create a Project
The
PSC Projects
screen is where a new project can be created or where a client can search for existing projects. Each project contains a set of changes to be applied to an entry that has been accepted and paid.To create a project:
- Enter a Project Name.
- Select a ReceiptDocID from the drop-down next to theCreate Projectlink.This drop-down pulls from theReceipt Historyscreen. It also has type-ahead capabilities. If all or part of the 214 admission number is known, the user can type the known portion into the drop-down to further narrow down results.
- After an admission number has been selected, clickCreate Project. This will save the project. Once a project has been created, it cannot be deleted.

If there is an entry 300 days or more beyond the release date, the screen will display the below message:

PSC: Edit Records
After a project has been successfully created, the system will redirect the user to the
PSC Project – Edit Records
screen.To add an explanation:
- Click theAdd/Editlink to the right of theExplanationdrop-down.
- Enter an explanation into the provided text box. This field can accept up to 1000 characters.
- Once the explanation has been written, clickAdd. The explanations added to a project will be transmitted on the PSC to CBP.
To edit an existing explanation:
- Click on theExplanationdrop-down and choose an explanation from the provided list.
- Once an explanation has been selected, click theAdd/Editlink.
- In the textbox below, make any necessary corrections.
- ClickUpdate. Once an explanation is saved, it cannot be deleted.

Once an explanation has been added to the PSC, the explanation will become available for future selection inside the
Explanation
drop-down.It is important to note that explanations are tied to the project itself and each new project will need to have explanations added to it. Explanations are required for each layer update, but do not have to be the same if multiple layers are updated. An asterisk (*) next to an explanation denotes that it has been used for a change and already applied to layers.

After the explanations have been added or updated:
- Return to thePSC Project – Edit Recordsscreen.
- Once back on this screen, select an explanation from the Explanation drop-down.
- Enter the needed search criteria to edit a specific field on a previously received layer.
- Use theSearchdrop-down to choose a field name.
- Use the textbox to enter the value to be searched. Up to three search criteria can be defined at a time.
- Choose the column to be modified from theEdit Columndrop-down.
- ClickGo….

The search results will appear below.

To update the column:
- Enter the updated value in theNew Valueflag.
- ClickSave.
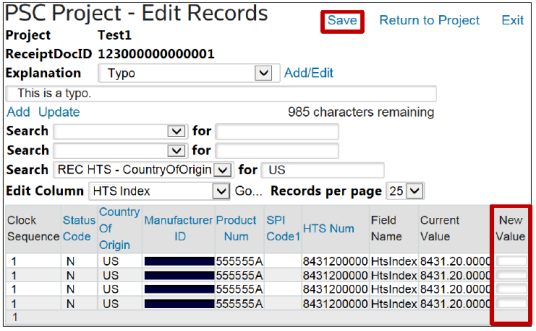
The number of records will be confirmed at the top of the screen. This will also tie the selected explanation to the change.

Note that this will save the changes to the project, but will not apply to the actual layers until
Apply
is clicked on the PSC Project
screen. Once all changes for the ReceiptDocID are complete and saved, click Return to Project
to review the project details.
The screen will display the Project Name along with the project’s status (Open or Applied) and any Receipt Changes that have been saved thus far.

To add more changes:
- Choose a ReceiptDocID from theSelect a ReceiptDocIDdrop-down.
- ClickAdd. This will redirect the user to thePSC Projects – Edit Recordsscreen. This project details screen includes a grid which displays the documents impacted by the added changes.

To refile an entry number:
- ClickView. Entries cannot be refiled until changes have beenApplied.

To return to the project details screen:
- ClickReturn to PSC Project.

To apply all changes to inventory layers:
- ClickApply.

A confirmation message will appear, noting that once a project has been applied, no further changes can be made.
To continue:
- ClickOK.
To drop changes and return to the screen.:
- ClickCancel.

If an entry is outside of the 300-day window, a warning message will appear and the user must reaffirm that changes should be applied.

Once changes have been confirmed and applied, a confirmation message will appear and the project will be disabled from any further changes. The project status will change from Open to Applied.

PSC: Refiling the Entry
Once all changes have been applied, the user can file the entry.
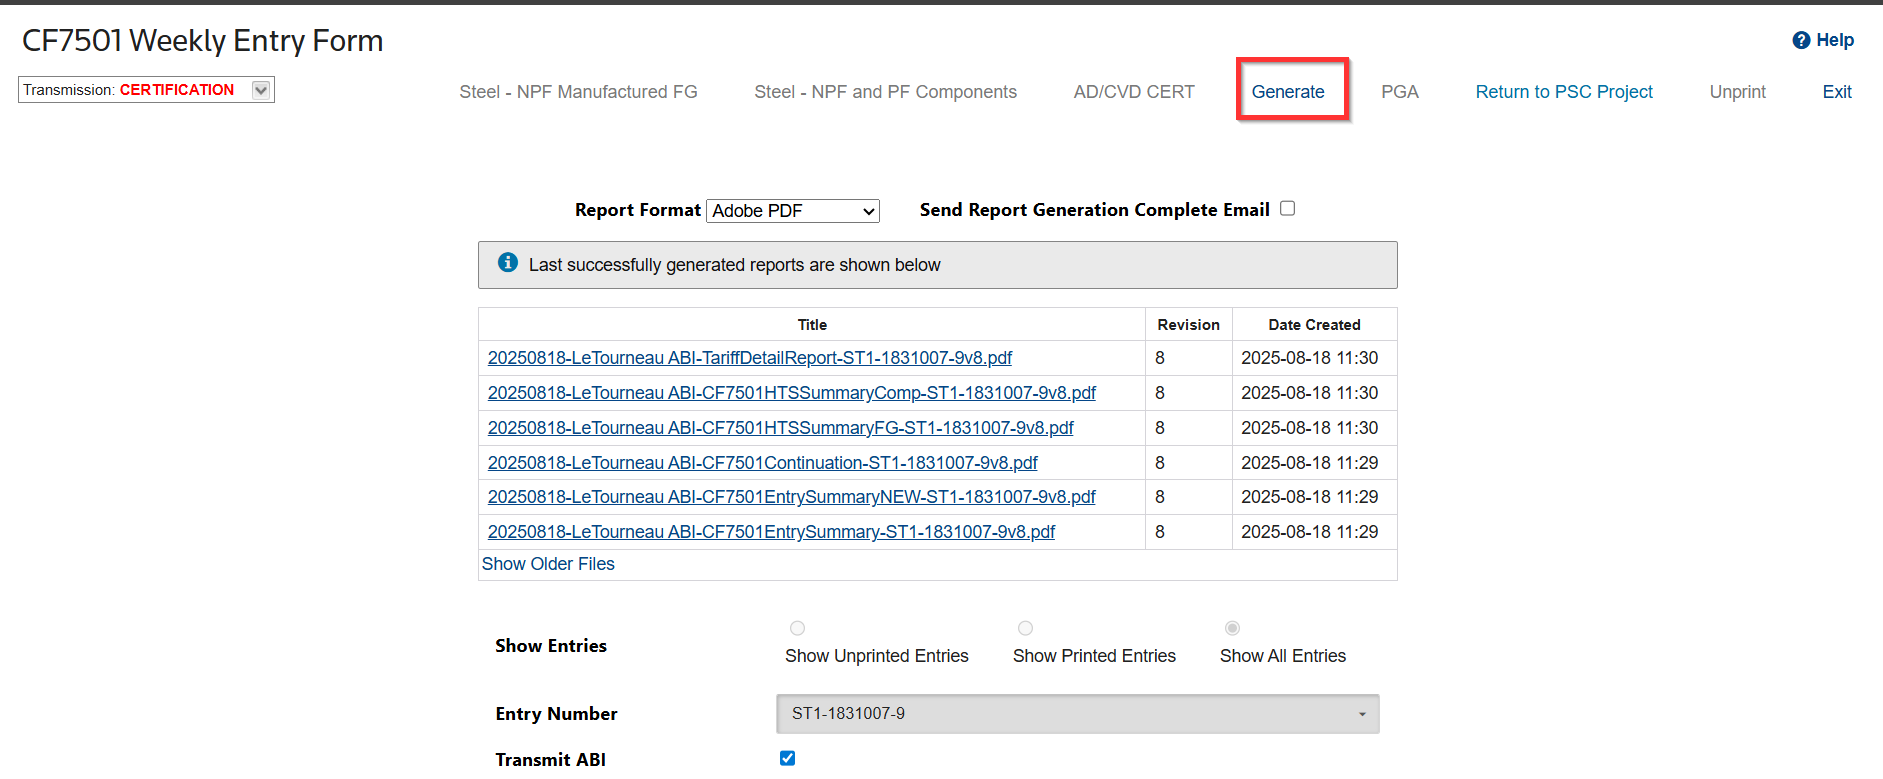
To file an entry:
- Choose an entry from theDocumentsgrid.
- Click its correspondingViewlink.

- Click View to go to CF7501 Weekly Entry Form. The entry number will be locked on the screen for refiling.
- Check theTransmit ABIbox.
- ClickGenerate. This will transmit the applied changes.
If the PSC requires further review, the below message will display:

Additionally, the entry status in the Document grid will change to
PSC Needs Review
.
To review the PSC changes:
- Click theViewlink next to the entry.

Clicking
View
will redirect the user to the Line Post Summary
sub-tab on the ABI Entry 7501
screen, as shown below. Review all changes, and then click
Transmit
to re-file the entry.
To refile any other entries:
- ClickReturn to PSC Projectand repeat the steps listed in this section.Before clickingTransmit, confirm review the calculated codes and verify they are correct. A full list of available reason codes and their associated instructions can be found in the ABI User Guide.
The status of the filed entry will change to
PSC Transmitted
.
PSC: Accounting Report
The Accounting Report is an internal document used to track changes made post-summary.
note
This report is temporary and will be deleted after seven (7) days.

Related Content
-
FTZ Management: Tools Overview, Task Manager, and FTZ Search
Format: Article,
7 min read
Article,
7 min read