
FTZ Management: Tools - Shipment and Receipt Reassignment
The
Shipment Reassignment
screen allows the user to reassign shipments from one document number to another after FIFO has been finalized. This screen can be opened by choosing Shipment Reassignment
from the Tools
menu.
Choose a document type (7501 – Entry, 7512 – IT, or Scrap) to reassign in the
Choose Source Doc Type
and Choose New Document Type
dropdowns. Source and new documents must match types. For example, if the source document is a CF7501, the new document should also be a CF7501.
Choose if the source document has already been generated by selecting Printed or Unprinted in the
Choose Source Document Location
. Note, the 7501 – Entry can only be reassigned from Printed status.- If the reassigned shipments are going to go to a document that hasn’t been created yet, selectEnter New Documentand type in the new document number in the blank space.

- If the reassigned shipments are going to a document that has already been created, selectSelect Existing Documentand then select the created document from the dropdown.

Select the document number that the shipments will be moved from in the
Choose Source Document
drop-down.Choose if you would like to receive an email notification or a message notification in the
Send E-Mail Notification
or Send Message Notification
boxes.
Once the source document is chosen, a grid will display at the bottom of the screen with the respective shipment information.
To mark a shipment(s) for reassignment, various tools can be used:
- The various filters can be utilized to help narrow down the shipments needed to be reassigned.
- TheSelect Allbutton can select all the records shown on theCurrent Page, or if the shipments span multiple pages,Allcan be selected. Note, if there are filters utilized, theSelect Allbutton will only apply to the filters.
- TheSelect Linebox will select all underlying parts on that line to be reassigned.
- The Expansion box next to a line will allow the selection of individual parts under a line to be reassigned.

- If a Filter is utilized, anExtract Current Resultsoption is available. This option will export the filtered data to an Excel Spreadsheet. This spreadsheet can be utilized to manage the items to be reassigned to another document.
- Do not reorder the columns on the Excel spreadsheet or add any columns.
- Remove all shipments from the Excel spreadsheet that will NOT be reassigned.
- Remove all filters from the Excel spreadsheet and ensure only the data on the spreadsheet are intended to be reassigned. All items that are in a spreadsheet that are uploaded will be marked for reassignment.
- Save the Excel spreadsheet.
- In theImport Shipment Transactionsselect theChoose Fileto upload the saved Excel spreadsheet.
- Select the Upload and Import Data to import the Excel spreadsheet and the shipments uploaded will all be marked for reassignment.
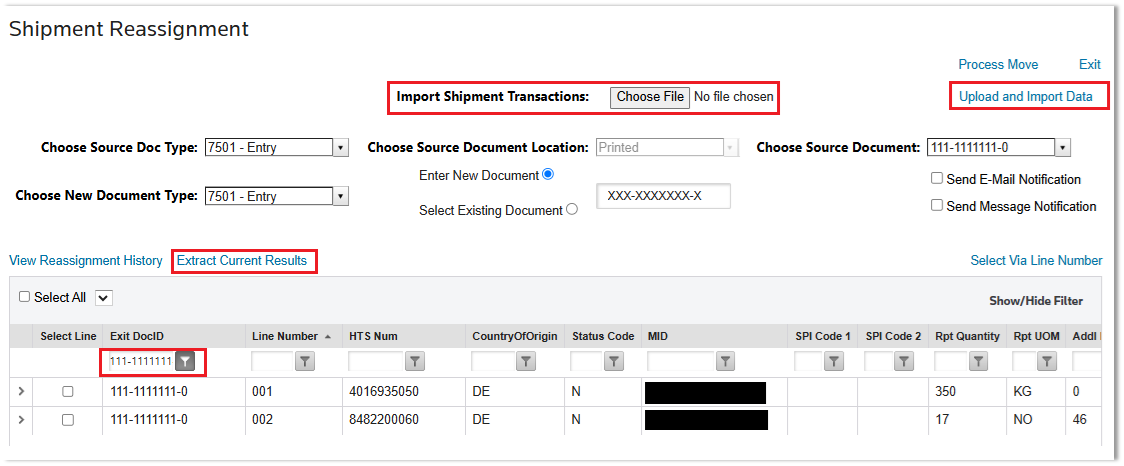
Once the correct lines have been marked for reassignment, click
Process Move
at the top of the screen. This will initiate the reassignment.Once completed, a confirmation message will appear, along with the option to undo the reassignment (if needed).
Receipt Reassignment
The
Receipt Reassignment
screen allows the user to reassign receipts from one document number to another after FIFO has been finalized. This screen can be opened by choosing Receipt Reassignment
from the Tools
menu.
To reassign a receipt:
- Choose a 214 from theChoose 214drop-down. This drop-down also has type-ahead capabilities, meaning the user can also begin typing a 214 number and further narrow down results.
- Choose a field to update from theUpdate Fielddrop-down. Multiple fields can be updated at a time using this screen. Each field being updated will need to be added before the reassignment is performed.
- Enter the new value for the fields to update to. If this is a new value, clickEnter New Value, then write the value in theSelect Valuedrop-down.
If this is an existing value:
- ClickSelect Existing Value.
- Choose a value from theSelect Valuedrop-down.
- ClickAdd Modificationto add the field to the list of fields for update.
- Repeat as needed until all fields to be updated are in the table on the right.

Once the source 214 is chosen, a grid will display at the bottom of the screen with the respective receipt information. Clicking the expansion arrow on the far left will expand the line to show more detailed information.
To mark a receipt for reassignment:
- Choose a receipt line.
- Check the box in theSelect Linecolumn. CheckingSelect All Transactionswill mark all receipts.
- ClickProcess Moveat the top of the screen to initiate the reassignment. Once the reassignment is complete, the reassignment can be seen by clickingView Reassignment History.

Related Content
-
FTZ Management: Tools Overview, Task Manager, and FTZ Search
Format: Article