
Personal Dashboard Maintenance
Creating a Personal Dashboard
To create a new Personal Dashboard, click
Setup & Management
. This will open the Dashboard Configuration
pop-up, where dashboard setup options are located.
In the
Dashboard Configuration
pop-up, click Create New Personal Configuration
.
The pop-up will refresh and display five progression steps at the top: Name, Grid, Map, Reports and Permissions. The current configuration step will be blue.
Tab | Description |
|---|---|
Name | Name the newly-created Personal Dashboard (limited to 100 characters). |
To continue, click
Save and Continue
.To return to the main Dashboard Configuration screen, click
Cancel
.To return to the Dashboard, click
X
. Clicking Cancel or X
will drop all changes without saving.
Tab | Description |
|---|---|
Grid |
|
To continue, click
Save and Continue
. To return to the Dashboard, click X
. Clicking X
drops all changes and closes the Dashboard Configuration
pop-up.
Tab | Description |
|---|---|
Map |
|
To continue, click
Save and Continue
.To return to the Dashboard, click
X
. Clicking X
drops all changes and closes the Dashboard Configuration
pop-up.
Tab | Description |
|---|---|
Reports | This tab generates in a manner that mimics the final dashboard layout. For example, if a map was chosen, the entire row assigned (top or bottom) will not be available for report selection. |
To assign a report, click
Select
.
The
Select Report
pop-up will open with the following two options:Fields | Description |
|---|---|
Select Report | Choose a report to appear on the new Personal Dashboard. |
Select Target | Choose a target to associate with the report on the new Personal Dashboard. |
The drop-down box includes type-ahead functionality to assist with locating the needed report. If a report does not need to be associated with a target, return the drop-down to
Select a Target
…. To continue, click Save Selected Report
.To return to the
Dashboard Configuration
pop-up, click Cancel or X
. Clicking Cancel
or X
drops all changes and closes the pop-up.
To continue, click
Continue
. To return to the previous screen, click Previous
.To return to the Dashboard, click the
X
in the top right of the pop-up. Clicking X
drops all changes and closes the pop-up.
Tab | Description |
|---|---|
Permissions | Personal Dashboards are only visible to the owner. |
To finalize all choices, click
Finish
.To return to the previous screen, click
Previous
.To close the
Dashboard Configuration
pop-up and return to the Dashboard, click X
. Clicking X
does not save any changes.
Once the Personal Dashboard has been finalized, a message (
The configuration has been saved
.) will appear on the Dashboard Configuration
pop-up. Click X
to close the pop-up and return to the Dashboard.
Modifying an Existing Personal Dashboard
To modify an existing Personal Dashboard, click
Setup & Management
.
This will open the
Dashboard Configuration
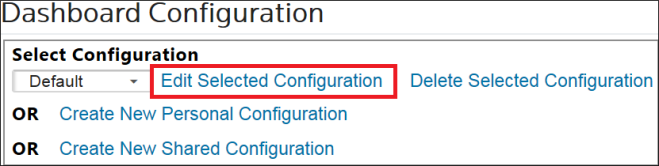
pop-up, where dashboard setup options are located. Use the Select Configuration
drop-down to locate the dashboard to be edited, and then click Edit Selected Configuration
.
Clicking
Edit Selected Configuration
will refresh the pop-up and display five progression steps across the top: Name, Grid, Map, Reports and Permissions.The current configuration step will display in a different color. Editing a Personal Dashboard follows the same process steps as creating a new Personal Dashboard.
For more details, see the
Creating a Personal Dashboard
section of this User Guide.Deleting an Existing Personal Dashboard
To delete a Personal Dashboard, click
Setup & Management
.
This will open the
Dashboard Configuration
pop-up, where dashboard setup options are located. Use the Select Configuration
drop-down to locate the dashboard to be deleted, and then click Delete Selected Configuration
.
A Confirm Delete pop-up will open, requesting confirmation that the dashboard is to be deleted. To continue, click
OK
. To cancel, click Cancel
.
Once the Personal Dashboard has been deleted, a message (
The configuration has been successfully deleted
.) will appear on the Dashboard Configuration
pop-up.Click
X
to close the pop-up and return to the Dashboard.
Related Content
-
GTV Dashboards
Format: Article