
Configuring IMCR Scenarios
tip
To view the images in higher resolution, right-click the image and select
Open image in new tab
.The
Item Master Custom Rules
screen lets you enter custom rules to modify transactions based on specific rule specifications.For example, you can add a custom rule to update your Product Transactions during validation. This rule adds chapter 99 numbers and updates the status code as needed for your specific business case.
Access this screen by selecting
Item Master Custom Rules
from the Maintenance
menu.
Manually add a new custom rule
To add a new rule to the system:
- SelectAdd New Record.

- Fill out the fields according to these notes:
 FieldDescriptionTargetTransactions:Always select this option unless adding the rule to a manufacturing FTZ partner (use the complete plural word when uploading the Template).Reports:Select this option if the rule applies only to finished goods in an FTZ partner (use the complete plural word when uploading the Template).Start Effective DateEnter the start date of when transactions should consider the rule.You can’t update this date once saved, so proactively add these rules.End Effective DateEnter the end date of when transactions should consider the rule.You can’t backdate this date once saved, so proactively add these rules.Match Product NumberIf storing rules at a product number level, enter the product number associated with the retaliatory tariff. While most regulations are enacted at the HS-level, some, like the Miscellaneous Trade Bill, require management at the Product-level.Match Country Of OriginEnter the country of origin associated with the retaliatory tariff, most commonly "CN".Match ManufacturerIDEnter the MID code associated with the retaliatory tariff, while it is not typically required for retaliatory tariffs.Match HTSIndexEnter the full 10-digit HS number associated with the retaliatory tariff.Match HTS NumberOnly utilized when the Target is Reports.Match HTS Number 2Not required for retaliatory tariffs.Match Status CodeEnter the status code of receipts to update. This field must be populated for the FTZ solution.Typically, enter “N” for FTZ, or "X" otherwise.Update To HTS IndexEnter the full 10-digit HS number associated with the retaliatory tariff.Do not populate if doing Multi-HTS rules.Update to HTS Number 2Enter the chapter 99 HS number that must be reported with the base HS number listed in the Update To HTS Index field.Do not populate if doing Multi-HTS rules.Update To Status CodeEnter the status code of receipts to update. This is only required for FTZ and is most commonly “P”.Do not populate if doing Multi-HTS rules.Example for Multi-HTS Tariff
 - Use this grid to understand the required fields when adding clock rules.

- We are deprecating the HTSNum2 field as an option for storing additional chapter 99 tariffs to better accommodate current and future regulatory changes.Follow these steps to create multi-HTS tariffs properly. Leave the following fields blank:
- Update to Hts Index
- Update to Hts Number 2
- Update to Status Code
- SelectInsert.

- After adding the rule, select the arrow on the left-hand side of the rule and chooseAdd New Recordfor each multi-HTS record:
- Add in details according to the following notes.Match RecordCheck this box if the record you are matching already contains the HTS.Uncheck this box if you are adding the HTS to an existing record.Match HTS NumberFor each rule, create one child record for the base HS number and one for each retaliatory tariff or MTB HS number required for that base HS.If you check theMatch Recordbox, fill in theMatch HTS Numberwith the 10-digit base HS.If you don't check theMatch Recordbox, leave theMatch HTS Numberblank.Update to HTS IndexIf you leave theMatch HTS Numberblank and do not check theMatch Recordbox, enter the secondary HS number (chapter 99).If you fill in theMatch HTS Numberand check theMatch Recordbox, leave this field blank.Update to Status CodeEnter the status code of receipts to update. You must populate this field, but it is only used by the FTZ solution.Typically, use "P" for FTZ, or enter "X" otherwise.HTS SequenceSpecify the sequence in which the child record should be reported in relation to other child records. Refer to the USCBP publication for guidance on proper HTS sequencing.Value PercentFor non-split value reporting, make this a 0 for chapter 99 HTS Numbers and a 1 For the Commoity HTS Number.For split value reporting you can provide a decimal value for a chapter 99 and a decimal value for a Commodity HTS number (if not populating the Unite Value field).MultiplierThe relationship between the identifier and set. In order to have the identifier broken out in the set, the Multiplier must be greater than 0.Unit ValueFor non-split value reporting, make this a 0 for chapter 99 and commodity HTS Numbers.For split value reporting, you can provide a value for the different portions of you chapter 99 and commodity value splits (if not populating the Value Percent field).WeightMake this 0 if do not need to report different weights for you multi-HTSHTS UOM Conv FactorProvide the UOM Conversion Factor if your HTS number has a UOM reporting requirement.Addl HTS UOM Conv FactorProvide the Addl UOM Conversion Factor if your HTS number has am Additional UOM reporting requirement.
- SelectInsert.

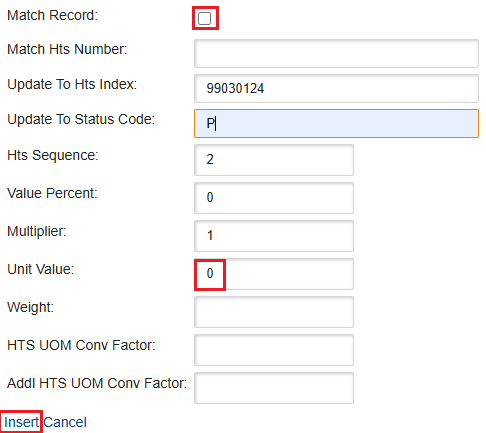
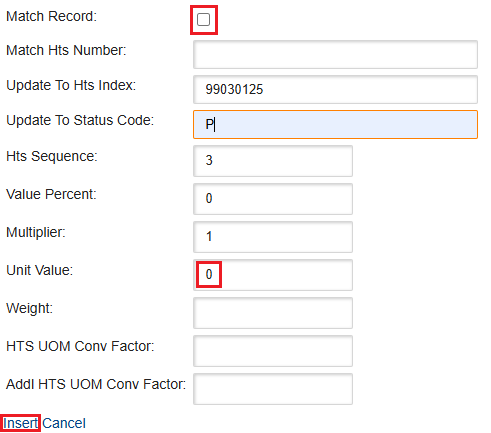
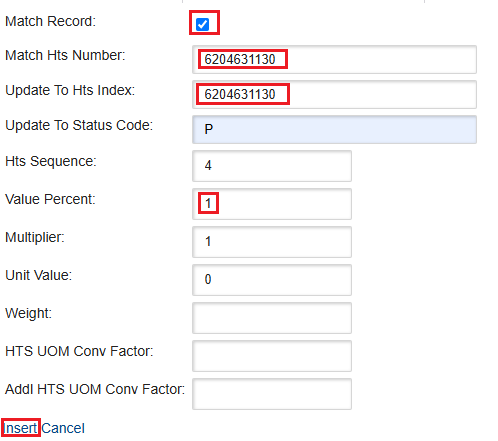
When the final record is added, you'll see the details you entered on the row.
Update an end date for an existing custom rule
To modify the end date of an existing custom rule:
- Choose a custom rule from the grid.
- Select its correspondingEditbutton.
- Update the End Effective Date.
- SelectUpdate.

Turn off an existing custom rule
To turn off an existing custom rule:
- Choose a custom rule from the grid.
- Select its correspondingDeactivatebutton.

Delete a future date custom rule
To delete an existing custom rule that has a future Start Effective Date:
- Choose a custom rule from the grid.
- Select its correspondingDeletebutton.

Add multiple custom rules via spreadsheet upload
We understand that staying on top of changing updates and reporting requirements can be challenging. Considering that, we designed our system to adapt to your unique business needs, without imposing rigid data set up requirements.
To help you go to these changes, you can use the
Upload and Import Data
functionality.- SelectExport.
 Proceed here if you would like to see sample videos on how to fill out the spreadsheet for upload..
 - Download the Excel spreadsheet generated from the prompt.
- You can use this template to help you understand the types of data/updates you could do in the upload.
- Keep the template columns intact and add your specific data as needed, following the sample examples highlighted in yellow.
- You may have different field requirements depending on your specific use cases.
- If you're an FTZ that uses dots in your HTS numbers, include them in your rules.
- When you finish adding your specific rules, remove the sample rows highlighted in yellow from the spreadsheet.
- Save your updated template.
- Return to theItem Master Custom Rulesscreen.
- SelectUpload and Import Data.
- After you complete the prompt, the system uploads all changes you made to the spreadsheet and shows them in theItem Master Custom Rulesgrid.
Related Content
-
Understanding IMCR Scenarios
Format: Article
-
IMCR Sample Scenarios
Format:
Article
-
Working with Tariff Orders in IMCR
Format:
Article