
Details
The
Details
tab stores all part level details (e.g. Product Number, Product Description, Transaction Quantity, Unit Value, Total Cost, and Tariff Number).Tab fields are configurable to client needs, ensuring that recorded details apply to client business requirements.
Data corresponding to these fields is inserted via
Add New Record
or Edit
functions as discussed below. Many features exist throughout the Details
tab to ease navigation across data sets.Functions | Description |
|---|---|
Navigation Arrows | Used to transition through pages of records. The currently viewed page is noted numerically between arrows. Single arrows move across pages. Barred arrows move to the first/last page of records. |
Page Size | Restricts/expands the number of viewable records per page. |
# items in # pages | A quantitative overview of all records within the grid. Located at lower right of page. |
Scroll Bar | Provided to view columns outside the visible pop-up. Can go left-right or up-down. |

Add New Detail
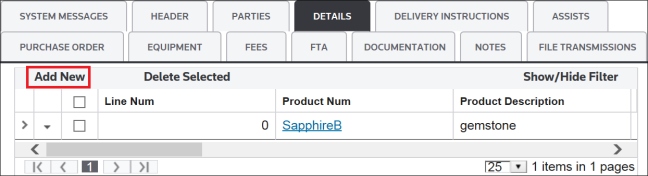
To add a new detail record, click
Add New
.
This action will open a blank
Edit Detail
screen. The contents of the Edit Line Detail
pop-up are in a form view. Depending on how the system was configured, the fields on this tab may be broken into one or multiple sections, as indicated by a gray bar.
Currency Conversion
Currency Conversion is an optional standard functionality that makes it possible for users to store and convert the Customs Value of each line item in the invoice from an Original Currency to a Customs (declarable) Currency. This feature makes it easier for Customs analysts to convert values into whatever compliant currency needs to be reported.
The exchange rates used for this functionality are maintained and supplied within the ONESOURCE: Global Trade Content product. This way, companies can be confident that the rates being used for their invoices come from valid sources and are regularly updated.
If Currency Conversion has been enabled, the following additional fields can be configured to appear in the
Edit Detail
pop-up:
Hiding/Expanding Sections
To hide a section, choose a section to hide and then click its corresponding arrow on the far right.

The fields for that section will now be hidden on the screen. Clicking the arrow a second time will make the fields visible again.

Fields
Fields with a red asterisk (*) beside the field name are required fields and cannot be omitted.

Filter Form Fields
Each section will have a
Filter Form Fields
search box. As the user types a value into this textbox, the section will refresh to only show fields matching what was typed.
Show Required Fields
To filter a section to only show the required fields, check the
Show Required Fields
box. The grid will refresh to only show required fields.
Show Empty Fields
To filter a section to only show the empty fields, check the
Show Empty Fields
box. The grid will refresh to only show empty fields.
Enter a part number or part description in the
Select Product
field. Select Product
has type-ahead capabilities and can be configured to pull information from ONESOURCE Global Classification.Once the product is found, select it from the drop-down.

Other fields within
Edit Detail
may vary, as these fields are configurable based on the client’s company’s needs. Enter additional information to complete the record.To save the record and keep the pop-up open for further editing, click
Save
.To save the record and close the pop-up, click
Save and Close
. The Details
screen will now include the newly added record.To drop all changes without saving, click
X
.Offset Auto License Field
The
Offset Auto License
field supports the entry of an offset license code on individual line items within an import shipment. This field is available in Add New Detail
and Edit Detail
.This feature was introduced to support CBP's offset license process, which allows importers to apply licenses granted by the Department of Commerce to reduce or adjust import duty amounts on eligible entries.
The offset license code follows a specific format: 7 characters total (1 letter followed by 6 numbers).
important
The
Offset Auto License
field will only be visible if it has been configured for your account. If this field does not appear for you, contact your system administrator to have it enabled. Once entered, the offset license code will be associated with that line item and submitted to CBP as part of the entry filing.Once the offset license code is entered, the system will associate the license management information with that line item, allowing it to be submitted as part of the shipment's license compliance process.
Edit Detail
To the left of each record in the
Details
tab is a downward pointing arrow. Moving over this arrow yields the following set of selections:- Edit
- Manage Licenses
- Copy
- Delete
Additional options (e.g.
Manage Licenses, Add Child Record, Manage PGAs
) may be available depending on how the system was configured.
Editing a Detail Record
To edit a detail record, choose a record to edit and move the cursor over the record’s corresponding downward arrow on the left.

When the options menu appears, click
Edit
.
Clicking
Edit
will open the Edit Detail
pop-up. Make all necessary changes.To save the record and keep the pop-up open for further editing, click
Save
.To save the record and close the pop-up, click
Save and Close
.To drop all changes without saving, click
X
.If
Show Hold/Info Messages
is clicked, then any system message summaries related to the invoice will appear at the top of the “Edit Detail” pop-up.
Details can be configured so certain security groups cannot see the Edit Detail data. If a user does not belong to a security group with access, the following validation message will appear:

Export and Import Tariff Number Links

Clicking the
Export Tariff Num
OR Import Tariff Num
link opens a new window with links to corresponding HS Numbers in the ONESOURCE Global Trade Content Global Tariffs
screen.
Clicking the icons to the right of the
Export Tariff Num
or Import Tariff Num
will open a pop-up that displays further details from the Global Tariffs screen.
To save the record and keep the pop-up open for further editing, click
Save
.To save the record and close the pop-up, click
Save and Close
.To drop all changes without saving, click
X
.Attach Document
If a line item has an associated document that needs to be attached, this can be done at the line level. To add a document, choose a record to view. Move the cursor over the arrow to the left of the
Line Num
column and click Attach a Document
.
Clicking
Attach a Document
will open the Add Document
pop-up. In the Doc Type
drop-down, select the type of document being attached to the line item. Click Choose File
to search for a file to upload from the local computer. Once a file is selected, click Add this Document
to attach the file to the line item.
The document will now be attached to the line item. Clicking the expansion arrow on the far left will display a line item’s associated sub-tabs. All attached documents will be visible in the “Documentation” tab.

To save the document to the local drive, click
Download
.To send the document electronically, click
Email
. This will open a pop-up where the user fills out the subject, body and recipient of the e-mail. To send the document, click Send Email
at the bottom of the pop-up.
To delete an attached document, click the
X
. A confirmation pop-up will appear. Click OK to confirm the deletion of the document.
Manage Licenses
If a line item was shipped to be declared against an import license and the license is stored in
License Management
, the user can identify which license to decrement by using the Manage Licenses
feature.To open this feature, choose a record to view and move the cursor to the corresponding downward arrow on the left. Once the option menu appears, click
Manage Licenses
.
This functionality can also be reached within the
Edit Detail
pop-up by clicking Manage Licenses
.
The
License Allocation
screen displays all possible licenses available for use. Enter the amount to be allocated, and then click Save and Close
. The Base Qty
and Base Value
fields can also be used to auto-populate amounts from an invoice.
Currency Conversion
While some licenses are issued in the currency that goods will ultimately be invoiced in, this is not always the case. When enabled, the Currency Conversion feature supports the ability to hold and view a Commercial Value that is different than the Customs (declarable) Value on an invoice or license.
Having both the Customs Value and Commercial Value fields on the invoice makes it easier for Customs analysts to manage situations when those values differ; and they may need to report a different value to Customs than they transacted with their supplier and still ensure they are meeting all regulatory compliance requirements.
If Currency Conversion is enabled, the following fields will appear:

If no exchange rate can be found for the currency code, the license cannot be allocated and an error message will appear on the screen:

Conversion Factor
If a license is tracked using a quantity or value different than the base quantities (e.g. TxnQty, TotalValue),
Conv Factor
can be used to calculate licensable amounts.To display the
Conv Factor
fields, click Show Conv Factor
.
After selecting the base quantity and value fields, a conversion factor can be entered to calculate the licensable quantity and value.

Missing License
To display the
Missing License
fields, click Missing License
. The system will compare any license with any invoice; which provides visibility into what required data is missing or inconsistent between the two records.
Clicking
Missing License
will open a Select License
pop-up. Select a license to proceed.
After selecting a license, a new pop-up window will display comparison information from the
Details, Header
, and Parties
tabs. From here, the user can update the header and parties records of the Invoice screen. If one or more details cannot be updated from this pop-up, the screen will display a validation message.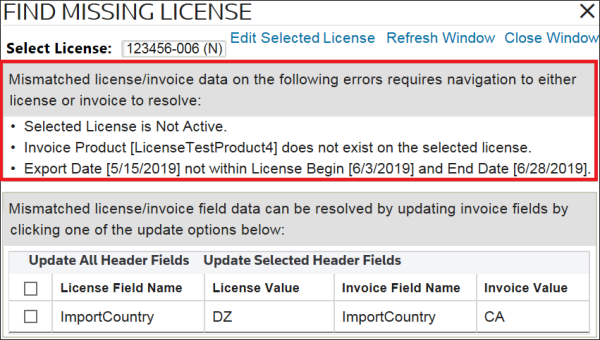
Click
Edit Selected License
and make any necessary changes to the invoice. Once these changes have been made and saved, click Refresh Window
.
If the update was successful, the following validation message will appear:

Once the user updates the invoice, the License will be allocated.

Invalid Allocations and Warning Messages
If an allocation is invalid, a warning icon will appear in the corner of the record’s
License Number
field. Moving the cursor over the icon will provide further details about the validation error.Validation messages indicate that the selected license does not match the specifics (parties, products, dates, etc.) on the shipment. Users can utilize the messages to troubleshoot if a shipment or license needs to be updated or if a different license should be used.

Valid Allocations (License Allocations)
If an allocation is valid, it will appear in the
License Allocations
sub-tab of the Details
tab, as shown below.If Currency Conversion is enabled, the following fields will appear:

Add Child Record
If the system was configured to utilize the creation of child records, the
Add Child Record
option will be visible.To add a child record, choose a line item to be the parent record for the new entry. Move the cursor over the downward pointing arrow on the left. Once the options appear, click
Add Child Record
.
Clicking “
Add Child Record
” will open a blank “Edit Detail
” pop-up.
In the
Select Product
field, enter a part number or part description. Select Product
has type-ahead capabilities and can be configured to pull information from ONESOURCE Global Classification.
Use the other fields within the pop-up to enter further information about the child record.
To store the child record and keep the pop-up open for further editing, click “
Save
”.To store the child record and close the pop-up, click “
Save and Close
”.To drop all changes and return to the
Details
tab, click X
.Once a child record exists, the parent detail can be expanded by clicking the expansion arrow on the far left.

Clicking > will display the
License Allocations, Child Details
and PGA
tabs beneath the detail. To see the Child Record
details, open the Child Details tab. To the left of the child record (within Child Details
tab) is a downward arrow.
Moving over this arrow yields the following set of selections:
Edit
and Delete
.
Edit Child Record
To edit an existing child record, choose a record to edit. For that record, move the cursor to the downward arrow to the left of the
Line Num
column and click Edit
.
Clicking
Edit
will open the Edit Detail
pop-up. Make all necessary changes.To save the child record and keep the pop-up open for further editing, click
Save
.To save the child record and close the pop-up, click
Save and Close
.To drop all changes without saving, click
X
.Delete Child Record
To delete a child record, move the cursor over the child record that needs to be deleted. Move the cursor to the downward arrow at the far left and click
Delete
.
To remove the record, click
OK
in the confirmation pop-up.To cancel the deletion and close the pop-up, click
X
or Cancel
.
Manage PGAs
If the system was configured to utilize Participating Government Agency (PGA) data tables, the
Manage PGAs
option will be visible. Each PGA has a separate tab. To manage PGA records, choose a detail line item. Move the cursor over the downward pointing arrow to the left of the Line Num
column. Click Manage PGAs
.
Click the needed PGA tab and enter information into the appropriate fields below. Click
Save
to save changes. The system can be configured to inform the user when PGA data is required. For additional details, please contact your system administrator. For further information on the PGA data tabs, fields, and functionalities, please refer to the PGA User Guide.
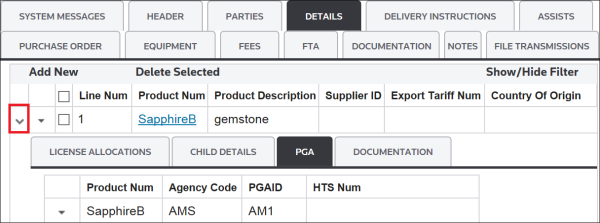
To review the map level PGA data for each agency associated to each line item, click the downward arrow to the left of the
Line Num
column. This will expand the record and open the “License Allocations” and PGA
tabs. Open the PGA
tab.important
Companies can choose to generate a report of the PGA data associated with each detail record on the shipment.
Copy Detail Record
To copy a detail record, choose a record to copy. For that record, move the cursor over the downward arrow to left of the
Line Num
column. When the options menu appears, click Copy
.
A confirmation pop-up opens, prompting for confirmation of the copy action.
To drop changes and return to the
Details
tab, click Cancel
or X
.To create a copy, click
OK
.
Editing a Copied Detail
This feature is useful for quickly creating detail line items for similar products where only a few fields have different information. Go to the copied record and hover the cursor over the corresponding down-arrow on the left. When the options menu appears, click
Edit
.
Make any necessary changes in the
Edit Detail
pop-up and save.important
If a detail record is copied, its PGA Data will also be copied.
Delete Detail Record
To delete a single detail record, choose a record to delete. For that record, move the cursor to the downward arrow to the left of the
Line Num
column. Once the options menu becomes visible, click Delete
.
To remove the detail record, click
OK
in the confirmation pop-up.To cancel the deletion and close the pop-up, click
X
or Cancel
.
To delete more than one detail record, choose which records in the grid to delete and check their corresponding boxes on the left. Next, click
Delete Selected
.
A message will show at the top of the screen, indicating the number of detail records that were deleted.

To remove all detail records, check the box at the top of the grid and click
Delete Selected
. This will permanently delete all detail records in the shipment.
Sorting Detail
To sort detail records, choose a column to sort and click the column header.
Click once to sort in ascending order.
Click twice to sort in descending order.
Click a third time to return the table to its original order.
Numerical values will precede alphabetical values.

Filter Details
To use the advanced filter options, click
Show/Hide Filter
.
A field will appear in the bar above each column header. Choose a column to filter by and enter a value into the field. Click the filter button to the right once a value is entered.

Choose a filter option. Filter options may vary depending on the column type (alphanumeric, numeric, etc.).

Multiple columns can be filtered at the same time to further refine a search.

Related Content
-
Import Management
Format: Article