
Business Partner/Supplier View
DASHBOARD
The following table describes the columns displayed on the first screen you see after logging into ONESOURCE Supply Chain compliance.
Columns | Description |
|---|---|
Name | The name of the questionnaire that was sent. |
Sender | The name of the Company who sent you the questionnaire. |
Questionnaire | Contains the Go to Questions link, which when clicked will take you to the the View Questionnaire screen, containing a list of the questions, the assigned to party and status of the question (e.g., answered). |
Sent Date | The day the questionnaire was sent to you in the format YYYY-MM-DD. |
Status |
|
Description | Complementary information about the status provided in greater detail (e.g., 5 of 50 questions have been answered). |
Due Date | The latest date by which the questionnaire must be completed. |
Corrective Action Sent | If Corrective Action appears you can click the link to redirect you to the corrective actions sent to you. |
CA Responses | The number of corrective actions in the status Not Started, In Progress and Completed for this Questionnaire. |
H | Clicking H will redirect you to the History screen of the corrective action. TheHistory screen shows:
View Status screen, clickBack . |
An alert message (a highlighted message box at the top of the screen) appears at the top of this screen for partner/suppliers with pending Corrective Actions. This message states,
You have pending Corrective Actions. Please click on the ‘Corrective Action’ link below to view and respond
.This message will continue to show on the screen until all Corrective Actions have been "approved" or "failed”.

Use the scroll bar on the bottom of the screen to see the remaining columns.

To only display Questionnaires meeting certain specified criteria; use the
Show/Hide Filter
button on the right side of the screen. Partner/suppliers can also sort Questionnaires by clicking column headers.The
Go to Questions
link redirects to the questions contained in the specified Questionnaire.MAINTENANCE
Adding New Users
To add a new user.
- Go to theUsersscreen under theMaintenancemenu.
 This screen lists users for the company. TheAdd Userlink in the upper left corner links to theUser Profilescreen.
- Enter the necessary information and clickSave. This adds the new user and displays a message under theBackandSavelinks saying the information was saved.

Updating User Profiles
To update the current user’s profile.
- ClickUser Profileunder theMaintenancemenu.
- Make any necessary changes, and then clickSavein the upper left corner.

To update information for other users.
- ClickUsersunder theMaintenancemenu.
- Choose a username to update. This will open theUser Profilescreen shown below.
- Make any necessary changes and then clickSavein the upper left corner.

RESETTING USER PASSWORDS
To reset a user’s password, navigate to the user’s profile. Users can reset their own Password by opening the
User Profile
screen under the Maintenance
menu.From their user profile, their password can be reset by completing the Current Password, New Password and Confirm Password fields. Users who entered an incorrect password/cannot remember their current password can reset their password from the
Login
screen.
To reset the password for another user.
- Go to the Maintenance menu and click onUsers.
- Click on the username link that needs to have the password reset.
- On the User Profile, click on theReset User Password (automatic reset)link. The user will then receive an automated email advising them their password has been reset, and providing a temporary password for login. Upon login, they will be required to change the password.

If an incorrect password is entered on the Login screen, the screen will provide a link/prompt for the user:
Need help logging in?
. Click this link to open a Reset my password
screen.Updating Company Profiles
- SelectCompany Profilefrom theAdministrationmenu.
- Make any necessary changes and clickSavein the upper left corner.
important
Importers/Exporters can make this screen “read only”. If this screen does not allow updates/edits, please contact the sender of the Questionnaire/survey to have updates made.

QUESTIONNAIRES
The
View Status
screen can be opened by clicking Questionnaires
in the main menu bar. This screen displays the Questionnaire name, sender, questionnaire link, sent date, status, description, due date, Corrective Actions sent, Corrective Action responses and history for all Questionnaires that have been sent to this partner/supplier.If partner/suppliers have multiple Questionnaires, the
Show/Hide Filter
option can be used to display only Questionnaires meeting certain criteria. The link labeled Go to Questions
will take the user to the specified Questionnaire.An alert message (a highlighted message box at the top of the screen) will show at the top of this screen for partner/suppliers with pending Corrective Actions. This message states,
You have pending Corrective Actions. Please click on the ‘Corrective Action’ link below to view and respond
.This message will continue to show on the screen until all Corrective Actions have been "approved" or "failed”.
Answering Questions
From the
Dashboard
or View Status
screen, click Go To Questions
beside the desired Questionnaire. This will bring up a screen listing all questions in the Questionnaire.To start answering the questions, click the name of the question to answer. Keep in mind that some Questionnaires are designed to force a partner to answer questions in an assigned order (e.g., question #1 must be complete before access is given to answer question #2). If Forced Answer Order is not in place, questions can be answered in any order.

If the question allows for notes and/or attachments, notes can be entered and/or files can be attached. Choose the appropriate answer, enter notes and/or attach files if necessary (click
Add
once notes/attachments are entered) and click Save
.Clicking
Next
(upper right) will save the response and then proceed to the next question. Repeat until all questions are answered.If only one question is being answered, enter the appropriate information, and click
Save
in the action bar. This saves the response and allows the user to logout or return to the Dashboard
.
When a supplier/business partner clicks
Finish
on a questionnaire, the following warning message is displayed.
Renewal Questionnaires
A Renewal Questionnaire is a previously sent/answered Questionnaire that has been re-sent to the supplier. The Renewal Questionnaire will include:
- Your company's original responses for each question
- Any notes and/or attachments associated with the original responses
- Any newly added questions.
If the Sender has included new questions, those will not show answers and will need to be fully completed.
When answering a Renewal Questionnaire, the following instructions will appear. A user can choose to either keep the original answer provided or update accordingly. With the exception of previous responses being available, the same process will be followed as the completion of a standard Questionnaire.

Assigning Questions to Other Users
If multiple users exist for a company, questions can be assigned to different users.
On the
View Questionnaire
screen, (reached by clicking Go To Questions
from the Dashboard
or the View Status
screen), there is a drop-down under the heading Assigned To
. All users appear in this drop-down.Click the arrow of the drop-down beside the appropriate question and choose the assigned user for the question.
An e-mail will be sent to that user with his/her login information. Below is an example of the notification email:
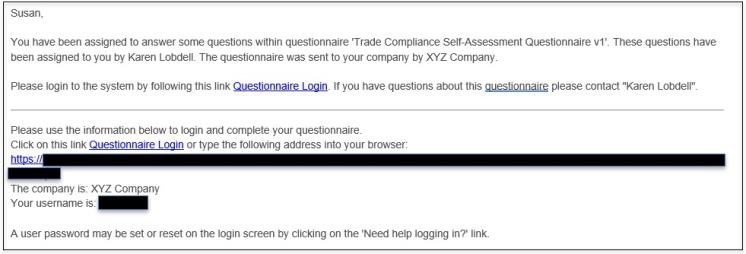
Email notifications to users will always include the system URL necessary to access the system, along with the required Company Name and username to use at Login. Individual user passwords will not be shown for security purposes. Should the user not remember their password, or need to set a password on initial use, they can click on the
Need help logging in
link on the Login screen to set/reset their password.The
Assigned To
field is an informational assignment; it does not stop other users from the company from answering these questions.
To add an individual who does not appear in the drop-down.
- Go toMaintenance Menu.
- SelectUsersand thenAdd User. Once the user is added and the screen is refreshed, the individual will appear in the drop-down. Questions can then be assigned to the individual.
Answering Corrective Actions
If a partner/supplier answers a Questionnaire question in a manner that triggers Corrective Action, the importer/exporter can send a Corrective Action to the partner/supplier to address the matter. Corrective Actions are displayed on the
View Status
screen under the Questionnaires menu or directly on the Dashboard
. The CA Responses
column (far right) indicates the number of Corrective ActionsNot Started, In Progress and Complete
for a Questionnaire.
To respond to a Corrective Action Questionnaire, click the
Corrective Action
link in the Corrective Action Sent column. All questions requiring Corrective Actions will be listed on the View Corrective Action
screen.The
Rating
column near the far right shows the customer-provided rating for the action taken in response to the Corrective Action. This could be Approved, Failed
, or Pending
. This column may or may not be visible, depending on how the system was configured.
Click the
Question Name
hyperlink for the question. This loads the Corrective Action Followup
screen for this Corrective Action.
The arrow to the left of each Corrective Action on the grid can be clicked on to expand the grid to show the most recent communication on that Corrective Action.

The
Corrective Action Followup
screen is displayed below. This screen is used to reply to each individual Corrective Action.
Corrective Action Follow-Up | Description |
|---|---|
Corrective Action Required | Indicates what the partner/supplier must do in order to become compliant or resolve the nonconformity. |
Action Taken | Must be completed by partner/supplier with actions taken to meet required Corrective Action. To do this, click Add Response , and provide the response in the pop-up. Click Save Response to ensure the answer is saved. The communication grid in Action Taken can be used to capture the history of ongoing dialogue during the Corrective Action process. The grid shows the response date/time, partner, user and message. Responses can be added to the grid, and will be ordered by date/time, most recent at the top. When adding a response, the last response displays at the top of the pop-up used to enter the response to show user the last update in communication. Save Response in the pop-up dialogue box saves the grid. The user is no longer required to clickSave again on theCorrective Action Followup screen. The grid can be adjusted for page size and to "view all" if needed. |
Due Date | The deadline for the Corrective Action to be completed. |
Responsible Party | Designate the name of partner/supplier employee responsible for ensuring the Corrective Action is completed. |
Status | The status of the Corrective Action (Not Started, In Progress, Completed). This will be automatically updated by the system as actions are taken. |
Attachments | Documents, photos, etc. attached by partner/supplier as supplementary information. |
Once information is entered for a Corrective Action, click the
Save Response
link at the bottom of the Corrective Action to ensure all entries are saved.Click
Back
at the top left of the screen to return to the View Corrective Action
screen. The Previous
and Next
links can be used to move through the Corrective Actions in the order they were asked in the Questionnaire. The Save
link is used to save all information, including uploaded attachments on the Corrective Action.Corrective Action Questionnaires can be resent multiple times until the desired response is achieved.