
Company (Partner) Profile
The
Company Profile
screen for a business partner has tabbed views for the purpose of grouping various data for ease of management and updating. These tabs are covered in more detail in the below sections.
Company Data
The
Company Data
tab provides general information along with configurable drop-downs to assist with categorizing partners for reporting purposes. Fields notated with an asterisk “*” are required fields.Fields | Description |
|---|---|
Threat | Assigns a threat level to the partner. This number is factored into the partner's overall risk score. |
Consequence/ Criticality | Assigns a consequence score to the partner if a supply chain incident occurs. This number is factored into the partner's overall risk score. |
Programs | Allows the assignment of one or more programs to a partner (CTPAT, AEO, PIP, etc.) as well as capturing respective account/membership numbers, assuming membership exists. This drop-down reflects the programs the user is presently subscribed to. Multiple choices can be selected. |
Partner Type | Assigns the partner’s role in a supply chain (factory, Customs broker, vessel carrier, etc.). This drop-down is configurable and multiple choices can be selected. |
Partner Process | Allows the assignment of whatever process the partner is involved in for the supply chain (e.g. Customs clearance, manufacturing, document preparation, etc.). This drop-down is configurable and multiple choices can be selected. |
Parent Company | Allows the business partner to affiliate with a specific brand, parent company, or division. If the business partner does business with multiple parents/brands/divisions, multiple choices can be selected. This drop-down is configurable. |
Other Fields | These additional fields capture relevant information such as the historical CTPAT SVI number/name for partner (if applicable). |

Additional Information
The
Additional Information
tab provides additional data fields to store relevant information regarding the partner/supplier, which can then be used in the creation of reports and queries when conducting analysis.These additional fields can be configured to be required or disabled based on client preference and can be requested during implementation or through Support.

User
The
User
tab provides a list of all the applicable users for the selected company partner. All company partners must have at least one Primary User
associated with their partner profile.Adding a New User
To add a new user.
- ClickAdd Newto open a pop-up version of theUser Profile.

- Enter the new user’s data.
- ClickSave.

note
New business partner / supplier users will not receive notification with their login credentials until the first communication to them is emailed from the system (e.g., when they are sent their first questionnaire).
At that point, the email notification will provide them the necessary secure credentials to login. They will be required to set their unique password at first login.
Modifying an Existing User
To modify an existing user.
- Hover the cursor over the arrow to the left of the user name.

- ClickEditto activate read-write capabilities for the fields for the selected user.

- Make any necessary changes.
- ClickSave.

Deleting an Existing User
To delete an existing user.
- Hover the cursor over the arrow to the left of the user name.

- ClickDelete.A confirmation pop-up will appear.

- ClickOKto confirm the deletion.

Auditor Results
The
Auditor Results
tab allows you to enter a third-party auditor’s name, assessment date, and final score (provided by the auditor) to track any assessments that may have been done outside the ONESOURCE Supply Chain Compliance system.Adding New Auditor Information
To add an auditor’s information.
- ClickAdd Newto open theAuditor Resultspop-up.

- Enter the auditor’s name, the date of the audit, and the provided score.
- Once the information has been entered, clickSave. If any supporting documentation exists for the audit, it can be uploaded under theAttachmentstab.

Modifying Existing Auditor Information
To modify an existing audit result.
- Move the cursor over a downward arrow on the far left of the grid.

- ClickEditto open theAuditor Resultspop-up.

- Make any necessary changes.
- ClickSave.

Removing Existing Auditor Information
To remove an existing audit result.
- Move the cursor over a downward arrow on the far left of the grid.

- ClickDelete.A confirmation pop-up will open.

- ClickOKto confirm the deletion of the record.

Resend Dates
The
Resend Dates
tab is used to assign specific dates to resend Program Questionnaires to partners/suppliers, as well as set alerts to advise designated user(s) of the pending resend.Creating a New Resend Date
To create a resend date.
- ClickAdd Newto open theResend Datespop-up.

- Complete the data entry fields, including the desired Resend Date, and Program (e.g., CTPAT, AEO, etc.). If an alert is desired, check theAlertbox and complete theAlert Datefield.
- Use theAlert Usersdrop-down to choose the specific user(s) to receive the alert.
- Once all information has been submitted, clickSave.

Deleting an Existing Resend Date
To delete an existing alert.
- Choose an alert to be removed and hover the cursor over the corresponding arrow on the far left.

- ClickDelete.A confirmation pop-up will open.

- ClickOKto confirm the deletion of the record.

Products
The
Products
tab is used to store product numbers and descriptions for a partner.Adding a New Product
To add a product.
- ClickAdd Newto open theProductspop-up.

- Enter all information for the new product.
- ClickSave.

Deleting an Existing Product
To delete a product.
- Choose a product from the grid to be removed and move the cursor over the corresponding down arrow.

- ClickDelete.A confirmation pop-up will appear.

- ClickOKto confirm the deletion.

Notes
The
Notes
tab allows you to store relevant internal notes regarding a partner.Adding a New Note
To add a note.
- ClickAdd Newto open theNotespop-up.

- Enter the note information.
- ClickSave.

Deleting an Existing Note
To delete a note.
- Choose a note from the grid to be removed and move the cursor over the corresponding down arrow.

- ClickDelete.A confirmation pop-up will open.
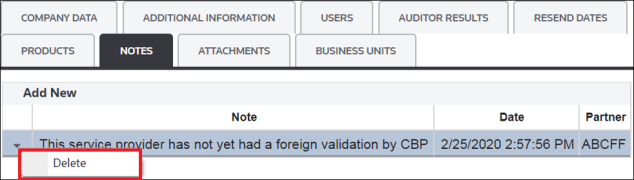
- ClickOKto confirm the deletion of the record.

Attachments
The
Attachments
tab centralizes attachments from the partner that are returned as part of the Questionnaire(s) and Corrective Actions, as well as any attachments that have been added by the user. Questionnaire Attachments
and Corrective Action Attachments
are automatically populated to this tab and are sorted by Questionnaire.To see the documents associated with a listed Questionnaire. click the arrow to the left of the Questionnaire name. The documents will segregate by the associated question/Corrective Action.
To open the attachment, click on the attachment. Questionnaire Attachments are also visible within the Questionnaire itself via the
View Status
screen.
Adding a New Attachment
To add a new attachment.
- ClickAdd Newto open theAttachmentspop-up.

- Add a description of the attachment and click Browse.
- Attach the desired external document.
- ClickSave.

Business Units
The
Business Units
tab allows you to select business units for the purpose of affiliating business partners/suppliers to specific business units of the company. All possible business units will be listed.To affiliate a partner to a business unit, check the box to the left.

To disassociate a partner from a business unit, un-check the box.

Related Content
-
Administration
Format: Article