
Reports and Analysis
Under the
Reports & Analysis
menu are five predefined reports. All these reports can be exported as an Adobe PDF or Microsoft Excel file by the links in the upper left corner: Generate PDF and Generate Excel
.Available Reports | Description |
|---|---|
Partner Report | Lists vulnerability score, best practices, Corrective Actions, and partner type by partners. |
Question Report | Shows vulnerability, best practices, Corrective Actions, and number of answers by question. Can be listed by vulnerability ascending, vulnerability descending, or by clicking on the column header. |
Questionnaire Report | Shows vulnerability, best practices, Corrective Actions, and number of answers by Questionnaire. |
Questionnaire Report by Sent (Questionnaire Risk by Company) | Shows vulnerability, best practices, Corrective Actions, number of answers, partner type, and status by partner name. |
Vulnerability by Question for Questionnaire | Shows answers, vulnerability, and best practices for each question on a specific Questionnaire for a specific partner. |
CORRECTIVE ACTION MANAGEMENT
The
Corrective Action Management
screen is designed to allow you to send Corrective Actions in a more customized manner. This functionality is an alternate option to the Auto Send Corrective Action functionality found in the Company Profile
screen.To view and send Corrective Action Reports for a partner, open the
Reports & Analysis
menu and click Corrective Action
. This redirects to a grid of all Questionnaire/partner responses answered in a manner triggering Corrective Action.The
Corrective Actions
column provides a quick snapshot of the total number of corrective actions triggered on that Questionnaire, as well as the number of corrective actions sent to the Business Partner to date.
Filtering the Corrective Action Grid
The
Show/Hide Filter
, as well as the ability to sort column headers, can be used to narrow the focus of the grid to only the corrective actions needing attention.To limit the view to only relevant corrective actions, click
Show/Hide Filter
.
A bar with filter fields will appear directly below the column headers. Choose a column to sort by and enter the value to be searched. Once a value has been entered, click the filter button to the right of the field.

A list of possible filters will appear to the right. Filters will vary depending on the field type (alphanumeric, date, numeric, time). Select a filter to be used.

Once a filter is selected, the grid will refresh to show only those corrective actions meeting the criteria listed in the filter. More than one filter can be applied at a time to further narrow down results. Corrective actions may also be sorted by clicking on the respective column headers.

Archiving a Corrective Action
To archive one or more Questionnaires containing Corrective Actions, choose the record(s) to be archived from the grid and dheck the corresponding box(es) on the far left.

Clicking
Archive
will change the status of all selected Corrective Actions to Archived
.To view the Questionnaires containing corrective actions that are no longer
Active
, select Archived
from the Status
drop-down. The grid below will display all Questionnaires with Corrective Actions with that status.To reactivate an archived Questionnaire with Corrective Actions, choose the record(s) to be reactivated from the grid and check the corresponding box(es) on the far left.
Clicking
Activate
will return the Questionnaire with Corrective Action’s status back to Active
.
To view the Questionnaires with Corrective Actions that are
Active
again, select Active
from the status drop-down. The grid will display all corrective actions that are still active.
Selecting a Corrective Action
To view a specific partner’s Corrective Actions.
- Choose a record in the grid.
- ClickViewon the far left to open theActive Corrective Actionsscreen for further actions.

The
Active Corrective Actions
screen displays the individual question (number, name, and the question itself), the answer provided, any notes, the status of the Corrective Action (Sent, Not Sent), and the Corrective Action required for a partner based on how the question was answered.If the Renewal Questionnaire functionality is enabled, an additional status (Previously Overridden) will appear if a corrective action that was overridden in the previous version of the Questionnaire. All answers, attachments, notes, and Corrective Actions will be carried over to the Renewal Questionnaire.

To generate a Corrective Action for partner follow-up.
- Review the original Corrective Action required along with any notes the partner may have made that could impact the decision to send a Corrective Action.
- If the specific Correction Action needs to be edited prior to sending, clickEditto the left of the Question to open theEdit Corrective Actionpop-up.

- Make any necessary changes to the Corrective Action text.
- ClickSave.

- Select the question(s) to include in the Corrective Action request.
- Assign aDue DateandReminder Datefor each Corrective Action as applicable. Dates can vary by Corrective Action. Entering dates in the Due Date and/or Reminder Date fields in the grid header bar will apply the date to all Corrective Actions for that Questionnaire.
- If an e-mail alert is needed when the partner takes action, click the Alert box.Alertscan be applied to select Corrective Actions, or by checking the Alert box in the grid header bar. An alert will be applied to all Corrective Actions for the selected Questionnaire.
- ClickSend to Partnerto open theSend Corrective Actionspop-up.

- Choose an e-mail template, enter theSend ToandCCaddresses, and make any necessary changes.
- ClickSendto send the e-mail.

The
Status
column will show Sent
once the e-mail is sent to the partner.
Overriding a Corrective Action
Sometimes a partner responds to a question in such a way that the user may determine that no Corrective Action is required. Perhaps additional comments/notes from the partner provide additional clarification. In these cases, a Corrective Action can be overridden.
To override a Corrective Action.
- Review the Corrective Action triggered by the supplier’s response to the question as well as any explanatory notes that may have been provided.
- If it is determined that no follow-up action is necessary, check the box next to the corrective action and clickOverride.

The Corrective Action’s status will change to
Overridden
and a status message will appear on the screen. This action will automatically take you to the Overridden Corrective Actions
screen. This screen provides the option for you to include additional updates to the overridden Corrective Actions, including adjustments to the vulnerability level and notes explaining the reason for the override.
Additionally, you can access overridden Corrective Actions from the Active Corrective Actions screen by changing the selection in the Status dropdown to
Overridden
.
The screen will refresh to show a grid containing all overridden Corrective Actions for the selected Questionnaire.

Once on the
Overridden Corrective Actions
screen, choose a Corrective Action to view and click Edit
.
Clicking
Edit
will open a pop-up where notes can be added to explain the cause for the override. Additionally, the vulnerability level can be adjusted if needed to ensure an accurate score. Upon adjusting the vulnerability, the system will recalculate the partner’s overall score to take this action into account. Only Corrective Actions that are in the Active
status can be sent to a business partner.
Reactivating an Overridden Corrective Action
To reactivate an overridden Corrective Action, check the box on the far left of a Corrective Action and click “Reactivate CA”.
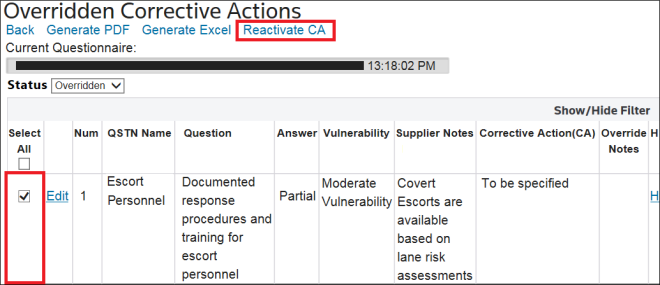
The Corrective Action’s status will change to “Active” and the following status message will appear on the screen:

Reactivating an overridden Corrective Action will transfer it back to the Active Corrective Actions screen and reset the vulnerability level to its original state. A reactivated Corrective Action can be sent to a business partner.
To view active Corrective Actions from the currently selected Questionnaire results, click on the “Status” drop-down and select “Active”.

Corrective Action History
To view the status history of a Corrective Action, click the
H
in the far-right column to open the History
screen. 
The grid will display a log of each change from Overridden to Active and from Active to Overridden, along with any changes to notes and vulnerability levels.

Reviewing Responses to Corrective Action
To review a partner’s response to any sent
Corrective Actions
from the Corrective Action Report screen, click on the link in the Corrective Actions
column for the corresponding Questionnaire (e.g., 6 total, 6 sent). This will redirect you to the View Corrective Actions
screen for that specific Questionnaire.
Alternatively, open the
Questionnaire
menu and click View Status
.
In the
Corrective Action Sent
column, click Yes
for the corresponding partner/Questionnaire.
This will redirect to the
View Corrective Actions
screen. See Corrective Action Management
section for further details.
When the Corrective Action is first sent out, the status will be automatically defaulted as
Not Started
.Once the Business Partner takes any action on the
Corrective Action Followup
screen (e.g., types in a response) and clicks Save, the status will automatically update to In Progress
.The status can only be updated to
Completed
when you set the Approval rating on the Corrective Action to be either Approved
or Failed
. Business Partners cannot change the status manually. When Approved/Failed is selected by you and you click Save
, the status will then show as Completed
.Changing the Approval from Approved/Failed to Pending will reopen the CA and enable the Status drop-down.
Corrective Action Follow-Up | Description |
|---|---|
Vulnerability | Determined by you as severe, high, moderate, low or no vulnerability. This allows you to adjust vulnerability based on the corrective action taken. Select a vulnerability level from the drop-down. |
Action Taken | The partner’s response to the Corrective Action Required for each specific question. |
Responsible Party | The partner-assigned party responsible for completing the specified Corrective Action. |
Status | The current status in completing required Corrective Action. Assigned by system and/or you. |
Approval | This drop-down menu is located at the top of each question and allows you to “approve” or “fail” a response. This locks the question from further partner edits.
If pending is selected, you can resend the question to a partner for further feedback. Pending status also allow edits to Corrective Action Required for resending purposes. |

