
Updating Company Profiles
The
Company Profile
screen is located within the Administration
menu and contains four tabs:- Company Data
- Settings
- Organizational Structure
- Business Units
Values for custom vulnerability scores and pass/fail thresholds and question weights are stored in
Settings
. Make any necessary changes and click Save
in the upper left corner.
Company Data Tab
Company data | Description |
|---|---|
Default Email | The email address displayed in the From line on any outgoing emails is set by default toSCC@thomsonreuters.com. This default sender address will appear grayed out, indicating that you can’t change it directly. This ensures that the domain sending the email matches the domain shown on the email subject line, reducing the risk of emails being blocked or marked as spam, and provides a heightened level of security. |
Display Name | The display name is the name that appears in the From line of outgoing emails, alongside the default email address (SCC@thomsonreuters.com). Configuring a display name allows you to customize the sender’s name that recipients see, making the email appear more recognizable and trustworthy. If you are using the ReplyTo Email field, you may choose to have that email address also as theDisplay Name for consistency – however this is optional. To enter or change aDisplay Name , select the drop-down menu underDefault Email and selectEnter Different Address . A field will open next toDisplay Name . Enter the desired email address in theDisplay Name field and selectSave . A confirmation message will appear on the screen. |
Reply to Email | You can configure a ReplyTo email address to show in addition to theDefault Email that is shown on theFrom line when the recipient selectsReply All to an email they have received. This allows the email to display a recognizable company name in addition to the Thomson Reuters email address, enhancing both security and recognition. It also provides an email address that the recipient can reply to, if needed, that will go directly to the appropriate company point of contact. SelectingReply All will show theReply To email address along with theDefault Email .ReplyTo Email must be configured by Thomson Reuters. This can be done during implementation, or if after go-live, by Professional Services or Support. |
Auto Send Corrective Action | If enabled, Corrective Actions will be sent automatically from the system when a partner fully completes a Questionnaire and one or more answered questions trigger Corrective Action.
important
Corrective Actions sent in this manner will not allow for edits to the sent Corrective Action, or the ability to review partner answers prior to Corrective Action being sent out. Additional options can be found under Corrective Action Report . |
Show Corrective Action Rating to Supplier | If enabled, business partners/suppliers will be able to view the rating they received from their response to their Corrective Action on the View Corrective Actions screen. The rating is eitherApproved, Pending, or Failed .
important
If this is enabled, the Corrective Action Approval Rating will be visible for all business partners. |
Corrective Action Due Date | All Corrective Actions (CAs) sent using the Auto Send feature will be automatically sent 48 hours after the Questionnaire is fully complete. The number entered in this field will determine theDue Date for all Corrective Actions.
Example: If 30 is entered, the Due Date is 30 days after the Corrective Action is sent. |
Corrective Action Reminder Date | The number entered in this field will determine the one-time Reminder Date for all Corrective Actions sent via the Auto Send feature.
Example: If 10 is entered, the Reminder Date is 10 days after the Corrective Action is sent. Reminder Dates should be scheduled prior to the Due Date. |
Enable Periodic Reminders | If enabled, allows user to set periodic reminders in intervals (e.g. every 10 days) until the supplier completes a Questionnaire. Specific interval periods are set on the Send Questionnaire screen and can be further managed/edited from the QuestionnaireView Status screen. |

Settings Tab
The
Settings
tab gives the user the ability to customize Answer Vulnerability and/or Pass/Fail thresholds per program, as well as setup custom Question Weighting values. When customizing the Answer Vulnerability, a separate tab exists for each risk program the user subscribes to (e.g. CTPAT, AEO, PIP, etc.).The
Importer
tab provides a default scoring if a Questionnaire is sent out without being affiliated to a specific program. A Questionnaire affiliated with a specific program uses the saved values for that program when being scored.Sections | Description |
|---|---|
Custom Vulnerability Settings | This configurable vulnerability scale determines the values to be assigned to individual answers that have corresponding vulnerability selections. The scale can be set to a numerical value of the user’s choice (e.g. 1-5, 0-100, 0-10, etc.) |
Custom Pass/Fail Settings | Sets mark for Pass/Marginal/Fail threshold values for an overall Questionnaire score. Results will appear on the Dashboard . |

Tab | Description |
|---|---|
Question Weight Settings | This tab provides five (5) weight levels, from Low to High, where the user can assign a numerical value for scoring purposes. By default, all question weights are set to “1”, so each question is equally weighted. The user can modify these settings.
The Weight drop-down on the Create/Edit Question screen is used for attributing a weight to each specific question on a Questionnaire. The value/score assigned to a specific question will use an algorithm that takes into consideration the vulnerability score as well as the weight value assigned to that same question. |

Business Units Tab
The
Business Units
tab allows the user to store business units for the purpose of affiliating business partners/suppliers to specific business units of the company.To add a new business unit.
- ClickAdd Newto open theBusiness Unitspop-up.

- Enter all information for the new business unit.
- ClickSave.

To edit an existing business unit.
- Hover the cursor over the arrow to the left of a business unit name.

- ClickEditto open theBusiness Unitspop-up with all existing information on the business unit prepopulated.
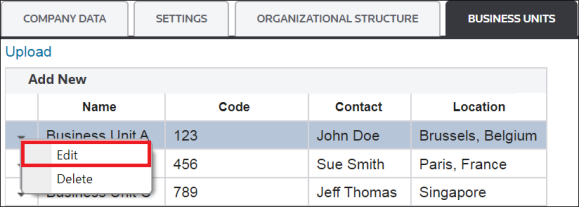
- Make any necessary changes, and then clickUpdate.

To delete an existing business unit.
- Click the arrow to the left of a business unit name.

- ClickDeleteto open a confirmation pop-up.

- ClickOKto delete the business unit. OnceOKis clicked, the business unit will be removed from the grid and no longer appear.

Mass upload of business units and partner/supplier affiliation can be accomplished via spreadsheet upload during implementation. Once in production, assistance with this process can be obtained by contacting Support.

For instructions on how to affiliate a business partner with one or more business units, please see the Managing Company Partners section of this User Guide.
Related Content
-
Administration
Format: Article