
Filter data and filter documents
Filter data
On many Onvio screens that present lists or grids of data, you can create filters to control the information that is displayed on the screen and in various firm management reports.
You can access filters through a
Show Filter
button, a Filters
panel on the left side of the screen, and in some cases, a quick filter button.- If the filter area is hidden, selectShow Filter, and then selectEdit Filter.
- SelectAdd Ruleand create 1 or more filter rules by selecting an option and building a statement to include or exclude information. UseAND/ORstatements to make the rule more specific.
- If you're mixingANDandORstatements, add a group to combine the rules so that they’ll operate together. You can use multiple groups to create complex rules. The primaryANDorORstatement is at the top of the panel. TheANDorORstatements for groups are indented below it.
Example
The following filter shows all clients who have the status of active, OR clients who are inactive AND have left the firm since 1/1/2017. (For dates, "less than" means "before," and "greater than" means "after.")
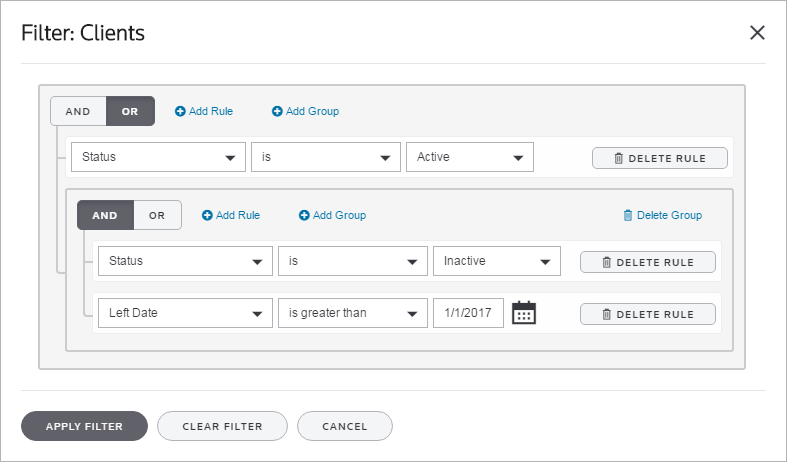
(Rule 1)
Status is Active
OR
(Group 1 Rule 1)
Status is Inactive
AND
(Group 1 Rule 2)
Left Date is greater than 1/1/2017
Once you create and apply a filter, it will stay active for future Onvio sessions until you change or remove the filter. You can remove filters, or rules and groups from a filter, one of two ways.
- Select anXin theFilterpanel to delete a specific rule or group.
- SelectEdit Filterto open a panel with all of the filter's details, where you can delete specific rules or clear the entire filter.
Filters panel
Use the Filters panel to organize projects and tasks.
- If necessary, select theShow Panel
 button to expand the Filterspanel.
 - Make selections in one or more of the expandable sections.
- To filter by criteria not represented by the available sections, use theAdvanced Filterssection at the bottom of the panel, where you can build a custom filter.All the filtering criteria you select in the panel combine to narrow the data displayed on the screen. Onvio will retain the filter until you change it or clear it.
- When building a custom filter in theAdvanced Filterssection, mark theCustom Filtercheckbox and selectEdit.
- SelectAdd Ruleand create 1 or more filter rules by selecting an option and building a statement to include or exclude information. UseAND/ORstatements to make the rule more specific.
- If you are mixingANDandORstatements, add a group to combine the rules so that they’ll operate together. You can use multiple groups to create complex rules. The primaryANDorORstatement is at the top of the panel. TheANDorORstatements for groups are indented below it.
Example
The following filter shows all clients who have the status of active, OR clients who are inactive AND have left the firm since 1/1/2017. (For dates, "less than" means "before," and "greater than" means "after.")
(Rule 1)
Status is Active
OR
(Group 1 Rule 1)
Status is Inactive
AND
(Group 1 Rule 2)
Left Date is greater than 1/1/2017
Once you create and apply a filter, it will stay active for future Onvio sessions until you change or remove the filter.
The heading on this screen is followed by
(Filtered)
when a filter has been applied.You can remove filters, or rules and groups from a filter, one of two ways.
- Remove anXin an expandable section of theFilterspanel to delete a specific rule or group.
- SelectEditin theAdvanced Filterssection to open a panel with all of the custom filter's details, where you can delete specific rules or clear the entire custom filter.
Quick Filter button
On some screens, other filtering capabilities may be supplemented by a quick filter button, which enables you to quickly filter by a common criterion. One example is on the  button. Select the button to turn this quick filter on or off. When the button is orange, the filter is applied (in this case, items with zero balances are hidden).
Billing Selection
screen ( tab), where you can hide entries with zero balances using the Zero Balance WIP
button. Select the button to turn this quick filter on or off. When the button is orange, the filter is applied (in this case, items with zero balances are hidden).When you remove a filter, Onvio applies the changes immediately.
Filter documents
In the
Client
, Firm
, and My Documents
tabs of the Documents
area, you can select Show Filter
to turn on filtering at the storage level to create filters, and/or clear all existing filters.- To display filter buttons in the storage area of theClient,Firm, orMy Documentstab, select theShow Filterbutton.noteTheShow filterbutton appears white when the column filter buttons are hidden, and orange when the column filter buttons are displayed in the header row for each column in the grid.
- Select a filter button in a column to sort the column by ascending or descending order, and/or create a filter to include or exclude information by condition or value.
- If you choose to filter by value, you can enter a search term in theSearchfield, and/or mark the checkboxes next to the items that you want to display in the grid.
- If you choose to filter by condition, you can apply a filter for items where the value Contains, Equals, Begins with, and so forth. Use AND or OR statements to make the rule more specific.

