Solutions
Law firms
Tax, audit & accounting firms
Success stories
-
A true competitive advantage
Law firm Zarwin Baum’s embrace of generative AI as the natural next step in the evolution of legal work and their adoption of CoCounsel Legal has helped them achieve remarkable efficiency gains and improved client relationships.
-
Workflow transformation drives impact
Brinks, a global leader in secure logistics and security solutions, used CoCounsel to reimagine what was possible with AI tools, turning legal challenges into a competitive advantage.
-
The forefront of audit tech
A better auditing workflow solution was the answer to multiple challenges faced by The Mercadien Group. Find out how they achieved greater efficiency by embracing Cloud Audit Suite.
Products
Legal
Trade & supply
Tax, audit & accounting
- 1040SCAN
- Audit Intelligence Analyze
- CoCounsel Audit
- CoCounsel Tax
- Ready to Advise
- Ready to Review
- View all
Corporate tax
Recommended products
-
CoCounsel Legal
Transform your work with the only AI legal solution uniting research, drafting, and document analysis in a single experience. Designed by legal experts and built on trusted content and advanced AI, CoCounsel Legal accelerates multistep work so you can better serve your clients and grow your business.
-
CoCounsel Tax
Transform your tax practice with CoCounsel Tax, an AI-powered assistant that combines trustworthy answers, automation, and firm knowledge into one seamless platform. Enhance efficiency, reduce risk, and improve client confidence with CoCounsel Tax.
-
CLEAR Investigate
Intelligently surface critical connections and insights in actionable format through AI-driven research workflows seamlessly integrated with the trusted and transparent CLEAR platform. Accelerate investigations and empower your team to make strategic decisions with confidence.
Purchase
Buy solutions
Resources
Insights
Events
Product training
Product communities
Developers
Highlights
-
2026 SKILLS showcase
Join weekly sessions to experience in-depth demonstrations of the leading legal AI products while connecting with strategic law firm leaders in knowledge management, innovation, and AI.
-
Ghosts on the ledger
Payroll fraud is a major compliance risk. Learn how payroll analytics and AI-powered tools can help exorcise phantom employees and employers.
-
Future of professionals report 2025
The Thomson Reuters Future of Professionals Report 2025 reveals how AI continues to shape professional work — and what it takes to get ahead. This year’s report shows that increased efficiency, productivity, and cost savings top the list of benefits professionals attribute to AI, making it indispensable for organizations facing rapid change.

Insert variables in Excel from the Onvio Office add-in
Amount variables
- Select theAmount Variablestab in theInsert Variablespanel.
- Select one of the followingAmount Typesto insert into the worksheet.noteSelections vary in theAmount Variablestab based on the selectedAmount Type.
- GL Account data
- Account Number
- Account Description
- Amounts (Balance, Debit amount, Credit amount)
- Grouping Schedule data (for example, Account Classification)
- Code/Subcode
- Code/Subcode Description
- Total Amounts (Balance, Debit, and Credit, based on account grouping)
- Tax Grouping Schedule data
- Tax Code/Subcode
- Tax Code/Subcode Descriptions
- Total Amounts (Balance, Debit, Credit, based on account grouping)
- Net Income amounts
- Select the Insert button to insert the variable into the selected cells of the worksheet.
Text variables
- Select one of the followingSourcesto insert into the worksheet.noteDetail selections will vary in theText Variablestab based on the selectedSource.
- Workpaper Properties (for the Excel file that is currently open)
- Reference
- Name
- Staff Assignment
- Signoffs (Preparer and Reviewer)
- Contact name (the contact for which the Excel file is currently open)
- Binder Properties
- Binder Name
- Binder Type
- Binder Period Ending date
- Select the Insert button to insert the variable into the selected cells of the worksheet.
Formulas
- Select theFormulastab in theInsert Variablespanel.
- SelectAdd Rowto insert a row in theFormulasgrid.
- In the 1st row of the grid, select an amount type, amount detail (that is, account or code, if necessary), and balance type.noteThese parameters are specific to each row.
- Select an operator to apply to the next row.
- Repeat step 2-4 for the next row and for subsequent rows, if necessary.
- In the fields following the Formulas grid, select the period and fiscal year for the current contact.
- Select theInsertbutton to add the result of the calculation into the selected cell.
- The application prompts you to specify a value forAmount Detailif it is not included when you attempt to insert a row—unlessNet Incomeis selected as theAmount Typevalue.
- The application inserts an add (+) operator by default if it is not selected when anAmount Typevalue is selected.
- You don't need to include an operator after the last row that has anAmount Typeselected.
- Amount formulas can be easily copied from a range of cells into another range of cells.
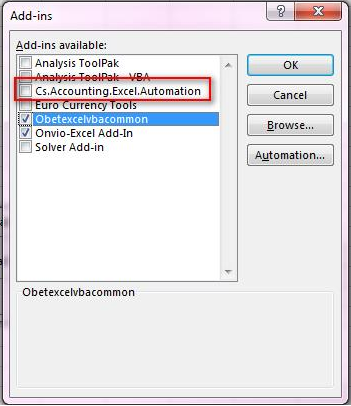
- If the add-in doesn't appear in Excel after installing, turn off the Onvio Office Excel add-in. In Excel, select. In theFileOptionsAdd-insManagefield, make sureExcel Add-insis selected, and selectGo. Clear the checkbox forCS.Accounting.Excel.Automation.
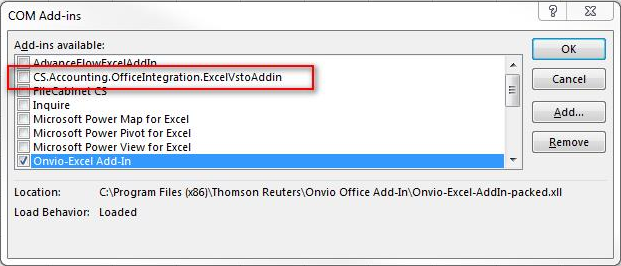
- Go to. In theFileOptionsAdd-insManagefield, selectCOM Add-ins, thenGo. Clear the checkbox forCS.Accounting.OfficeIntegration.ExcelVstoAddin.
- Close any open Excel spreadsheets.
- Sync and close all open items in Onvio Link.
- Open an Excel spreadsheet from within theBindertab, and verify that the Onvio Office Add-in ribbon is present in Excel. (If the ribbon is present, you should be able to re-enable the CS.Accounting add-in without causing an issue.)
- The user may have to repeat these steps again after updating or reinstalling the add-in.
- CopyandPastein Excel stops working after inserting a variable until you double-click a blank cell—which makes the cursor visible in the cell. Development is currently looking into this issue.
This article applies to:
- Product: Onvio
- Subject: Trial balance
- Audiences: Staff