
Add and move portlets on a dashboard
Dashboards display information about virtually all areas of the data in Practice CS in a single, convenient location that each staff member can customize to their specific needs and preferences. There are 4 dashboards.
- Staff Dashboard: Information about the activity and assignments for the staff member signed in.
- Client Dashboard: Information about the activity and status of a selected client.
- Firm Dashboard: Information about the activity and status of the firm as a whole or a subset of the firm such as the clients related with an office or partner.
- Home Dashboard: Access to resources outside of Practice CS that can improve the use of the application such as the Practice CS Library, Practice CS and Thomson Reuters newsfeeds, and Help and Support.
Dashboards are made up of 3 hierarchical components.
- Portlet: A window that includes information.
- View: A collection of portlets on a single screen, each View displays as a tab on theDashboardscreen.
- Layout: The collection of Views that make up the dashboard.
Most dashboard layouts consist of many portlets that are organized on several views. The views usually contain portlets that are related to each other such as:
- Projects and tasks assigned to a staff member,Staff Dashboard.
- A client's WIP and A/R balances, and billing and activity totals,Client Dashboard.
- Schedules, targets, and activity for all staff,Firm Dashboard.
The following information gives instructions for building and changing your dashboards.
Add a layout
You don't have to begin with an empty dashboard and build it from scratch. Your Practice CS database comes preloaded with default layouts for each dashboard. Also, other members of your firm may have created a dashboard layout and saved it. You can begin with any layout that is in your Practice CS database.
To select a layout, select
Select Layout
on the Dashboard
screen.When you select a layout, the application will ask if you want to save the layout you currently have. If you answer
Yes
, you'll need to give it a name. After doing this, the layout you saved will be available to you and all other users of Practice CS.Add a view (tabbed page)
Views let you create a “page” in your dashboard layout in which you can place one or more portlets. Usually, a view will contain portlets related to a specific function or type of information. Each view will be designated as a separate tab at the top of your
Dashboard
screen.To add a View, select
Add View
on the Dashboard
screen. You'll be asked to give the view a name.A new view will be added to the layout that will appear as a blank screen with a tab at the top containing the name you gave the view.
You can now add one or more portlets to the new view.
note
- To delete a view from the layout, select
 in the tab of the view.
 - To move theViewtab to a different location, select and hold the left mouse button on theViewtab and drag it to a different location at the top of the dashboard.
Add a portlet to a new view
You can add as many portlets as can practically fit on a view. The 1st portlet added will fill the entire view.
To add the 1st portlet to a view, select
Select Portlets
, or right-click anywhere on the blank screen and select Select Portlets
. The Select Portlets
window opens. You can select one or more portlets to add to the view by marking the boxes for each portlet you want and then select OK
.Add a portlet to an existing view
Once the 1st portlet has been added, you can add more portlets by selecting
Select Portlets
and selecting one or more portlets on the Select Portlets
window. These portlets will appear on the left side of the view.Move a portlet on an existing view
After adding one or more portlets, you can move it to a different location on the view. To move the portlet, position your cursor in the header of the portlet. Select and hold the left mouse button. Then, drag the pointer to the inside edge of an existing portlet. As you approach one of the inside edges, a shaded area will appear. When the shaded area is approximately where you want to locate the portlet, release the left mouse button and the portlet will move to the shaded location. You can then resize the portlet, if needed, by positioning the cursor over a divider line until it changes to a double facing arrow. Select and hold the left mouse button and move the divider until the portlet is the correct size. Release the mouse button to save the new position of the divider.
In the following image, the
A/R Detail
portlet was moved to the Prior Invoices
portlet by moving the mouse to the bottom edge of the Prior Invoices
portlet. The A/R Open Items
portlet was moved to the right of the Prior Invoices
portlet by moving the mouse to the right edge of the Prior Invoices
portlet. Finally, the A/R Open Items
portlet was made wider by moving the divider line between the Prior Invoices
portlet and the A/R Open Items
portlet.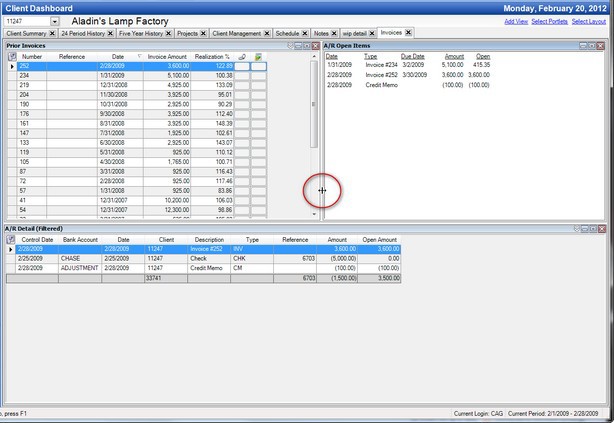
Related Content
-
Add dashboard views
Format: Article,
1 min read
Article,
1 min read