
Signature settings
Administrators can manage global signature settings like reminders, document types, delegation, client instructions, security options, and saved messages.
The Settings menu lets firm administrators update and save global default settings for Signatures.
note
Only System Administrators have access to the
Settings
section.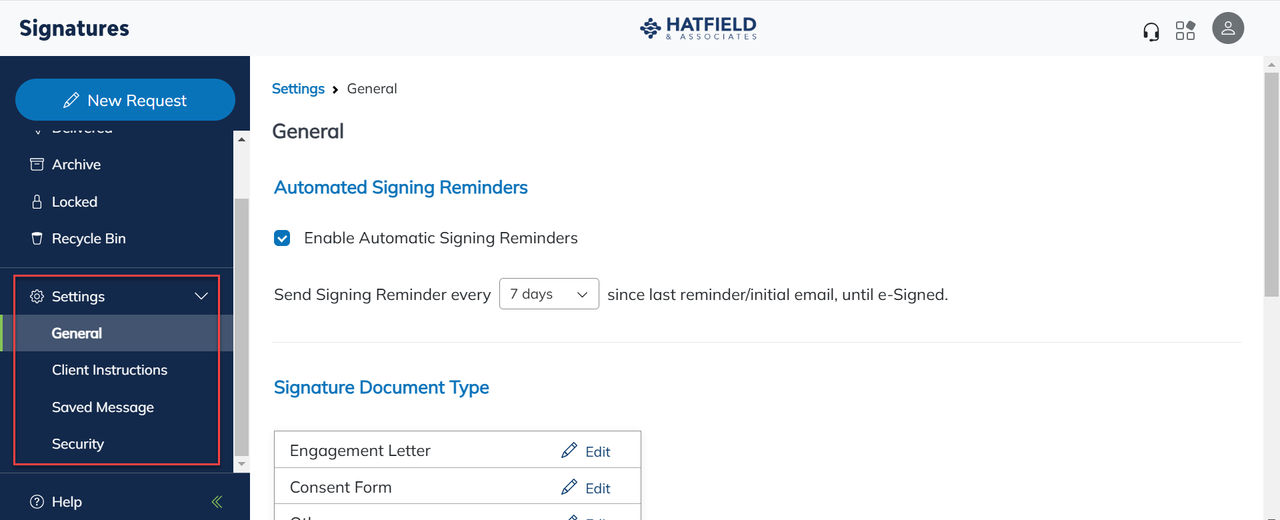
General
Automated Reminders
A firm-wide default for automated signing reminders can be selected here. The signer will receive a reminder based on the selected time frame until the signing is completed, the document has expired, or the item is deleted.
- Open theGeneralscreen from theSettingsmenu.
- Select theEnable Automatic Signing Remindersto turn on this feature.
- SelectSend Signing Reminder every. . .to select a reminder timeframe.
Signature Document Type
A document type needs to be selected to process a Signature item. Default document types can be added.
- Open theGeneralscreen from theSettingsmenu.
- SelectAddtoAdd Document Typeor selectEditto update an existing one.
- Enter aValueinto the document type field. This will be the value the processor uses when uploading, and the value the signer gets.
- SelectFile Expirationto select a default expiration date for the document type.
- SelectActivateto let users begin using the document type.
- SelectAddorSave.
Delegation
You can turn on Sender Delegation for users to send documents for signature on your behalf. This setting lets senders send documents but displays the sender's name as another user.
Setting | Description |
|---|---|
Sender Delegation | Let users decide who can and can't select them as a sender |
Automatically Delegate to Everyone | Let users select any other user as a sender |
Mandate Client ID
In the
General
screen of the Settings
menu, switch this option to On
to enforce all new requests to include a Client ID. This will apply to batches sent through Mail Merge as well. Client instructions
This section will let you add/customize the verbiage in the notifications sent to the recipient.
- Open theClient Instructionsscreen from theSettingsmenu.
- SelectAddto add a new template or useEditto update an existing one.noteThe message needs to be selected in the left panel first.
- Enter theNameof the template if you create a new one.
- Enter the verbiage for the body of the template.
- Expand theShow Variables Listto include fields in the message that will automatically fill with relevant taxpayer data.
- SelectSet as Defaultto make this the default template for all documents.
- SelectAddorSave.
Message | Description |
|---|---|
Review and Sign Reminder | This is the reminder email sent per the settings for Automated Reminders in the General settings. |
Download E-Sign Forms | This email is delivered once all parties have signed the document. |
Saved Message
This section will let you add/customize the verbiage that appears in the Initial Email that is sent for a new document.
note
Only 1 message can be used as the default. This can't be changed per document.
- Open theSaved Messagescreen from theSettingsmenu.
- SelectAddto add a new template orEditto update an existing one.noteThe message needs to be selected in the left panel first.
- EnterSaved Messagedetails.
- SelectAllow users to edit before sendingto let users edit the saved message before delivering the document.
- SelectSet as Defaultto make this message the default for all documents during processing.
- SelectSave.
Security
Default Access Options
- Open theSecurityscreen from theSettingsmenu.
- Set Access settings determine the default for those who is and is not able to view documents after delivery. Administrators will be able to view all documents, regardless of settings.
Setting | Description |
|---|---|
Everyone | Select this to let all users find documents on the Delivered report. |
Individual User | Select this to let only the user who uploaded the return view it on the Delivered report. |
Let user set additional access to other users before delivery | Select the checkbox to let the uploader change the access settings before/after delivery. |
Authentication Options
Turn on or off authentication, create authentication questions, and determine if users can add questions during processing.
- Open theSecurityscreen from theSettingsmenu.
- Switch theSigner Authenticationoption to turn on authentication for document recipients.
- SelectAddto add new authentication question users can select during processing orEditto update an existing one.noteThe question needs to be selected in the left panel first.
- EnterSecurity QuestionDetails.
- SelectSet as Defaultto make this the default security question.
- SelectSave.
- SelectAllow users to add new questions while processingto let users add unique authentication questions.
Signer Delegation
- Open theSecurityscreen from theSettingsmenu.
- SwitchSigner DelegationtoOnto let signers delegate someone else to sign on their behalf.