
Client management: Bulk import or edit clients
Import or update multiple client records at once using the Client Management CSV template.
Show all hidden content.
Client Management can be used to manage and view client information across the Returns and Organizers modules. This article outlines the Import Users function, which lets you add data for multiple clients at the same time.
note
Access to Account Management is only available to System Admins or users with predefined permissions enabled in User Management.
- Select theNavigation Widget.
- SelectAccount Management.noteA new tab opens.
- SelectClient Management.
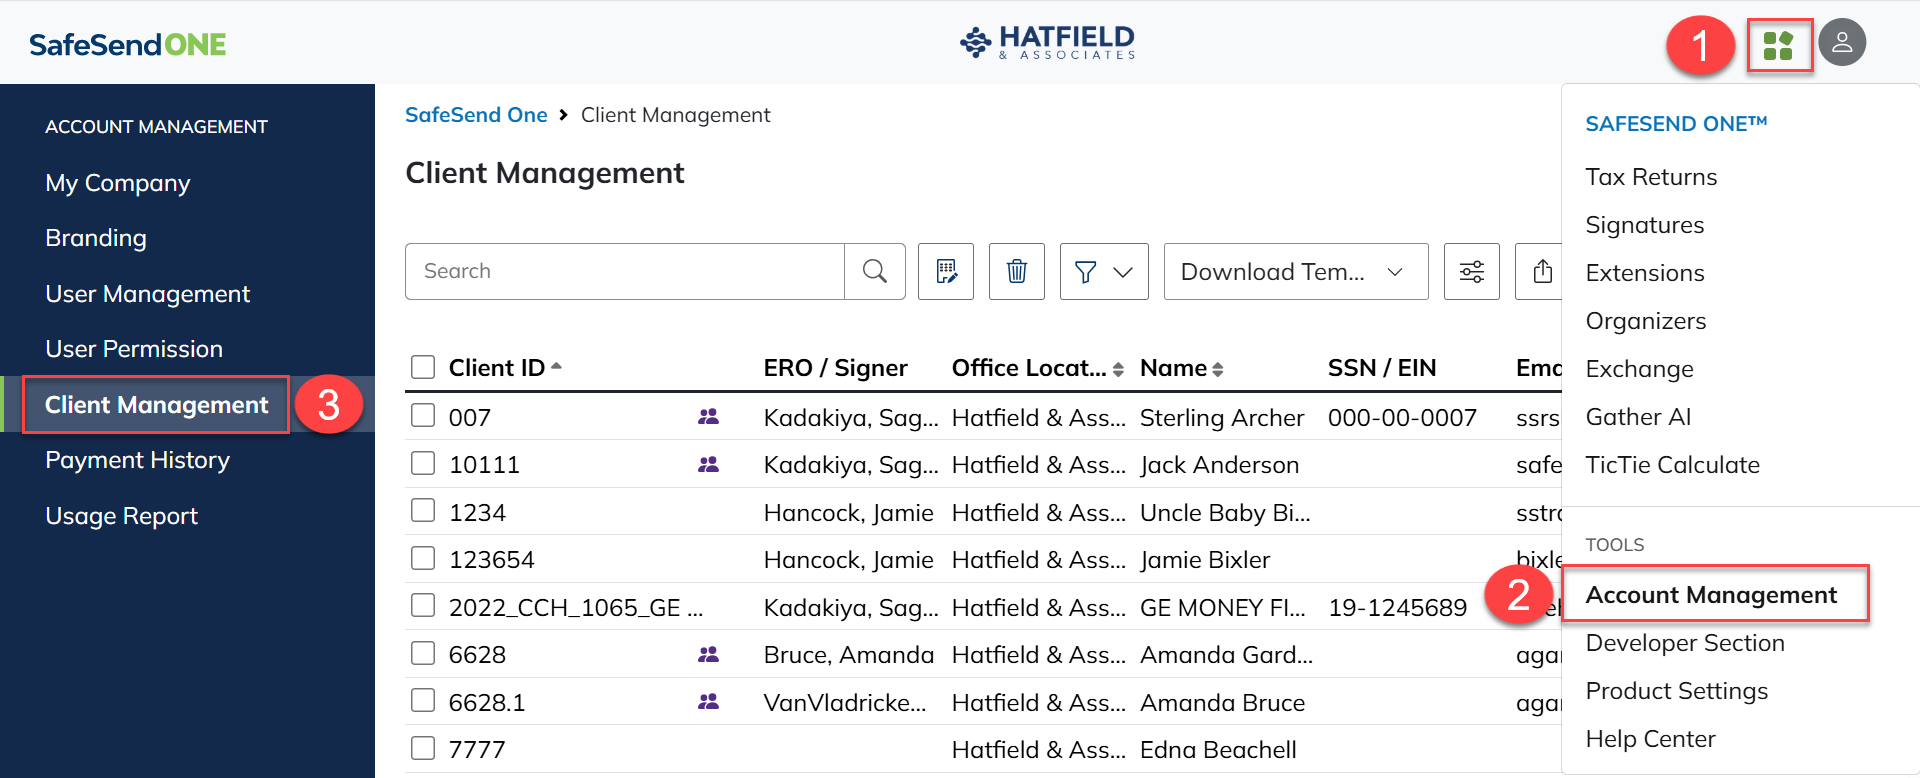
Bulk Import Clients
Download Template
: - Go toClient Management.
- Select theDownload Templateicon.
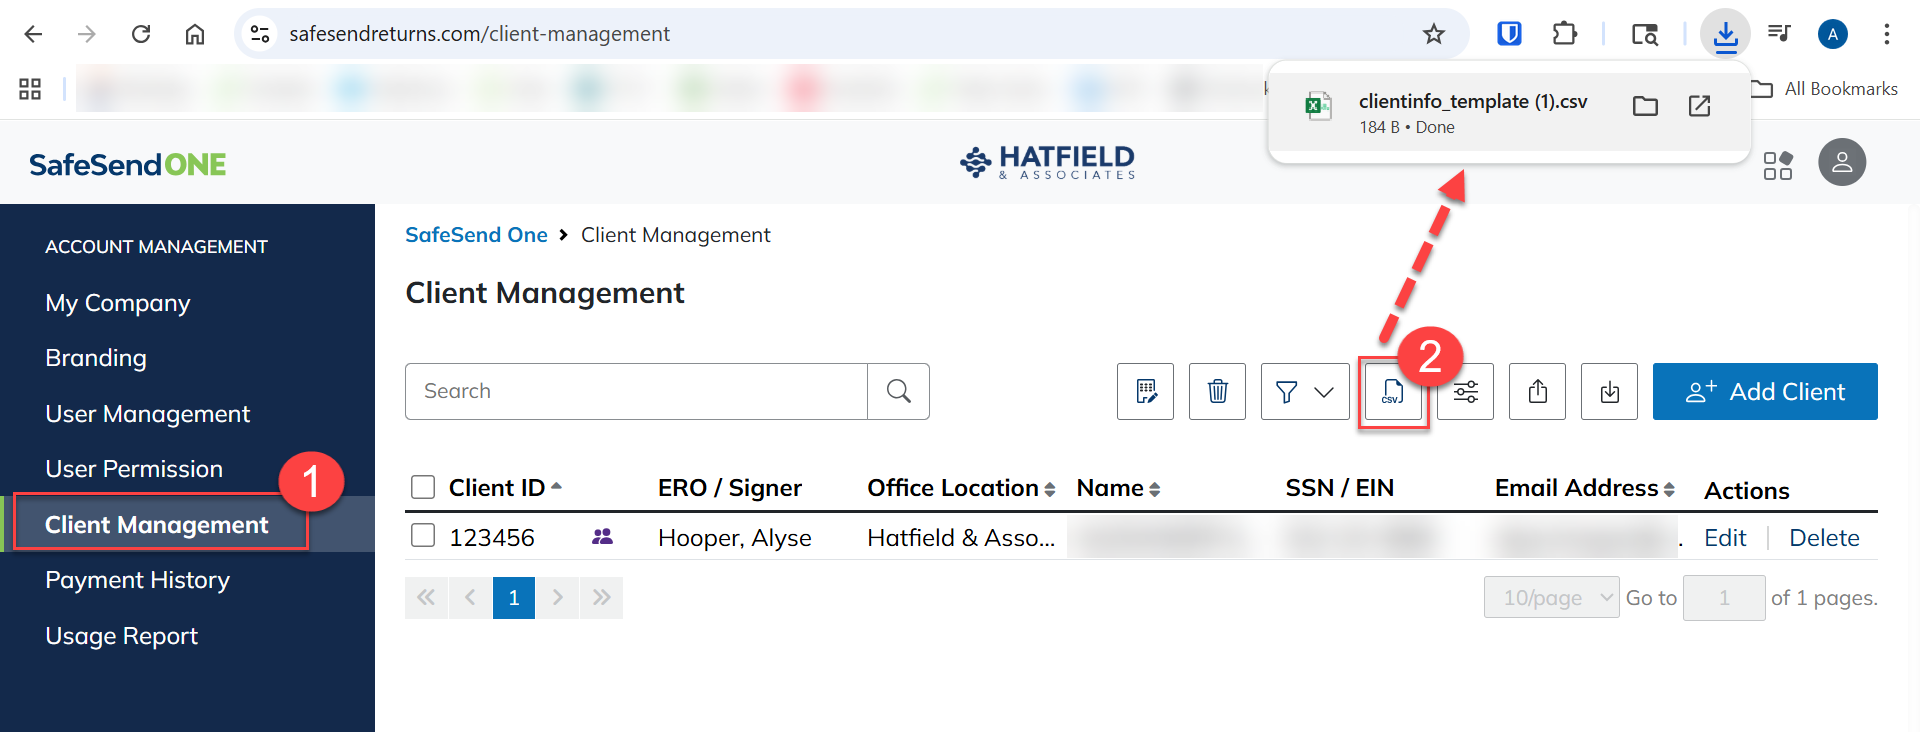
Complete CSV Template
Open and fill in the CSV template. Ensure the following conditions are met.
- Make sure that data is placed in the proper column.
- Make sure that cells in the Client ID column are formatted as text before you enter data. This prevents Excel from inadvertently truncating numbers.
- Don’t add or delete any columns in the provided CSV template (even if a column is empty).
- Don’t have text in any cells other than the columns provided.
- Don’t change the names of any headers in the CSV template.
- Country Code and Mobile Number fields for the taxpayer and spouse are optional.
- These fields should contain numbers only, with no additional symbols or formatting.
- The Date of Birth (DOB) field should be formatted as mm/dd/yyyy.
- SSN/EIN field should contain only numbers, no dashes.
Required fields
:- Client Type
- Format: Individual or Entity. Don’t include spaces before or after the text.
- Client ID
- Name
- Office Location
- Format should contain theLocation #which can be found in yourMy Companysettings.
Upload Template
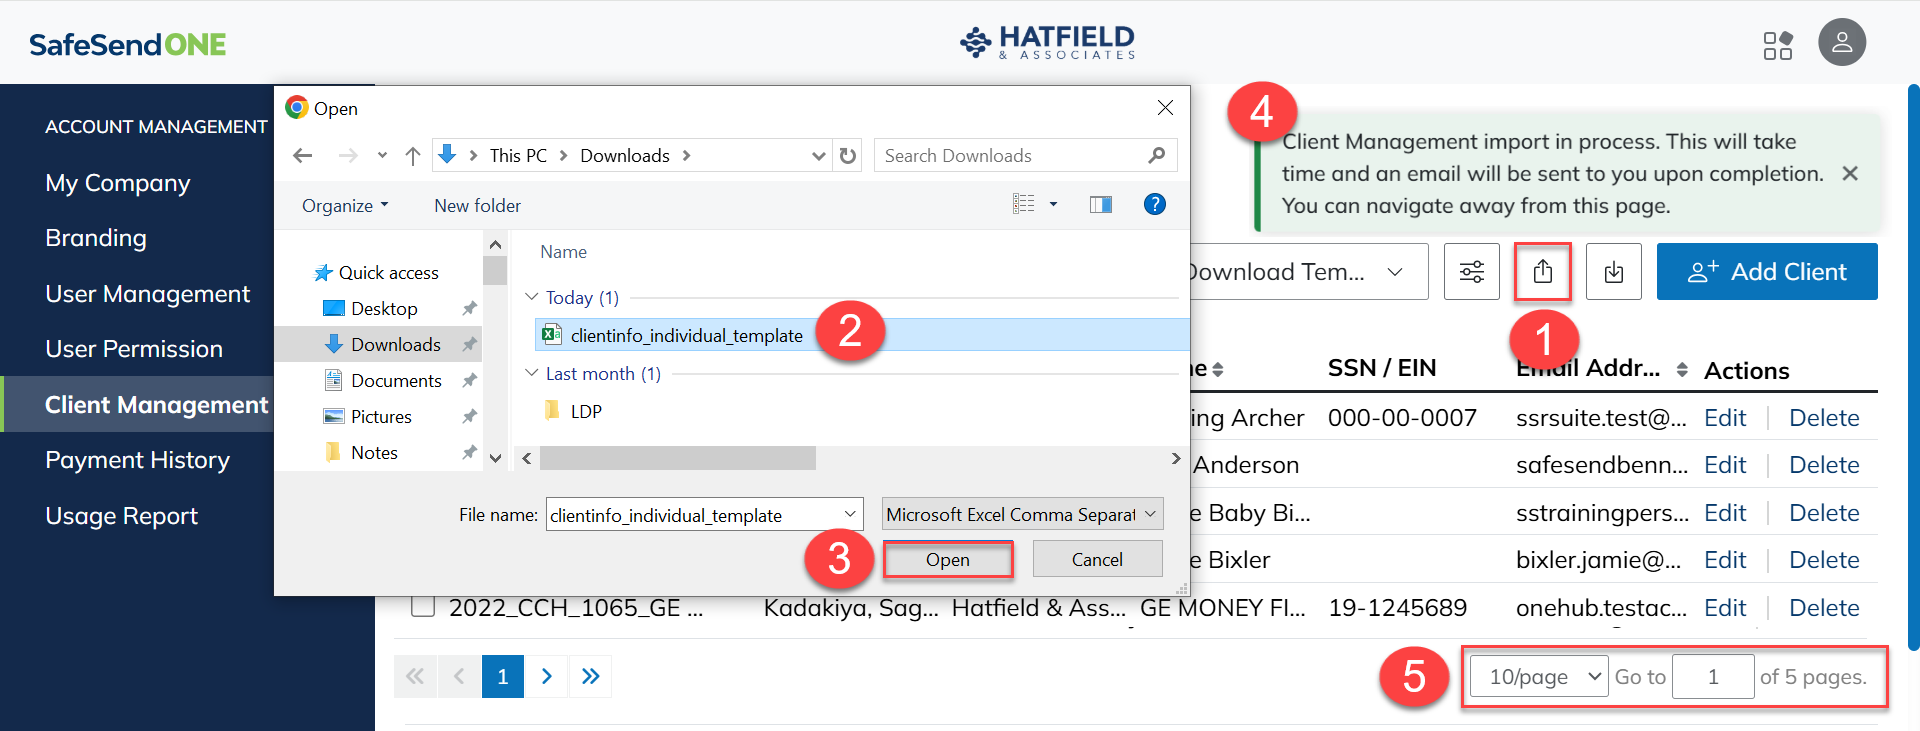
: - Select theImport CSVbutton.
- Select a file to upload from your file browser.
- SelectOpen.
- Review the pop-up notification. An email is delivered to you once the upload is complete.
- View how many pages of contacts have been added after the upload is complete.
If the upload was successful, the email shows “Successful Updates to Client Management”. If the upload was not successful, the email shows “Failed to Update Client Management” with a CSV file attached. That CSV file outlines what errors occurred.
Bulk Edit Clients
Users can be edited in bulk by importing an updated CSV template. If an existing client is found with the same Client ID, the new information replaces their existing data.
Export Client List
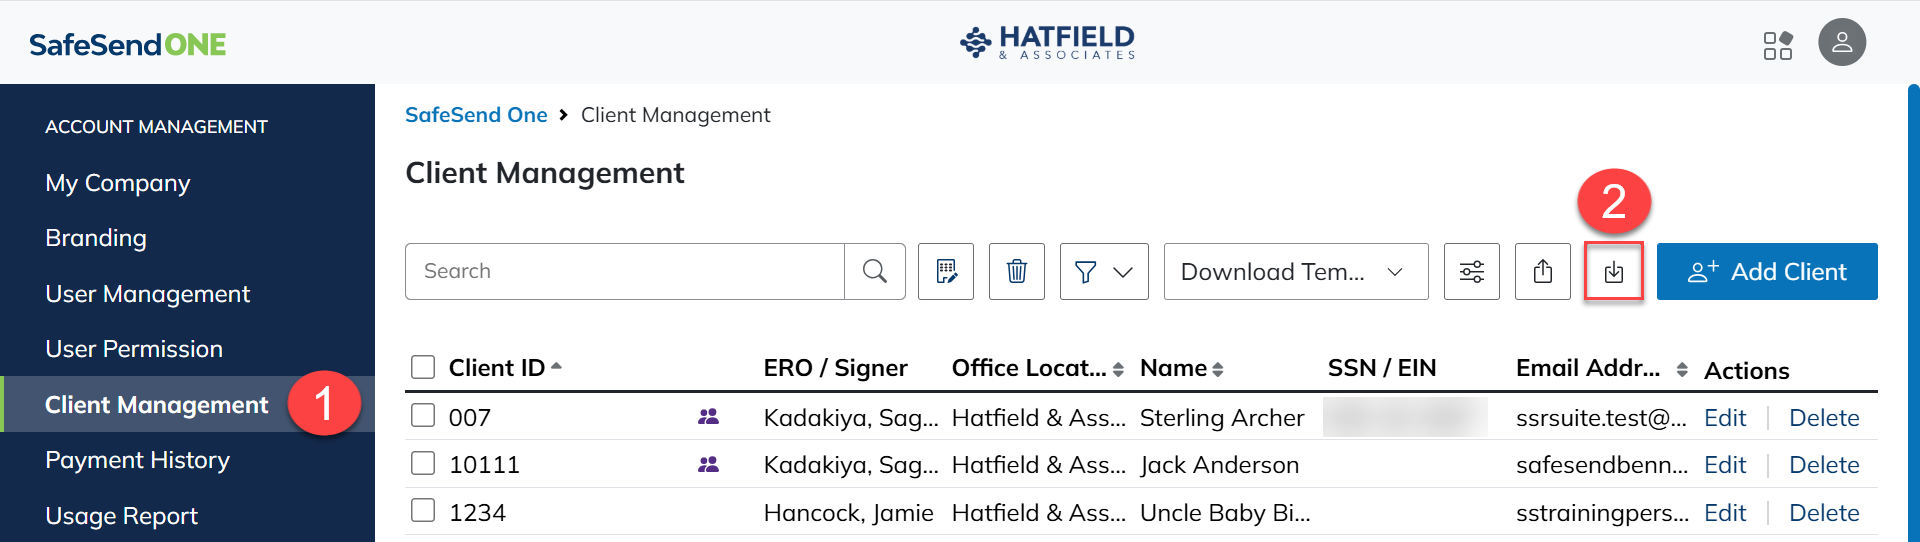
: You can use your current client list as a reference when filling out the import CSV template. This exported list should not be edited and uploaded. Any relevant information can be copied/pasted into the import CSV template.
- SelectClientManagement.
- Select theExport to Excelbutton.
Complete CSV Template
Open and fill in the CSV template. Ensure the following conditions are met.
- Make sure that data is placed in the proper column.
- Make sure that cells in the Client ID column are formatted as text before you enter data. This prevents Excel from inadvertently truncating numbers.
- Don’t add or delete any columns in the provided CSV template (even if a column is empty).
- Don’t have text in any cells other than the columns provided.
- Don’t change the names of any headers in the CSV template.
- Country CodeandMobile Numberfields for the taxpayer and spouse are optional.noteThese fields should contain numbers only, with no additional symbols or formatting.
- TheDate of Birth (DOB)field should be formatted asmm/dd/yyyy.
- SSN/EINfield should contain only numbers, no dashes.
Required fields
:- Client TypenoteFormat: Individual or Entity. Don’t include spaces before or after the text.
- Client ID
- Name
- Office LocationnoteFormat should contain theLocation #which can be found in yourMy Companysettings.
Upload Template
- Select theImport CSVbutton.
- Select a file to upload from your file browser.
- SelectOpen.
- Review the pop-up notification. An email is delivered to you once the upload is complete.
If the upload was successful, the email shows “Successful Updates to User Management”. If the upload was not successful, the email shows “Failed to Update User Management” with a CSV file attached. That CSV file outlines what errors occurred.