
Step 1 - Pre-Verification
If 1040SCAN is uncertain about the accuracy of a data field, the field and its related image are displayed for verification.
This uncertain data can be from 1099 Brokerage Statements, Grantor Letters, Schedule K-1s, 1095-C. In the pre-verification step, you can verify uncertain identifier fields associated with payer's names, account numbers, statement dates, and names of such Brokerage Statements.
When the
Review Wizard
begins, the highlight is in the 1st field to be verified.
note
If the checkbox
Export foreign income only when the foreign taxes paid exceeds the IRS defined limits
is selected in Admin
, Tax Exempt Income
or on a per binder basis, uncertain amounts of foreign tax from all source documents (excluding Organizer Pages) appear in this wizard. 
If required, this data can be corrected simply by typing over the displayed value.
This wizard ensures the following:
Verification of the account numbers ensures that pages of the same account are grouped together so that no information is duplicated or left out.
note
An Account Number field won’t appear in this step, if there is only 1
Consolidated Statement
or Grantor Letter
in the binder. Verification of the statement date ensures that data from only the latest and or final brokerage statement is considered (data for the same brokerage statement with different statement dates is not considered duplicated).
It also avoids unnecessary verification of amounts from such statements that don’t need to be considered in tax preparation for the next wizard.
note
If only 1 statement date is present for 1 account number, then it won’t appear in this step.
To view the shortcut keys for the various functions in the
Verification Review Wizard
, select the Tips on Using Shortcut Keys
link.note
An Account Number field won’t appear in this step, if there is only 1
Consolidated Statement
or Grantor Letter
in the binder. 
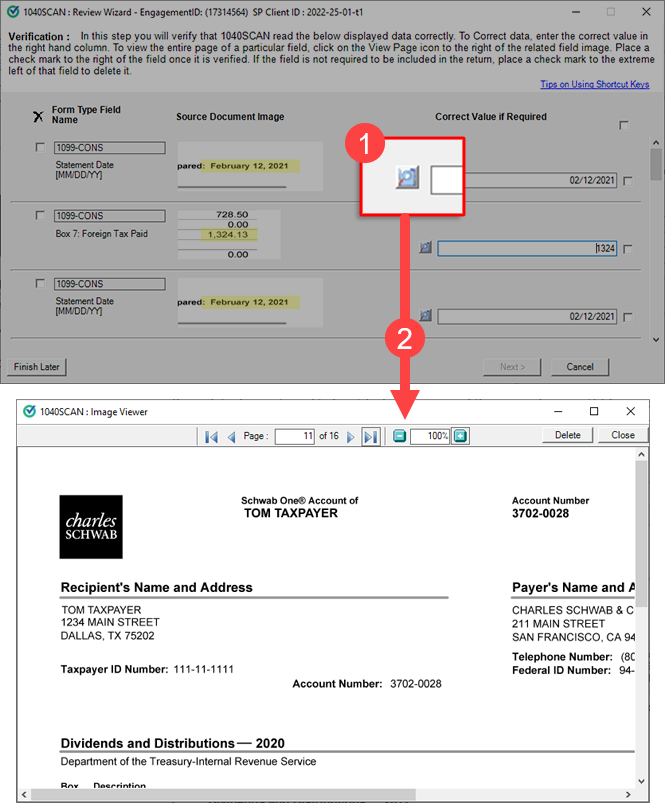
Correct the highlighted value if required and press the
Enter
key. This will mark the checkbox indicating that the field is verified and then move to the next field. Hitting the Enter
key will keep you moving to subsequent fields until all the checkboxes are checked.To view the entire page of a particular field, select the
View Page
icon or press F1
. To close the source document viewing window, select Close
or press Esc
. 
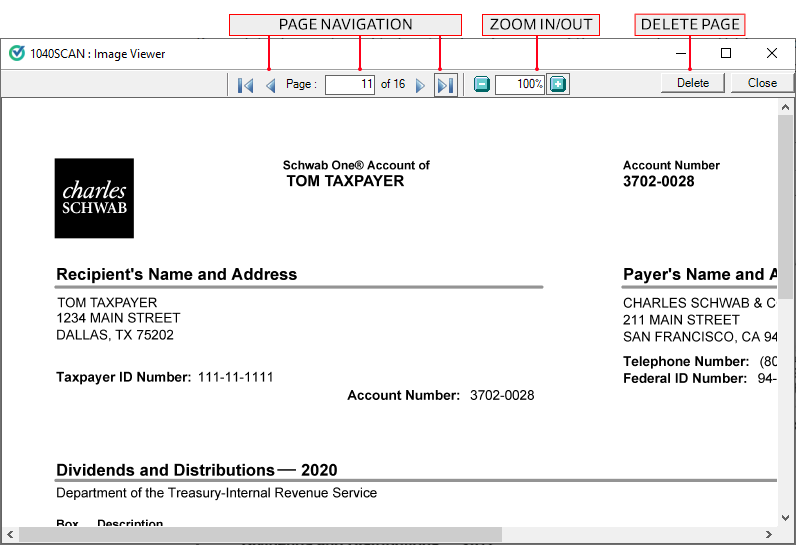
If any data doesn’t need to be picked up from any of the source documents for exporting to the tax application, then select
Delete
on the Image Viewer
window. All the fields captured by OCR for this source document will get deleted from the Review Wizard
.
The checkbox at the top of the
Review Wizard
can be used to Select
/Deselect all
verification checkboxes.To delete a field, select the checkbox to the left of the field or press
F4
. The field won’t be available after deletion.
Select
Cancel
or press Alt
+ C
to close the Review Wizard
without saving any of the changes you have made.Select
Finish Later
or press Alt
+ F
to close the Review Wizard
after saving your corrections.The
Next
button will be enabled only when you verify all the fields and mark all the checkboxes next to each field.note
Any pending task in the
Review Wizard
can be completed later. To access the Review Wizard
again for a particular binder, open the binder under the In Verification
status. This will open to that step in the Review Wizard
where you had selected Finish Later
. All the pending review work can then be completed. After completing verification, select
Next
to continue or press Alt
+ N
.Related Content
-
Review Wizard overview
Format: Article

